How to batch convert images on Mac
To convert many images at once on a Mac, load them into one converter, choose a single output format, set quality once, check a representative file, and export everything to a separate folder. The whole job takes a few minutes whether the folder holds 20 images or 2,000, as long as the settings are decided before the run instead of file by file.
macOS can do simple versions of this on its own. Preview exports a selection of images to JPEG, PNG, HEIC, TIFF or PDF, and Finder's Convert Image Quick Action turns a selection into JPEG, PNG or HEIF. What the built-in tools cannot do is write WebP or AVIF, hit a target file size, or combine conversion with resizing, watermarking and renaming. That is where a batch app such as Operimage, a free Mac app, takes over; it exports nine formats and keeps everything on the Mac.
Format conversion is one part of a wider set of jobs. If you also need to resize, compress, watermark or rename, the guide to batch processing images on Mac maps every tool and the order to run them in.
- 1SourceFolder of 412 HEIC photos
- 2FormatJPEG at 82% quality
- 3CheckBefore/After on one detailed shot
- 4Output412 JPEG copies in a new folder
Which image format should you convert to?
Every format is a trade-off between file size, quality and compatibility. The simplest rule: pick the lightest format the receiving system fully supports, and only move to a heavier one when you need lossless quality, transparency or print fidelity.
JPEG is still the universal format: every browser, email client, marketplace and operating system opens it. PNG is lossless and supports transparency, which makes it right for logos, screenshots and UI graphics but wasteful for photos. WebP and AVIF are modern web formats that produce much smaller files and support transparency; all current versions of Chrome, Safari, Firefox and Edge display both. HEIC is Apple's efficient camera format, compact but awkward outside Apple devices. TIFF and PDF serve print, archiving and document workflows. GIF and BMP are mostly legacy formats kept for compatibility. Comparing desktop converters? Read the honest XnConvert alternative breakdown.
Output formats compared
| Format | Best for | Transparency | Compression | Watch out for |
|---|---|---|---|---|
| JPEG | Sharing, uploads, marketplaces, email | No | Lossy | Artifacts below about 70% quality |
| PNG | Logos, screenshots, cutouts, editing | Yes | Lossless | Very large files for photos |
| WebP | Fast web pages, transparent web graphics | Yes | Lossy or lossless | Some older desktop apps cannot open it |
| AVIF | Smallest web images | Yes | Lossy or lossless | Slower to encode; older software lacks support |
| HEIC | Compact storage on Apple devices | Yes | Lossy | Many Windows apps and uploaders reject it |
| TIFF | Print, archiving, editing masters | Yes | Lossless or none | Huge files; CMYK variants look odd on screen |
| Documents and print handoff | Depends | Varies | Not an image format for the web | |
| GIF | Simple legacy graphics | 1-bit only | Lossless, 256 colors | Poor for photos |
| BMP | Legacy software that requires it | Rarely | None | Very large files |
Typical file size for the same photo
Conversion guides by source format
Each source format has its own quirks, from HEIC orientation tags to SVG files that have no fixed pixel size. Use the matching guide for exact steps, recommended settings and edge cases.
- iPhone photos: the HEIC converter hub covers every route out of HEIC, including the fastest way to turn iPhone HEIC photos into JPEGs and how to save HEIC as WebP for the web.
- WebP files: the WebP converter hub explains opening and creating WebP, with separate walkthroughs to change WebP downloads back to JPEG, make JPEG photos into WebP and convert PNG graphics to WebP.
- AVIF output: exporting JPEGs as AVIF for the smallest photo files, and turning PNGs into AVIF while keeping transparency.
- Heavy PNGs: switching PNG photos to JPEG often cuts file size dramatically when transparency is not needed.
- Design files: rasterizing SVG artwork to PNG at fixed pixel sizes for apps, slides and stores.
- Print and scans: making lighter JPEG copies of TIFF masters for email and review.
WebP or AVIF: which modern format for websites?
Both WebP and AVIF beat JPEG on file size, and both are displayed by every current major browser. AVIF usually wins on compression, especially for detailed photos and smooth gradients, but it takes longer to encode and some older apps, CMS plugins and image editors still cannot open it. WebP has been supported for longer, so it is the safer single choice when you cannot serve fallbacks.
If your site or platform supports multiple sources per image, serve AVIF first with WebP or JPEG as a fallback. If you can only upload one file, WebP at around 80% quality is the pragmatic default. The full comparison of AVIF and WebP for web images goes deeper into quality settings and browser behavior.
WebP
Safest single format
- About 25–35% smaller than JPEG in typical cases
- Fast to encode, widely supported by CMSs and apps
- Lossy and lossless modes, with transparency
AVIF
Smallest files
- Often around half the size of JPEG
- Slower to encode; some older software cannot open it
- Best served with a WebP or JPEG fallback
Verdict: Use WebP when you can upload only one file; add AVIF when your site can serve fallbacks.
How to convert a folder of images with Operimage
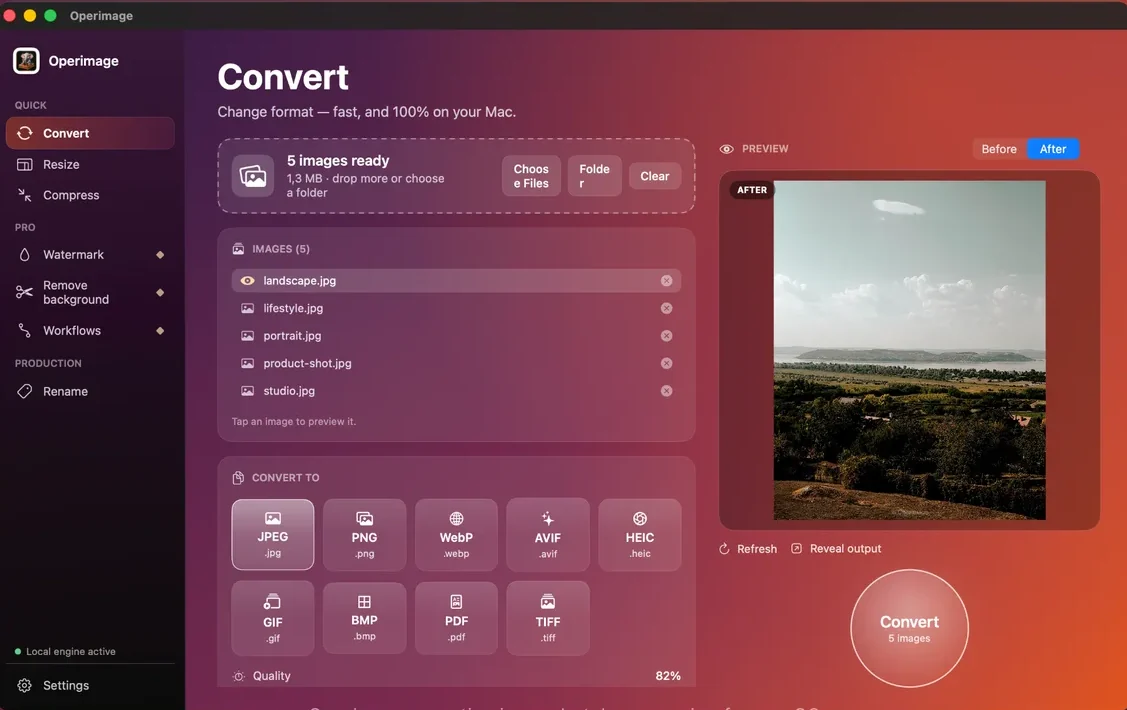
Operimage's Convert tool is built for whole folders. Drag files onto the window or click Folder to load a directory; the header confirms the count, for example 5 images ready, and you can drop more at any time. Choose the output format from the nine options, then set the quality slider for lossy formats. Click any file in the list to compare Before and After, and press Refresh after you change a setting.
When the sample looks right, click the round button (Convert 412 images, for example). Operimage writes new files and leaves the originals in place unless you choose otherwise, and it can keep the source folder structure so subfolders for clients, products or dates survive the conversion. Reveal output opens the result in Finder. For a detailed walkthrough of queues, destinations and naming, read the step-by-step multi-image conversion workflow.
Converting with Preview, Finder, Shortcuts and sips
For small jobs, the tools already on your Mac are fast and private. In Preview, open all the images, select them in the sidebar with Command-A, then choose File → Export Selected Images, pick a destination and open Options to choose the format. In Finder, select the files, right-click, and choose Quick Actions → Convert Image to get JPEG, PNG or HEIF at Small, Medium, Large or Actual Size, with an option to preserve metadata.
Shortcuts offers a Convert Image action that can loop over a folder, and Terminal users can run sips, for example sips -s format jpeg -s formatOptions 82 *.heic --out ~/Desktop/jpeg to convert every HEIC in a folder to JPEG at 82% quality. macOS can read WebP and, on recent versions, AVIF, but none of these built-in routes can write either format.
Built-in macOS conversion options
| Method | Output formats | Good for | Limits |
|---|---|---|---|
| Preview | JPEG, PNG, HEIC, TIFF, PDF, JPEG 2000 | A few dozen files, one format | No WebP/AVIF, no presets, manual each time |
| Finder Quick Action | JPEG, PNG, HEIF | Fast right-click conversion | Three formats, fixed size choices |
| Shortcuts | JPEG, PNG, HEIF, TIFF, GIF, PDF and more | Repeatable personal automations | You build and maintain the shortcut |
| sips (Terminal) | JPEG, PNG, HEIC, TIFF, GIF, BMP and more | Scriptable bulk jobs | Command line only, no preview |
| Operimage | JPEG, PNG, WebP, AVIF, HEIC, GIF, BMP, PDF, TIFF | Large or repeated folders | Mac only |
What quality setting should you use?
Quality percentages are not standardized between encoders, but on most of them the useful range is narrow. Below about 70% JPEG artifacts start to show on skies, skin and text; above about 90% file size climbs quickly with almost no visible gain. These starting points work for most batches.
- Everyday sharing and web pages: 80–85% for JPEG and WebP.
- Hero images and portfolio work: 88–92%, checked at 100% zoom.
- Thumbnails and previews: 70–75%, since small images hide artifacts.
- Screenshots with text: PNG or lossless WebP, because lossy formats blur sharp edges.
- Hard size limits: instead of guessing, use target-size compression to fit a byte budget.
- Avoid re-encoding: converting JPEG to JPEG again, or JPEG to WebP repeatedly, stacks compression losses. Always convert from the original.
Does converting change metadata, color or transparency?
Converting a file can change more than its extension. EXIF metadata such as capture date, camera model and GPS coordinates may be carried into the new file. That is useful for your own archive and a privacy risk for anything published, so strip it deliberately; the guide on cleaning location and camera data from photos shows what to check.
Transparency only survives if the target supports it: PNG, WebP, AVIF, HEIC and TIFF keep it, JPEG fills transparent areas with a solid color. Color profiles matter too. iPhone photos and many Mac screenshots use Display P3; if converted images look dull in a browser, the profile was dropped instead of converted, so check one sample in Safari and Chrome before running the whole folder. Animated GIF or WebP files keep only one frame when converted to a still format.
Which format for which destination?
Often the destination decides the format for you. When it does not, these choices avoid rejected uploads and unnecessary weight. Platform rules change, so confirm hard limits on the destination's current help page before a large run.
- Email and messaging: JPEG at 80–85%, resized to about 2048 px on the long edge, keeps attachments small and opens on every device.
- Colleagues on Windows: JPEG or PNG. HEIC needs an extra codec on many Windows PCs, and AVIF support in older Windows apps is patchy.
- Your own website: WebP or AVIF for photos, PNG or lossless WebP for graphics with sharp edges, ideally with a JPEG fallback if your CMS supports it.
- Marketplaces and store platforms: JPEG is the most widely accepted upload format; some platforms also accept PNG and WebP. Check the current product image guidelines.
- Slides and documents: PNG for diagrams and screenshots, JPEG for photos, and PDF when the recipient needs a printable document rather than an image.
- Print shops: TIFF or maximum-quality JPEG at the full original resolution; ask whether they want RGB or CMYK.
- Archive: keep the original HEIC, PNG or TIFF. Converting an archive to JPEG throws away data you cannot get back.
Troubleshooting failed or odd conversions
When a batch conversion produces surprising results, the cause is almost always one of a few predictable issues. Test a subset that includes your most unusual files, such as a portrait photo, a transparent PNG, a very large TIFF and an animated GIF, and these problems show up before the full run instead of after.
Files that are much larger after conversion usually mean a lossy photo was converted to a lossless format such as PNG or TIFF; that is expected, so choose JPEG, WebP or AVIF for photos instead. Portrait shots that appear rotated came from a camera that stored orientation as a metadata tag; check one in Before/After. Washed-out colors point to a dropped Display P3 profile. Black backgrounds behind logos mean transparency was flattened by a JPEG export. Files downloaded from websites sometimes carry a .jpg extension while actually being WebP or AVIF; running file name.jpg in Terminal reports the real format, and converting them to a true JPEG fixes apps that refuse to open them.
Finally, if a converted folder is missing files, check for formats the converter does not read, zero-byte placeholders left by cloud sync services, and duplicate names from merged subfolders. Keeping the source folder structure, or adding a counter in a rename step, prevents two IMG_0001 files from colliding in the same output folder.
Local converter or online converter?
Browser-based converters are convenient for one public image, but every file is uploaded to someone else's server, free tiers usually cap file count or size, and settings reset on each visit. For client work, personal photos, unreleased products or anything with GPS data, a local converter avoids the upload entirely. The guide on replacing browser converters with a local workflow covers when a web tool is still fine.
If you are choosing a desktop app, compare more than the format list: batch size, preview before export, folder handling and repeatability matter more in daily use. The roundup of offline image converters for Mac compares Preview, Permute, Retrobatch, XnConvert and Operimage on exactly those points.
What to check in any batch converter
- Writes the formats you need, including WebP and AVIF if you publish to the web
- Loads whole folders and keeps subfolder structure
- Shows Before/After on a sample before the full run
- Never overwrites originals unless you ask it to
- Can strip EXIF and GPS metadata
- Processes files on your Mac without uploading them
Step by step
Add the images or a whole folder
Open Operimage, choose Convert in the sidebar, then drag files onto the window or click Folder. The header shows how many images are ready.
Choose the output format
Pick JPEG for compatibility, PNG for transparency, WebP or AVIF for small web files, HEIC for compact Apple storage, or TIFF or PDF for print and documents.
Set the quality
For JPEG, WebP, AVIF and HEIC, start the quality slider around 82%. Use 90% for hero images and around 75% for thumbnails.
Check one image in Before/After
Click a detailed photo in the image list, compare Before and After, and press Refresh after changing settings.
Convert and reveal the output
Click the round Convert button, then Reveal output to open the converted files in Finder. Your originals stay untouched.
Batch conversion paths on Mac
| Path | Output formats | Batch scale | Uploads files | Best fit |
|---|---|---|---|---|
| Preview | JPEG, PNG, HEIC, TIFF, PDF | Dozens of files | No | Small one-off conversions |
| Finder Quick Action | JPEG, PNG, HEIF | A selection | No | Quick right-click jobs |
| Browser converter | Varies by site | Often capped | Yes | One disposable public image |
| Operimage | Nine, including WebP and AVIF | Very large folders | No | Repeatable batch conversion |
FAQ
What is the best free batch image converter for Mac?
For a few files, Preview and Finder Quick Actions are free and built in. For whole folders and WebP or AVIF output, Operimage is a free Mac app that converts to nine formats offline with Before/After preview.
How do I convert multiple images to JPEG on a Mac?
Select the images in Finder, right-click and choose Quick Actions → Convert Image, then pick JPEG. For large folders or a specific quality setting, load the folder into a batch converter and export JPEG at about 82%.
Can a Mac convert images to WebP without extra software?
No. macOS can open WebP files, but Preview, Finder Quick Actions and sips cannot save as WebP. You need a converter such as Operimage to write WebP or AVIF.
Will converting images reduce quality?
Converting to PNG or TIFF is lossless. Converting to JPEG, WebP, AVIF or HEIC is lossy, but at 80–90% quality the difference is usually invisible. Keep the originals as masters.
Does converting an image remove its EXIF data?
Not necessarily. Many converters copy metadata into the new file, so enable metadata stripping explicitly before publishing photos.
Are my photos uploaded when I convert them with Operimage?
No. Operimage processes every image on your Mac, so nothing is sent to a server and conversion works without an internet connection.
Which format makes the smallest image files?
AVIF usually produces the smallest files, followed by HEIC and WebP, all well below JPEG at similar quality. Results vary by image, so test a sample.