The fastest way to bulk resize images on a Mac
There are three practical ways to resize many images at once on macOS. Preview resizes a multi-image selection in one step. The sips command in Terminal resizes a whole folder with one line. A dedicated batch resizer such as Operimage, a free Mac app, handles large folders, exact platform sizes and cropping rules without touching your originals.
Which one is right depends on volume and repetition. For a dozen photos you will email once, Preview is enough. For a recurring job, like a weekly product shoot that must become Instagram, YouTube and web sizes, a batch tool pays off because the settings are the same every time. Operimage is one of several batch image tools for Mac that combine resizing with compression, conversion and renaming in one place.
Whatever tool you use, the decisions are the same: the target size in pixels, what happens when the source aspect ratio does not match the target (fit or fill), and where the resized copies go. Get those three right and bulk resizing becomes a one-click job.
- 1Source folder240 photos, 4032 × 3024
- 2Resize ruleFit inside 2048 × 2048
- 3Output folder240 copies, 2048 × 1536
How to resize multiple images in Preview
Preview on macOS can resize several images in a single pass. Select the files in Finder, press Command-O to open them together in one Preview window, then click in the sidebar and press Command-A to select every thumbnail. Choose Tools → Adjust Size, enter a width or height in pixels with Scale proportionally checked, and click OK. Every selected image is resized.
The catch is that Preview edits the files themselves. When you close the window or press Command-S, the originals are overwritten with the smaller versions. If you need to keep full-resolution masters, duplicate the folder first or use File → Export for each image. Preview also has no crop-to-ratio option, so a mix of portrait and landscape photos ends up with mixed dimensions.
Preview works best for 10–50 images that share an orientation, where you just want them smaller and do not need exact pixel dimensions. Moving away from Photoshop actions? See the Photoshop Image Processor alternative.
Finder Quick Actions, Shortcuts and sips in Terminal
Finder has a built-in Convert Image Quick Action on macOS 12 and later. Select images, right-click, choose Quick Actions → Convert Image, and pick an image size of Small, Medium, Large or Actual Size along with JPEG, PNG or HEIF. It writes new files next to the originals, which is safer than Preview, but the size choices are fixed and you cannot type exact pixel dimensions. The Shortcuts app can build a custom resize action with a set width if you want a reusable menu item.
For exact numbers without extra software, sips (scriptable image processing system) ships with every Mac. In Terminal, sips -Z 2048 *.jpg resizes every JPEG in the current folder so its longest side is at most 2048 pixels, keeping the aspect ratio. sips --resampleWidth 1200 sets an exact width instead. Like Preview, sips overwrites files in place unless you add --out followed by a separate folder, so run it on a copy.
These built-in tools are reliable but low-level. None of them crops to an aspect ratio, previews the result, or remembers a set of platform sizes. That is the gap a batch resizer fills.
Preview, Quick Actions, sips
Already on your Mac
- Free and preinstalled
- Good for one-off jobs and simple longest-side caps
- Preview and sips overwrite originals by default
- No crop-to-ratio, no visual preview, no platform presets
Batch resizer (Operimage)
Recurring jobs
- Exact width and height with Fit or Fill
- Social presets: Instagram 1:1 and 4:5, Story 9:16, YouTube 16:9
- Before/After preview on any file in the batch
- Writes copies and can keep the folder structure
Verdict: Use Preview or sips for occasional resizing; switch to a batch resizer when the same sizes repeat every week.
Fit vs Fill: choosing how images meet the target size
When the source aspect ratio matches the target, resizing is simple scaling. When it does not, for example a 3:2 camera photo going into a 1:1 square, the resizer has to choose between keeping the whole picture and covering the whole frame. That choice is the single biggest factor in whether a batch looks right.
Fit scales the image until it fits entirely inside the target box. Nothing is cropped, but the result can be narrower or shorter than the box. A 4032 × 3024 photo fitted into 2048 × 2048 becomes 2048 × 1536. Fit is the right choice for web galleries, email, archives and any case where the whole frame matters.
Fill scales the image until it covers the entire box, then crops whatever spills over. The output is always exactly the target dimensions, which is what social platforms, thumbnails and product grids need. The trade-off is that edges are trimmed, so subjects near the border can be cut. Preview a few of the most extreme orientations before you commit.
- Fit: whole image kept, output may be smaller than the box on one side; best for web, email and archives.
- Fill: output is exactly the box size, edges cropped; best for Instagram, YouTube thumbnails and product grids.
- Longest-side cap: use Fit with a square box (for example 2048 × 2048) so landscape and portrait images both end up with a 2048 px long edge.
- Stretching: avoid forcing an image into a different ratio without cropping; faces and products visibly distort.
How to bulk resize images with Operimage
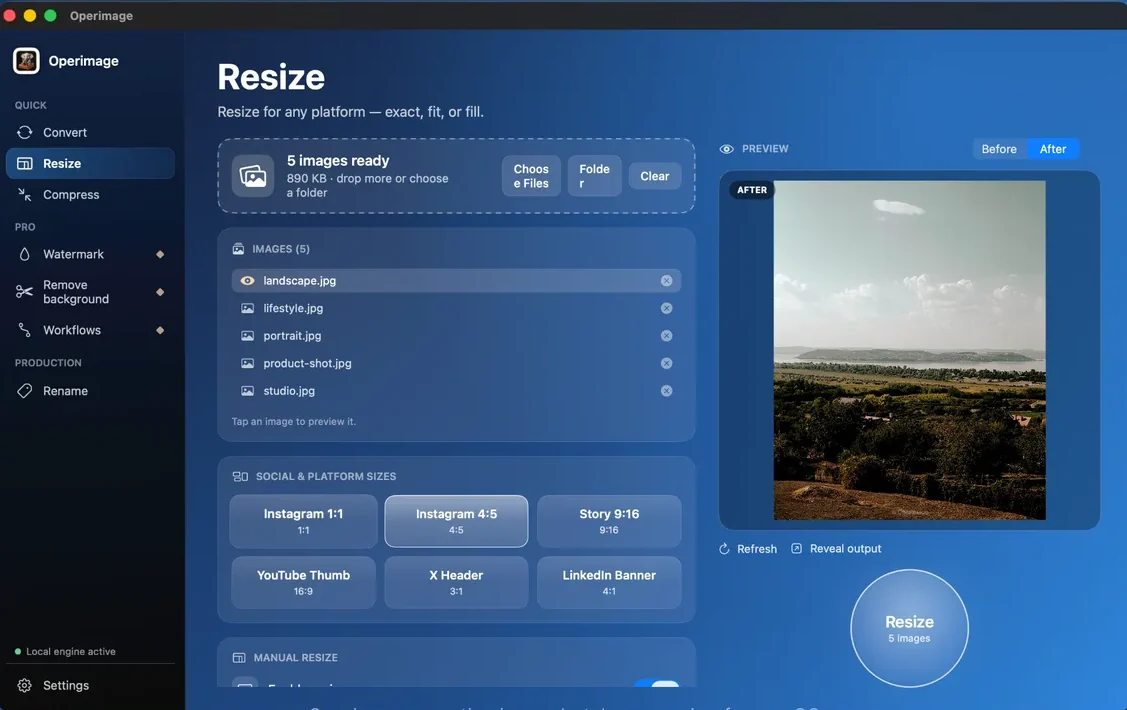
Operimage puts resizing in its own Resize tool in the sidebar. Drop images or a folder onto the window and the status line confirms what is loaded, for example 240 images ready. Click any file in the list to see it in the Before/After preview.
Choose one of the Social & platform sizes (Instagram 1:1, Instagram 4:5, Story 9:16, YouTube Thumb 16:9, X Header 3:1, LinkedIn Banner 4:1) or switch to Manual resize and type the exact width and height, then pick Fit or Fill. Click Resize, and when the batch finishes, Reveal output opens the new files in Finder. Processing happens entirely on your Mac, so client work and unreleased products are never uploaded.
Which size should you resize to?
Pick the target from where the images will be shown, not from a round number. Social platforms publish recommended pixel sizes and will recompress anything larger, so exporting at their size gives you control over sharpness. For websites, the right size is roughly the widest the image is ever displayed, times two for Retina screens when it matters.
The table below lists common targets. Social sizes are the platforms' long-standing recommendations; web sizes are sensible starting points rather than rules. For a deeper walkthrough of each placement, see the guide to resizing photos for Instagram feed and Stories and the YouTube thumbnail dimensions guide. For marketplace catalogs, the Shopify product photo sizing guide covers square product images.
Common bulk resize targets
| Destination | Size (px) | Ratio | Mode |
|---|---|---|---|
| Instagram square post | 1080 × 1080 | 1:1 | Fill |
| Instagram portrait post | 1080 × 1350 | 4:5 | Fill |
| Instagram Story / Reel cover | 1080 × 1920 | 9:16 | Fill |
| YouTube thumbnail | 1280 × 720 | 16:9 | Fill |
| Blog or website hero | 1920–2560 wide | Varies | Fit |
| Email or inline blog image | 1200–1600 long side | Varies | Fit |
| Sharing a photo library | 2048 long side | Varies | Fit |
- Instagram square1080 × 1080 · 1:1
- Instagram portrait1080 × 1350 · 4:5
- Story / Reel1080 × 1920 · 9:16
- YouTube thumbnail1280 × 720 · 16:9
How much smaller do resized images get?
File size follows pixel count far more than any other setting, so resizing is usually the biggest single saving you can make. A 12-megapixel iPhone photo is 4032 × 3024 pixels. Capping its long side at 2048 pixels leaves about 3.1 megapixels, roughly a quarter of the original. At 1080 pixels wide it is under a tenth.
The exact kilobytes depend on content and compression, but the pixel arithmetic is fixed. That is why resizing first and compressing images afterward gets far better results than squeezing a full-resolution file with heavy compression: fewer pixels need fewer bytes, so you can keep a high quality setting.
Pixels remaining after resizing a 12 MP photo
Troubleshooting: blurry, cropped or oversized results
Most bulk resizing problems trace back to one of a few causes. Check these before rerunning a large batch.
- Blurry output: the source was smaller than the target and got upscaled. Resizing up never adds detail; use the original size or a smaller target.
- Heads or products cut off: Fill cropped an image with a very different ratio. Switch those files to Fit, or sort portrait and landscape images into separate batches.
- Mixed dimensions after resizing: Fit keeps each image's own ratio. If every file must be identical, use Fill.
- Files still large: resizing cut the pixels but the format is heavy (PNG photos, TIFF). Convert photos to JPEG or WebP, or follow with compression.
- Colors look dull on the web: wide-gamut Display P3 photos can look flat where the color profile is ignored. Export to sRGB for websites and social platforms.
- HEIC files from iPhone: resizing works the same, but many websites and forms reject HEIC, so convert HEIC photos to JPG as part of the same job.
A safe workflow for resizing thousands of images
Treat a large resize like a production run. Load the full folder, but test the rule on a small subset first. Ten to twenty files that include the widest, tallest and smallest images will reveal cropping or upscaling problems in seconds.
Operimage writes resized copies and does not overwrite originals unless you choose to, and it can keep the source folder structure, which matters when a catalog is organized by product or campaign. If a job always runs the same steps, save it as a Workflow, for example resize to 2048 px, compress, then rename, and rerun it on next week's folder. Pair it with the batch rename tool so output names describe the size or placement, and strip EXIF and GPS data from anything going public.
Before you resize the full batch
- Target size chosen from the destination's real display size
- Fit or Fill decided, and tested on the most extreme aspect ratios
- No source images smaller than the target (no upscaling)
- Output goes to a separate folder; originals untouched
- Folder structure kept if the catalog depends on it
- 10–20 sample files checked in the Before/After preview
Step by step
Open Resize and add your images
In Operimage, open Resize in the sidebar, then drop images onto the window or use Choose Files or Folder to load a whole directory.
Pick a preset or set a manual size
Choose a Social & platform size such as Instagram 4:5 or YouTube Thumb 16:9, or switch to Manual resize and type an exact width and height.
Choose Fit or Fill
Fit keeps the whole image inside the box without cropping; Fill covers the box exactly and crops whatever overflows.
Check the Before/After preview
Click a few images in the list, including the widest and tallest ones, and confirm nothing important is cropped or stretched.
Resize and reveal the output
Click the Resize button, then use Reveal output to open the resized copies in Finder. Your originals stay untouched.
FAQ
How do I resize multiple images at once on a Mac?
Open all the images in Preview, select every thumbnail in the sidebar, and choose Tools → Adjust Size. For whole folders, exact sizes or cropping to a ratio, use a batch resizer such as Operimage, which writes resized copies instead of overwriting the originals.
Does Preview overwrite the original images when resizing?
Yes. Preview saves the resized pixels into the same files when you close or save, so the full-resolution originals are replaced. Duplicate the folder first if you need to keep them.
How do I resize images without distorting them?
Keep the aspect ratio locked. Use Fit to keep the whole image inside the target box, or Fill to cover the box exactly by cropping the overflow; both avoid stretching.
Does resizing an image reduce its quality?
Making an image smaller keeps it sharp at the new size and greatly reduces file size. Making it larger than the original adds no detail and usually looks soft.
What is the sips command on Mac?
sips is a built-in macOS command-line image tool. sips -Z 2048 *.jpg resizes every JPEG in a folder so its longest side is at most 2048 pixels, overwriting the files unless you use --out to write to another folder.
Can I bulk resize images on a Mac for free?
Yes. Preview, Finder Quick Actions and sips are built into macOS, and Operimage is a free Mac app on the Mac App Store that adds presets, Fit and Fill modes and safe batch output.
Are my photos uploaded when I resize them in Operimage?
No. Operimage processes every image on your Mac, so nothing is sent to a server.