How to convert WebP to JPG on Mac (quick answer)
To convert a WebP image to JPG on a Mac, open it in Preview, choose File → Export, select JPEG in the Format menu, set Quality to around 85% and click Save. Preview creates a new .jpg file and leaves the WebP untouched. This works on macOS Big Sur (11) and later, which can read WebP natively.
For more than a few files, the same job scales in three ways: Finder's Convert Image Quick Action for a selection, the sips command in Terminal for a single folder, or a batch converter for entire folder trees. This guide covers all of them, plus the settings that keep quality, transparency and color under control. For the full picture of opening, converting and creating WebP, see the WebP converter hub for Mac.
- 1WebP folder240 images saved from a website
- 2Convert to JPEG85% quality, overwrite off
- 3JPG outputSame folder structure, ready to upload
Why convert WebP to JPG at all?
WebP is a web delivery format. Websites use it because it is typically 25–34% smaller than an equivalent JPEG, according to Google's published comparisons, so browsers often hand you a .webp file when you save an image. Outside the browser, support is patchier. Marketplace listing tools, older content management systems, desktop email clients, print labs, slideshow and office apps and some photo editors either reject WebP or show a blank icon.
JPG (also written JPEG) is accepted virtually everywhere: every operating system, every upload form and every printer understands it. Converting WebP to JPG does not improve the image, but it removes the compatibility barrier. For photos, product images and anything without transparency, JPG is the right destination. For logos, screenshots and transparent graphics, PNG is the better target, and the PNG to JPG guide explains the trade-offs between those two formats in detail.
Method 1: Preview (one file or a few)
Preview is the default image viewer on macOS and the simplest WebP to JPG converter. Double-click the WebP to open it, then choose File → Export. In the dialog, set Format to JPEG and move the Quality slider; Preview shows the estimated file size as you drag. Around 85% is a sensible default. Choose a destination and click Save.
To convert several files at once, select them all in Finder and open them together in Preview. Select all thumbnails in the sidebar (Command-A), choose File → Export Selected Images, click Options, choose JPEG and pick a folder. Preview converts every selected image with the same setting.
Preview has limits: no batch preview of the result, no subfolder handling, and every run is manual. It is perfect for a download or two and tedious for anything you do every week.
Method 2: Finder Quick Actions (a selection of files)
macOS Monterey (12) added a Convert Image Quick Action to Finder. Select one or more WebP files, right-click, choose Quick Actions → Convert Image, set Format to JPEG and pick an Image Size (Small, Medium, Large or Actual Size). There is also an option to preserve metadata. Click Convert to JPEG and Finder writes the new files next to the originals.
Quick Actions are fast for ten or twenty files in one folder. They do not offer a quality slider, cannot reach into subfolders, and put the output beside the source files, which gets messy in large folders. Choose Actual Size unless you deliberately want smaller images; the other presets downscale the pixels.
Method 3: sips in Terminal (scriptable)
Every Mac includes sips, Apple's command-line image tool, and it reads WebP on macOS 11 and later. In Terminal, change to the folder with your WebP files, create an output folder with mkdir jpg, then run sips -s format jpeg -s formatOptions 85 *.webp --out jpg/. The formatOptions value sets JPEG quality from 0 to 100.
sips is quick and repeatable, and it leaves originals in place when you use --out. It does not show a preview, does not walk subfolders without extra shell scripting, and reports errors only as text. If you are comfortable in Terminal and the folder is flat, it is a good free option.
Method 4: Batch convert WebP to JPG in Operimage
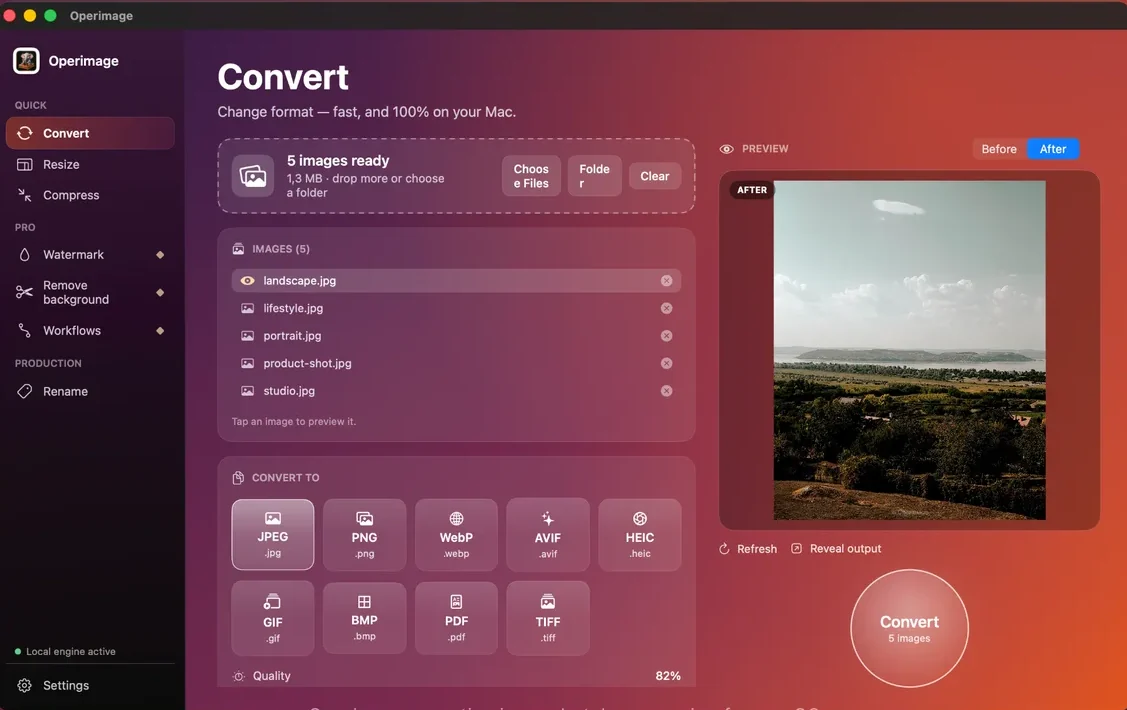
When you have nested folders, recurring deliveries or a few thousand files, a batch app is faster and safer. Operimage is a free Mac app that converts entirely on your Mac. Choose Convert in the sidebar, drop the folder on the window (the header shows something like “240 images ready”), choose JPEG as the output and set the quality slider to 85%.
Click any file in the image list to see it in the Before/After preview, which is the moment to check text, fine detail and areas that were transparent. When it looks right, click the round Convert button. Operimage keeps the source folder structure, does not overwrite the WebP originals unless you choose to, and Reveal output opens the finished JPG folder in Finder. If you do the same conversion every week, save the settings as a Workflow so the next run is one click. You can also convert mixed folders of images in one pass when WebP, PNG and HEIC files arrive together.
What JPG quality should you use for WebP to JPG?
Use 85% as a default and 90% for images that matter most, such as product photos, portfolio work and large hero banners. The reason to go higher than you might for a fresh camera export is that the WebP has already been compressed once. Re-encoding it at a low JPG quality stacks a second set of compression artifacts on top of the first, which shows up as blockiness in skies and smeared edges around text.
There is no such thing as a truly lossless WebP to JPG conversion, because JPG itself is lossy. In practice, 90% and above is visually indistinguishable from the source at normal viewing size. Going to 100% mostly inflates file size without recovering detail that the WebP never had. If the destination imposes a file size cap, set the cap first and let a target-size tool find the quality; the guide to compressing images on Mac covers that approach.
- 85%Default JPEG quality for WebP to JPG
- 90%Product photos and hero banners
- 100%Rarely worth it: bigger files, no extra detail
Transparent WebP files and JPG backgrounds
WebP supports transparency; JPG does not. When a transparent WebP becomes a JPG, every transparent pixel has to be filled with a solid color, usually white or black depending on the tool. A product cutout on transparency becomes a product on a white rectangle, which is fine for a white-background marketplace and wrong for a colored web page.
Before a batch run, check whether any files are transparent: open a few in Preview and look for a checkerboard, or watch the Before/After preview for unexpected backgrounds. If transparency matters, convert those files to PNG and the rest to JPG. Keep the original WebP files so you can always go back to the transparent version.
Colors, metadata and file names
Color: most web WebP files are sRGB, which converts cleanly. If a file was saved in Display P3 and the destination ignores color profiles, colors can look slightly dull or too saturated after upload. Converting the source to sRGB fixes this; in Terminal, sips --matchTo '/System/Library/ColorSync/Profiles/sRGB Profile.icc' file.webp does it per file.
Metadata: WebP files saved from websites usually carry little metadata, but files from your own pipeline may still contain EXIF and even GPS coordinates. Removing metadata before public upload is a good habit, and the EXIF and GPS removal guide shows how.
File names: converters keep the base name and change the extension, so photo-01.webp becomes photo-01.jpg. If a folder already contains a JPG with the same name, write to a separate output folder rather than risking an overwrite.
Before converting a WebP folder to JPG
- Check for transparent files and send those to PNG
- Check for animated WebP (only one frame survives)
- Set JPEG quality to 85%, or 90% for hero and product images
- Write to a separate output folder with overwrite off
- Preview at 100% zoom: text, edges, gradients
- Strip GPS and EXIF if the images will be public
Troubleshooting WebP to JPG problems
Most failed conversions come down to a few causes, and each has a quick check.
- Preview won't open the file: the Mac runs macOS 10.15 or earlier, or the file is not really an image. Open it in a browser to check.
- Only the first frame converted: the WebP is animated. JPG cannot animate; keep the WebP or use a GIF or video workflow.
- Result looks blocky: quality was too low for a file that was already compressed. Reconvert from the WebP at 85–90%.
- Upload still rejected: the site may also limit pixel dimensions or file size. Resize or compress after converting; Amazon, for example, has its own product image requirements.
- Black background appeared: the source was transparent and the tool filled it with black. Convert to PNG instead, or flatten deliberately.
Step by step
Open Convert and load the WebP files
In Operimage, select Convert in the sidebar and drop your WebP files on the window, or click Folder to load a directory including its subfolders.
Choose JPEG as the output format
Pick JPEG from the nine output formats. Every file in the list will be converted with the same settings.
Set quality to 85–90%
Drag the quality slider to about 85% for general use, or 90% for product shots and large hero images.
Preview a representative image
Click an image in the list and compare Before and After, checking text, edges and any areas that were transparent.
Convert and open the results
Click the round Convert button, then Reveal output to see the JPG files in Finder. Your WebP originals stay unchanged.
WebP to JPG methods on Mac
| Method | Best for | Quality control | Subfolders | Privacy |
|---|---|---|---|---|
| Preview | One or a few files | Quality slider | No | Local |
| Finder Quick Action | A selection of files | Size presets only | No | Local |
| sips in Terminal | Scripted single folders | formatOptions value | No, without scripting | Local |
| Online converter | Occasional single files | Varies | No | Files uploaded |
| Operimage | Folders and repeat jobs | Slider with Before/After preview | Yes | Local, nothing uploaded |
FAQ
How do I change a WebP to a JPG on a Mac?
Open the WebP in Preview, choose File → Export, set Format to JPEG and click Save. Renaming the file extension does not convert it; the file must be re-encoded.
Can I batch convert WebP to JPG on Mac for free?
Yes. Finder's Convert Image Quick Action converts a selection, sips converts a folder from Terminal, and Operimage, a free Mac app, converts whole folders and subfolders with a preview.
Will converting WebP to JPG lose quality?
There is a small loss because JPG is lossy, but at 85–90% quality it is not visible at normal viewing sizes. Transparent areas become a solid color.
Can I just rename .webp to .jpg?
No. Renaming changes only the extension, not the data inside, so many apps and upload forms will still reject the file or show it as corrupt. Use a real conversion.
Why do saved images from websites download as WebP?
Many sites serve WebP because it loads faster than JPEG at similar quality. Your browser saves the file in the format the site delivered.
Should I convert WebP to JPG or PNG?
Use JPG for photos and anything going to uploads, email or print. Use PNG for logos, screenshots and images with transparent backgrounds.
Do my files stay private when I convert on Mac?
Yes, if you use Preview, Finder, sips or a local app like Operimage. Online converters upload your images to someone else's server.