What is the best way to convert WebP on a Mac?
The best way to convert WebP on a Mac depends on direction and volume. To turn a few WebP files into JPG or PNG, the tools already on your Mac are enough: Preview opens WebP on macOS Big Sur (11) and later, and File → Export saves a copy as JPEG or PNG. To create WebP files, or to convert a folder of hundreds of images in either direction, you need a dedicated converter, because macOS can read WebP but cannot save it.
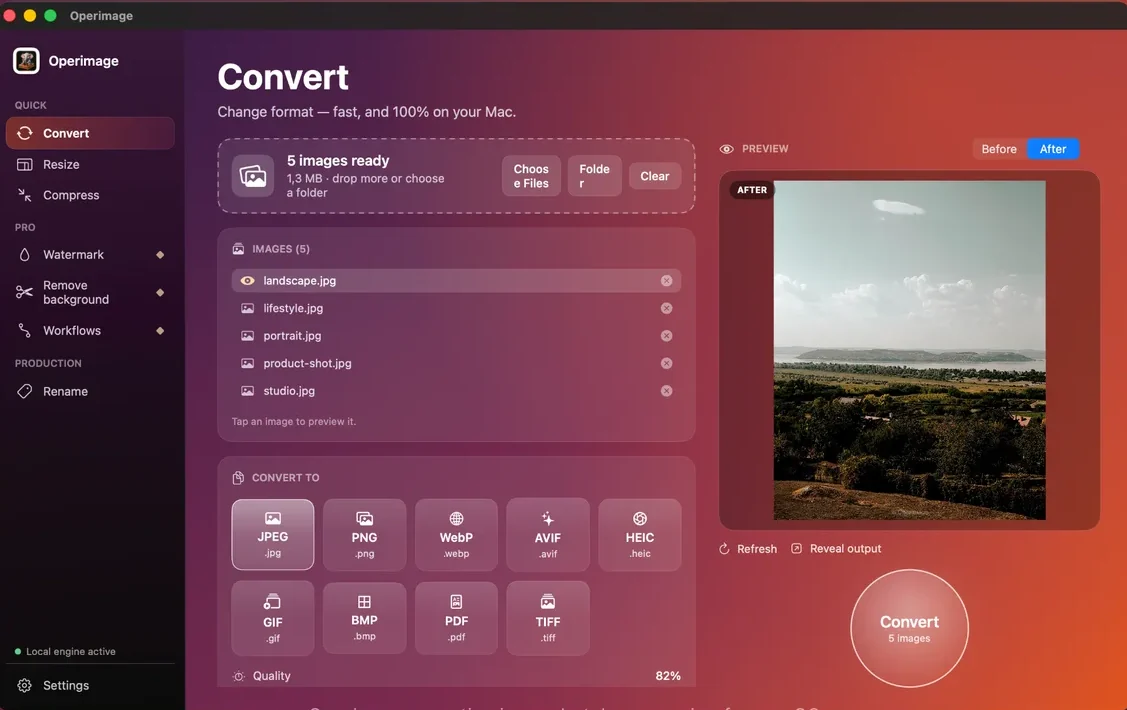
Operimage is a free Mac app that handles both directions in one Convert tool. It outputs JPEG, PNG, WebP, AVIF, HEIC, GIF, BMP, PDF and TIFF, processes everything on your Mac without uploading, and keeps your originals untouched. This hub sits under the wider Mac image format converter guide and links to a dedicated walkthrough for each WebP conversion.
A quick rule of thumb: convert away from WebP when a destination rejects it, and convert to WebP when you control the website and want smaller pages. The sections below cover both, with the settings that matter.
- 1WebP from the webDownloads, CMS exports, browser saves
- 2ConvertJPEG 85% or PNG for compatibility
- 3JPG/PNG mastersPhotos, cutouts, screenshots
- 4WebP for your site75–82% quality, smaller pages
Why WebP files cause trouble outside the browser
WebP is a Google image format introduced in 2010. It supports lossy compression (like JPEG), lossless compression (like PNG), transparency and animation in one file type. Google's own published comparisons put lossy WebP at roughly 25–34% smaller than JPEG at equivalent quality, and lossless WebP about 26% smaller than PNG. That efficiency is why so many websites now serve WebP, and why “Save Image As” in a browser often gives you a .webp file.
The friction starts outside the browser. Marketplace listing tools, older content management systems, email clients such as desktop Outlook on Windows, print services and some design and office apps still expect JPG or PNG. Amazon, for example, documents JPEG, TIFF, PNG and GIF for product images. When a WebP is rejected, converting it to JPG or PNG is the fix, and it does not visibly change the picture at sensible quality settings.
WebP files also cannot hold every kind of image. The format has a maximum size of 16,383 × 16,383 pixels, and lossy WebP always stores color at reduced resolution (4:2:0 chroma subsampling), which can soften thin red or blue lines in graphics. Those limits rarely matter for photos, but they explain why some screenshots look slightly blurrier as WebP.
How to open WebP files on Mac
On macOS 11 and later, double-clicking a .webp file opens it in Preview, Finder shows a thumbnail, and pressing Space gives a Quick Look preview. Safari, Chrome, Firefox and Edge all display WebP too, so dragging the file onto a browser window is a fallback on any Mac.
If a WebP will not open, the usual causes are an older macOS version, a file that is actually an animated WebP (Preview shows only the first frame or fails), or a download that was renamed .webp but contains HTML or a broken transfer. Check the file size in Finder: a 2 KB “image” is almost always a failed download rather than a real picture.
- macOS 11 Big Sur or later: Preview, Quick Look and Finder thumbnails work natively.
- Animated WebP: browsers play it; Preview and still-image converters keep a single frame.
- Wrong extension: if Preview refuses the file, open it in a browser to confirm it is really an image.
- Very large WebP: files near the 16,383-pixel limit can be slow to open in Preview.
Convert WebP to JPG or PNG with built-in macOS tools
For one file, Preview is the quickest route. Open the WebP, choose File → Export, set Format to JPEG or PNG, drag the Quality slider to around 85% for JPEG, and click Save. Preview writes a new file and leaves the WebP alone.
For a handful of files, select them in Finder, right-click and choose Quick Actions → Convert Image (macOS Monterey and later). You can choose JPEG, PNG or HEIF, pick an image size and decide whether to keep metadata. Finder writes the converted copies next to the originals.
For Terminal users, sips (scriptable image processing system) ships with every Mac. The command sips -s format jpeg -s formatOptions 85 *.webp --out converted/ converts every WebP in the current folder into an existing folder named converted. sips is fast and free, but it gives no preview and does not recurse into subfolders on its own.
These built-in methods are right for one-off jobs. They become slow and error-prone when you have nested folders, need the same settings every week, or have to check results before they go live, which is where a batch app pays off. Our WebP to JPG walkthrough covers each method step by step, including transparency and color issues.
Built-in macOS WebP tools compared
| Method | Reads WebP | Writes WebP | Batch | Best for |
|---|---|---|---|---|
| Preview (File → Export) | Yes, macOS 11+ | No | Several files, one dialog | A single image |
| Finder Quick Action | Yes | No (JPEG, PNG, HEIF) | A selection | A few files, quick copies |
| sips in Terminal | Yes | No | Yes, one folder level | Scripted, no preview |
| Operimage Convert | Yes | Yes | Whole folders and subfolders | Repeatable batches with preview |
Which format should you convert WebP to?
The destination decides. Convert to the most compatible format the receiving system accepts, and pick PNG only when you need what PNG does well. JPG is the right answer for most photos, product shots and anything going to a marketplace, email or print service. PNG is right for logos, screenshots, diagrams and anything with a transparent background.
If you are not sure whether a WebP has transparency, open it in Preview and look for a checkerboard or a colored background that does not match the page it came from. Converting a transparent WebP to JPG fills those areas with a solid color, which ruins cutouts meant to sit on colored backgrounds.
WebP → JPG
Photos and uploads
- Accepted almost everywhere, including marketplaces and email
- Small files for photographic content at 85% quality
- No transparency: clear areas become a solid color
WebP → PNG
Graphics and cutouts
- Keeps transparency and sharp text
- Lossless, safe for further editing
- Often 3–10× larger than JPG for photos
Verdict: Default to JPG; choose PNG only for transparency, text-heavy graphics or files you will edit again.
How to convert JPG and PNG to WebP on Mac
Going the other way, from JPG or PNG to WebP, is what web publishers need, and it is the part macOS cannot do on its own. Preview's export list includes JPEG, PNG, HEIC, TIFF and PDF but not WebP, and Finder's Convert Image action does not offer it either. Your options are Google's free cwebp command-line encoder (installable with Homebrew), an online converter that uploads your files, or a Mac app with a WebP encoder.
In Operimage, choose Convert, add the folder, set the output format to WebP and the quality slider to about 80%. For photographs, 75–82% typically cuts file size noticeably compared with the source JPG with no visible difference at normal viewing size. Detailed guides cover each source format: turning JPG photos into WebP focuses on photo quality and page weight, while PNG to WebP with transparency intact covers cutouts, logos and edge halos.
If your source images are iPhone photos, you can skip the intermediate JPG entirely and go straight from HEIC; the HEIC to WebP guide explains the color and orientation checks for that path.
What quality setting should you use?
Quality numbers are not universal: 80% in one encoder is not identical to 80% in another, so treat these as starting points and confirm in a side-by-side preview. The goal is the lowest setting where you cannot see a difference at the size the image will actually be displayed.
When converting from WebP to JPG, use a higher setting than you would for a fresh export, because the WebP is already lossy and a second lossy pass compounds artifacts. When converting to WebP, start lower for large photos and higher for graphics.
- WebP to JPG: 85% for general use, 90% for hero images and product photos.
- JPG to WebP (photos): 75–82%; below 70% look for blotchy skies and skin.
- PNG to WebP (cutouts, logos): 85–90% so transparent edges stay clean.
- Screenshots with small text: keep PNG or use 90%+ WebP and check the text at 100% zoom.
- Size budget instead of quality: use target-size compression to find the highest quality under, say, 200 KB.
Batch converting WebP folders without mistakes
Converting a few files is trivial; converting 2,000 files from a site export is where mistakes happen. The common failures are overwriting originals, flattening transparent images onto the wrong background, losing the folder structure that a CMS or client depends on, and shipping a whole batch before anyone checked one result.
Treat a big conversion like a production run: load the full folder, settle the settings on a small representative sample, check it, then release the rest. In Operimage, the image list lets you click through samples in the Before/After preview before you press Convert, and once settings are right you can save them as a Workflow to rerun next time.
Before you convert a WebP folder
- Confirm the destination's accepted formats and size limits
- Check whether any files are transparent or animated
- Pick output format and quality once for the whole batch
- Keep source folder structure on and overwrite off
- Preview three representative images at 100% zoom
- Decide whether to strip EXIF and GPS metadata
- Spot-check the output in Finder with Reveal output
Transparency, color, animation and metadata
Transparency: WebP, PNG and AVIF can store transparent pixels; JPG cannot. A transparent WebP converted to JPG gets a solid fill behind the subject. If that fill matters, convert to PNG instead, or keep the WebP as the master.
Color: web images should be sRGB. Images exported from newer Macs and iPhones are often Display P3, and some browsers and apps display untagged or mismatched files with dull or oversaturated color. If colors shift after conversion, convert the source to sRGB first; in Terminal, sips --matchTo '/System/Library/ColorSync/Profiles/sRGB Profile.icc' does this for a folder.
Animation: animated WebP files contain many frames. JPG and PNG are still formats, so a converter keeps a single frame. Keep the WebP, or use a tool built for animation, if the motion matters.
Metadata: WebP can carry EXIF, including GPS location from phone photos. For public uploads, stripping it is a sensible default; the guide to removing EXIF and GPS data on Mac explains what gets removed and when to keep it.
Using WebP on your own website
Every current version of Chrome, Safari, Firefox and Edge displays WebP, so for most sites WebP can be the only format you serve. Safari added WebP support in version 14 in 2020, which means only very old browsers need a JPG fallback. WordPress has accepted WebP uploads since version 5.8, and the WordPress image compression guide covers upload size and quality settings for that platform.
If you want the smallest possible files, AVIF compresses further than WebP but encodes more slowly and is less widely accepted by upload tools. The AVIF or WebP decision guide explains when the extra savings are worth the extra complexity. A common setup is WebP for everything, with AVIF added later for the heaviest pages.
Typical file size relative to JPEG
Which WebP guide do you need?
Each guide in this cluster covers one conversion path in depth, with built-in macOS methods, batch settings, troubleshooting and FAQs. Pick the one that matches your source and destination.
- WebP won't upload somewhere: convert it to JPG for photos or PNG for graphics.
- Site is slow and images are JPG: convert to WebP at 75–82% and resize oversized images first.
- Transparent PNG cutouts or logos are heavy: convert to WebP at 85%+ and check edges on dark and light backgrounds.
- You need the absolute smallest files: compare AVIF and WebP on your own images before switching.
- Images contain location data: strip metadata in the same batch before publishing.
Step by step
Open Convert and add your files
In Operimage, choose Convert in the sidebar, then drop WebP, JPG or PNG files onto the window or click Folder to load a whole directory.
Pick the output format
Choose JPEG for maximum compatibility, PNG when you need transparency or lossless output, or WebP when you are preparing images for a website.
Set the quality slider
Use about 85% for WebP to JPEG, and 75–82% when creating WebP from photos. Raise it for product shots, text and logos.
Check the Before/After preview
Click a representative image in the list and compare Before and After at full size, looking at edges, text and gradients.
Convert and reveal the output
Click the round Convert button, then use Reveal output to open the converted files in Finder. The originals are left untouched.
FAQ
How do I open a WebP file on a Mac?
On macOS Big Sur (11) or later, double-click the file to open it in Preview, or press Space in Finder for Quick Look. On older macOS versions, drag the file into Safari, Chrome or Firefox.
How do I convert WebP to PNG on Mac?
Open the WebP in Preview, choose File → Export, set Format to PNG and click Save. For many files, select them in Finder and use Quick Actions → Convert Image, or use a batch converter for whole folders.
Can Preview save files as WebP?
No. Preview can open WebP and export it to JPEG, PNG, HEIC, TIFF or PDF, but WebP is not in its export list. Creating WebP files needs a third-party encoder or app.
Does converting WebP to JPG reduce quality?
JPG is lossy, so there is a small loss, but at 85–90% quality it is not visible at normal viewing sizes. The bigger change is that any transparency becomes a solid background.
Why are WebP files so common when I save images from the web?
Many websites serve WebP because it is typically 25–34% smaller than JPEG at similar quality, which makes pages load faster. Browsers save the file in the format the site delivered.
Is there a free WebP converter for Mac that works offline?
Yes. Preview, Finder Quick Actions and sips convert from WebP for free and offline. Operimage is a free Mac app on the Mac App Store that also converts to WebP in batches, entirely on your Mac.
Can I batch convert WebP files on Mac?
Yes. Finder's Convert Image Quick Action handles a selection, sips handles one folder from Terminal, and a batch app like Operimage converts whole folders and subfolders with one set of settings and a preview.