How to compress an image to 100KB
Getting an image under 100 KB takes two adjustments: the pixel dimensions and the compression quality. For a typical photo, resize the long side to about 1200 pixels, save it as JPEG or WebP, and lower the quality until the file is just under 100 KB. On a Mac you can do this by hand in Preview with File → Export, where the Quality slider shows the resulting file size as you drag it.
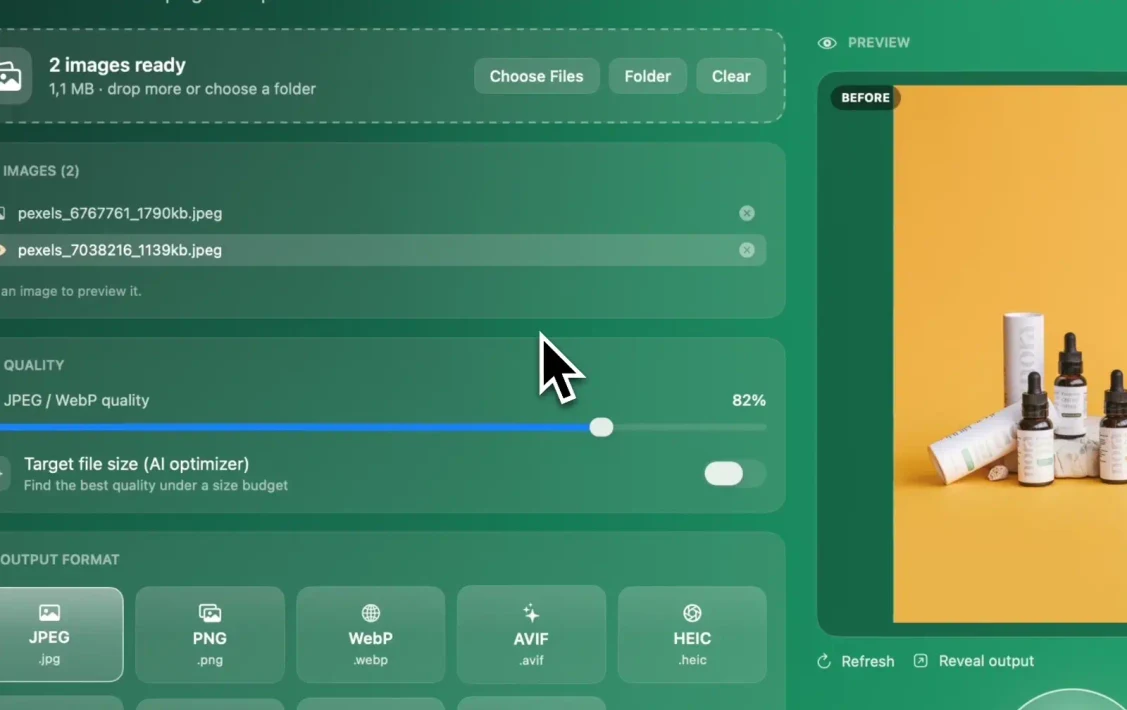
Doing that for more than a few files is slow, because every image needs a different quality to reach the same size. Target-size compression automates the search. You enter the limit once and the tool finds the highest quality that fits for each image. Operimage, a free Mac app, does this in its Compress tool, and it is one of the most useful steps in any batch image workflow on a Mac.
The same method works for any limit: 50 KB for a tight form, 200 KB for a web page, 1 MB or 2 MB for platforms with larger caps.
- 1Original photo4032 × 3024, 3.2 MB
- 2Resize1200 px long side
- 3Target 95 KBQuality found per image
- 4Upload-readyEvery file under 100 KB
Why a fixed quality setting misses the target
JPEG and WebP file size depends heavily on image content. A plain product shot on a white background compresses very efficiently, while foliage, fabric, gravel or crowds full of fine detail need many more bytes at the same quality. Export a folder of mixed images at 80% quality and the results can easily differ in size several times over.
That is why a single quality value fails against a hard limit. Set it low enough for the busiest photo and every simple image is needlessly degraded; set it for the simple images and the detailed ones exceed the cap. Target-size compression removes the trade-off by choosing quality per image. ImageOptim users can compare approaches in the ImageOptim alternative guide.
Fixed quality
Same setting for all
- Fast and predictable visually
- File sizes vary widely by content
- Detailed images may exceed the limit
- Simple images often end up smaller than needed
Target file size
Same budget for all
- Every file lands under the limit
- Quality chosen per image
- Simple images keep higher quality
- Needs sensible dimensions to look good
Verdict: Use fixed quality for general web exports; use a target size whenever a site, form or platform rejects files over a limit.
How target-size compression works
A target-size compressor runs a short search on the quality setting. It encodes the image at one quality, measures the file, then tries higher or lower values, narrowing in until it finds the highest quality whose file is still under the target. This takes a handful of encodes per image rather than one, which is why it is a job for a fast local engine rather than a manual loop in Preview.
Because the search keeps the highest quality that fits, simple images are not crushed just because a difficult image in the same batch needed more compression. Operimage calls this Target file size (AI optimizer): it finds the best quality under a size budget, on your Mac, without uploading anything.
Hitting a size by hand with Preview or sips
Preview on macOS is the only built-in tool that shows the file size while you choose quality. Open the image, choose Tools → Adjust Size to set the long side, then File → Export with Format set to JPEG. The size readout under the Quality slider updates as you drag, so you can stop just under the limit. It is accurate and free, but it is one file at a time and the quality you land on is only right for that image.
The sips command in Terminal can set a JPEG quality for a whole folder, for example sips -s format jpeg -s formatOptions 70, but it has no notion of a size budget. You would have to run it, check which files are still too large, and rerun those at a lower quality, which is exactly the loop that target-size compression automates.
For two or three images, Preview is perfectly adequate. For a folder of product photos, ID photos for a team, or a week of blog images, the manual loop costs far more time than the job deserves.
Choose dimensions that make the target realistic
The target and the dimensions have to match. Squeezing a full 12-megapixel photo into 100 KB forces quality so low that blocks and smearing appear. Reducing the image to 1200 pixels on the long side cuts the pixel count by about ninety percent, so the same 100 KB budget is spent on far fewer pixels and quality stays high.
The table below gives starting points for typical photos saved as JPEG. Treat them as a first try, not a rule: very detailed images may need smaller dimensions, and clean product shots can often go larger. Resizing the whole folder first and then applying the target is the most reliable combination.
Starting dimensions for common size targets (typical JPEG photos)
| Target | Long side to start with | Typical use |
|---|---|---|
| 50 KB | 800–1000 px | Strict forms, thumbnails |
| 100 KB | 1000–1200 px | Application forms, inline web images |
| 200 KB | 1400–1600 px | Blog images, email |
| 500 KB | 2000–2560 px | Large web heroes, portfolios |
| 1 MB | 2560–3500 px | Detailed photos, marketplaces |
KB, KiB and why to aim slightly under
Kilobytes are not counted the same way everywhere. macOS Finder uses decimal units, so 100 KB means 100,000 bytes. Some websites and upload forms count 1 KB as 1024 bytes, which makes their 100 KB limit 102,400 bytes, while others are stricter than they state.
The safe habit is to set the target a few percent below the published limit, for example 95 KB for a 100 KB cap or 1.9 MB for a 2 MB cap. The visual difference is negligible and you avoid rejected uploads. Check the result in Finder's list view or with Get Info, which shows the exact byte count.
- 100,000 bytes100 KB as Finder counts it
- 102,400 bytes100 KB on sites that use 1024
- 95 KBSafe target for a 100 KB limit
Which format to use for a size target
Target-size compression only works with lossy formats, because only they have a quality dial to turn. JPEG is the safe choice when you do not know what the destination accepts. WebP usually reaches the same file size at visibly higher quality, so switching from JPG to WebP is worth it wherever WebP is accepted, such as most modern websites and CMSs.
PNG is lossless. A PNG photo cannot be compressed to an arbitrary size without changing format or reducing its dimensions, so convert photos to JPEG or WebP before applying a target. Keep PNG, or use WebP, only when the image needs transparency.
- JPEG: accepted everywhere; the default for forms and marketplaces.
- WebP: smaller at the same quality; good for websites and CMSs.
- AVIF: often smaller still, but check that the destination accepts it.
- PNG: lossless; convert photos away from PNG before targeting a size.
How to compress a folder to a target size on Mac
Open Compress in Operimage's sidebar and drop in the images or choose a folder. Pick JPEG or WebP as the output format, switch on Target file size, and enter the budget. Turning on metadata stripping also helps: stripping camera and location metadata frees a few kilobytes that can go into image quality, and it keeps location out of published photos.
Click the most detailed files in the list to compare Before and After, then click Compress. Operimage writes new files and leaves the originals alone, and Reveal output opens the results in Finder. If you run the same budget every week, save resize and compress as a Workflow so the dimensions and target are always applied together.
Common size limits you will run into
Size limits come from upload forms, platforms and your own performance budgets. Some are fixed and well known, like the 2 MB cap for YouTube custom thumbnails. Others depend on the site or host and change over time, so check the current help page of the platform before setting a target.
For websites, the limit is usually your own: a page that loads quickly on a phone keeps most images in the low hundreds of kilobytes. The guides to image weight for WordPress sites and preparing Shopify store images suggest budgets by image role. For general compression without a hard limit, see compressing photos on a Mac for free.
When an image can't hit the target
Occasionally an image reaches the target only at a quality where artifacts are obvious. That is a sign the budget and the dimensions do not match, not that compression failed.
- Visible blocks or smearing: reduce the dimensions by 20–30% and run the target again.
- Text looks fuzzy: text needs more bytes than photos; use a larger budget or WebP.
- Transparent PNG will not shrink enough: convert to WebP, which supports transparency with lossy compression.
- Some files far under the target: that is normal for simple images; the search stops at the best quality, not at the exact byte count.
- Upload still rejected: the site may count 1 KB as 1024 bytes or check dimensions too; lower the target a few percent and read the stated pixel limits.
Before running a target-size batch
- Limit taken from the platform's current help page
- Target set a few percent under the limit
- Images resized to dimensions that suit the budget
- Photos in JPEG or WebP, not PNG
- Most detailed images previewed at 100% zoom
- Output to a new folder; originals kept
Step by step
Open Compress and add images
In Operimage, open Compress in the sidebar and drop in images, or choose a folder to compress a whole set to the same budget.
Choose JPEG or WebP
Pick the output format. JPEG works everywhere; WebP reaches the same target at higher visual quality where it is accepted.
Turn on Target file size and enter the limit
Switch on Target file size (AI optimizer) and enter the budget, such as 95 KB for a 100 KB upload limit.
Preview the hardest images
Click the most detailed files in the list and compare Before and After. If one looks degraded, resize that set smaller and run it again.
Compress and check the sizes
Click Compress, use Reveal output to open the results in Finder, and confirm the sizes in list view before uploading.
FAQ
How do I compress an image to 100KB on a Mac?
Resize it to about 1200 pixels on the long side, then export as JPEG in Preview and lower the quality until the size shown is under 100 KB. For many images, use Operimage's Target file size option, which does this automatically for each file.
Can I compress an image to an exact file size?
You can get each image just under a target, such as 100 KB or 200 KB. Target-size compression finds the highest quality that fits, so files land at or slightly below the limit rather than at an exact byte count.
How do I compress a JPEG to under 1MB?
Keep the long side around 2560–3500 pixels and set a 1 MB target, or lower JPEG quality to about 80%. Most photos at those dimensions fit under 1 MB with little visible loss.
Why is my image still too large after compressing?
It is probably too many pixels for the budget or saved as PNG. Resize it smaller and save it as JPEG or WebP, then compress again.
Is 100 KB 100,000 or 102,400 bytes?
macOS Finder counts 100 KB as 100,000 bytes, while some sites use 1024-byte kilobytes. Aim a few percent under the limit to be safe either way.
Can I compress a whole folder to the same file size?
Yes. Operimage applies one target file size to every image in a folder and picks the quality per file, all on your Mac.