Do you need an ImageOptim alternative?
Maybe not. ImageOptim is a free, open-source Mac app that makes images smaller without changing how they look. You drag JPEG, PNG, GIF or SVG files onto its window and it recompresses them using a bundle of well-regarded optimizers, including MozJPEG, pngquant, Pngcrush, Zopfli and SVGO, while removing metadata most websites do not need. For web developers who already have correctly sized images, it is one of the best tools on the Mac and costs nothing.
What ImageOptim does not set out to do is change the image itself: its size in pixels or its format. Those are usually where the biggest savings are. A 4032 × 3024 iPhone photo shrunk to 1600 pixels wide and saved as WebP is far smaller than the same photo losslessly optimized at full size. Operimage, a free Mac app, handles that part: resizing, converting to WebP or AVIF and compressing to a target file size, all offline. The overview of batch processing images on Mac shows where each of those steps fits in a workflow.
ImageOptim
Same pixels, smaller file
- Lossless by default; lossy optional in Preferences
- JPEG, PNG, GIF and SVG
- Strips EXIF, thumbnails, comments, extra color profiles
- Free and open source (GPL v2 or later)
Operimage
Fewer pixels, better format
- Resize with presets or exact dimensions
- Convert to WebP, AVIF and 7 other formats
- Compress to a target file size
- Writes new files; originals kept
Verdict: Already-sized JPEG, PNG or SVG files: ImageOptim. Camera-size photos, WebP or AVIF, or a hard size limit: Operimage, optionally followed by ImageOptim.
What ImageOptim does well
ImageOptim's appeal is that it is safe and effortless. Lossless optimization cannot make an image look worse, so you can run it on anything without checking results one by one. The points below come from ImageOptim's own site and help pages.
- Lossless by default: files get smaller without visible change; lossy optimizations can be enabled in Preferences when you want more savings.
- Proven encoders: it bundles MozJPEG, pngquant, Pngcrush, 7zip, SVGO and Google Zopfli rather than reinventing compression.
- Privacy cleanup: it removes private EXIF metadata from cameras, embedded thumbnails, comments and unnecessary color profiles.
- Formats: lossy compression can apply to JPEG, SVG, animated GIF and PNG.
- Open source: ImageOptim is free software under the GPL v2 or later.
- Safety net: originals are moved to the Trash after optimization, so they can be restored.
ImageOptim vs Operimage side by side
The table lists common jobs on folders of web and product images. ImageOptim values come from imageoptim.com, its help pages and the project's public issue tracker as of October 2026. Not built in means the official pages describe the app without that capability; Check current version means we could not confirm either way.
ImageOptim vs Operimage (as of October 2026)
| Job | ImageOptim | Operimage |
|---|---|---|
| Lossless recompression of JPEG and PNG | Yes | Not built in |
| SVG optimization | Yes (SVGO) | No |
| Convert formats (WebP, AVIF) | Not built in | Yes, 9 formats |
| Resize presets | Check current version | Yes, 6 social presets plus manual sizes |
| Compress to target file size | Check current version | Yes (AI optimizer) |
| Strip EXIF and GPS | Yes, by default | Yes, optional |
| Watermark | Check current version | Yes |
| Rename | Check current version | Yes |
| Background removal | Check current version | Yes, on-device |
| Keeps originals | Moves originals to Trash | Yes, writes new files |
| Works offline | Yes | Yes |
| Where to get it | imageoptim.com (free, open source) | Mac App Store (free) |
Why resizing and format beat lossless optimization
File size depends mostly on how many pixels an image has and how efficiently its format encodes them. Lossless optimization keeps both fixed and removes redundancy in the encoding, which typically trims a modest share of the file. Resizing and changing format alter the two things that matter most.
Pixel count scales with the square of the dimensions: halving the width and height leaves a quarter of the pixels. A 12-megapixel photo displayed in a 1200-pixel-wide column carries far more data than any visitor sees. Format matters next. WebP is widely reported to produce files roughly a quarter to a third smaller than JPEG at similar visual quality, and AVIF often smaller still. The AVIF and WebP comparison explains the trade-offs in browser support and encoding speed.
That is why a typical web pipeline resizes first, converts second and only then applies final optimization. Each step works on less data than the one before. If you are unsure which format a folder should end up in, the guide to picking and batch converting image formats walks through JPEG, PNG, WebP, AVIF and HEIC.
- 4×Fewer pixels when width and height are halved
- 25–34%Typical WebP saving vs JPEG at similar quality
- 0Visible change from lossless optimization
When a file-size budget matters
Many upload forms, CMSs and marketplaces enforce a maximum file size, and performance budgets often set one per image. ImageOptim's lossless mode cannot guarantee a result under a given size, because it never reduces quality. Its lossy settings reduce size further but do not target a specific number.
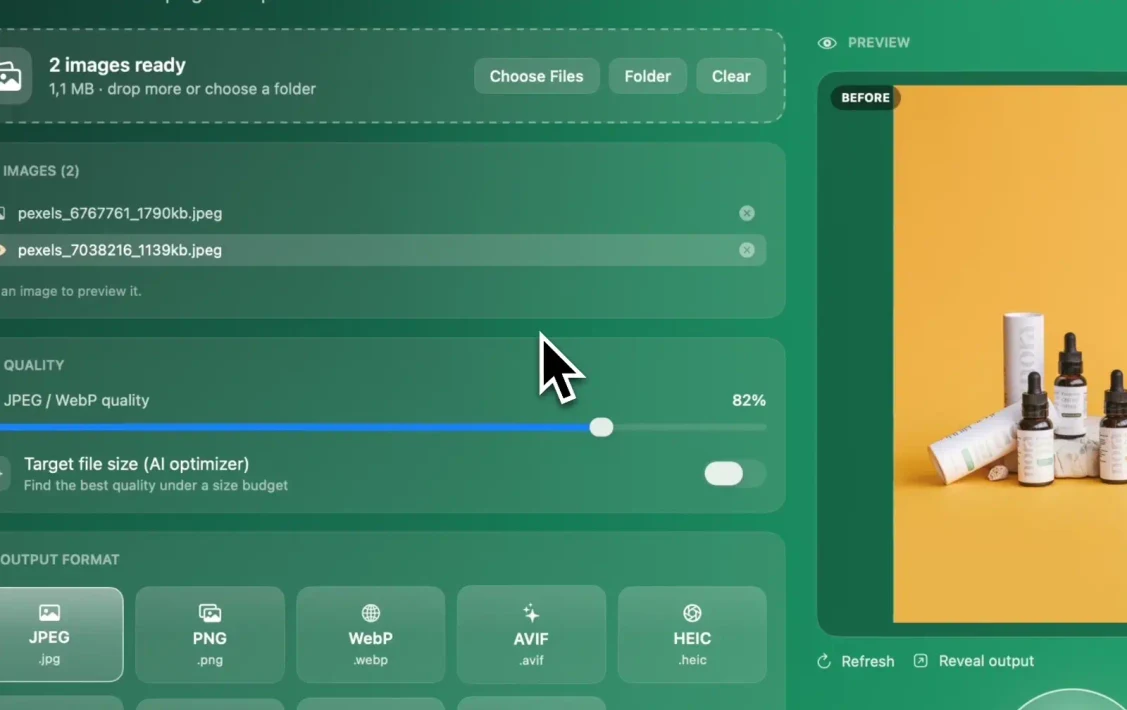
Operimage's Compress tool has a Target file size (AI optimizer) that searches for the highest quality under the budget you enter, image by image, so a folder of mixed photos all lands under, for example, 200 KB without manual testing. The guide to compressing images to an exact size like 100 KB explains realistic budgets for different image dimensions. For WordPress sites in particular, the walkthrough for lighter WordPress media uploads covers sizes and formats that suit themes and the media library.
Settings by image type
The right tool and setting depend on what is in the image. These starting points work for most web and shop images; check a few results in Before/After and adjust.
- Photos for a website: resize to the largest display width (often 1600–2048 px), convert to WebP at about 80%, strip metadata.
- Product photos for a marketplace: resize to the platform's recommended square, JPEG at 82–85%, or a target file size if the platform caps uploads.
- Screenshots and UI graphics: keep PNG for sharp text, resize if they are larger than displayed, then run ImageOptim for lossless PNG savings.
- Logos and icons: keep SVG where the site supports it and optimize with ImageOptim; export PNG only where SVG is not accepted.
- Animated GIFs: ImageOptim can optimize them; for large animations, consider whether a short video would be lighter.
Matching ImageOptim's metadata cleanup
One reason people like ImageOptim is that it quietly removes data that does not belong on the web: camera EXIF fields, GPS coordinates, embedded thumbnails and comments. If you move compression to another tool, make sure that cleanup still happens.
In Operimage, metadata stripping is an option in the Compress tool, so it runs in the same pass as resizing and compression. To confirm the result, open an output file in Preview and choose Tools → Show Inspector; the GPS tab should be gone. The guide to stripping EXIF and location data on a Mac shows other ways to check and clean files. Color is the other detail: iPhone photos are usually Display P3, and web images look most consistent in sRGB, so compare a few colorful outputs side by side after switching.
How to redo your ImageOptim workflow in Operimage
If your current routine is export from an editor, then drop the folder on ImageOptim, the Operimage version folds resizing, format and compression into one pass. Load the folder in Operimage, use Resize for the display size you actually need (for example 1600 or 2048 pixels on the long edge), then Compress with WebP or JPEG output and either a quality around 80% or a target file size. Enable metadata stripping to match ImageOptim's default cleanup.
Save the chain as a Workflow, such as resize → compress, so each new batch is one click. Because Operimage writes new files rather than replacing originals, you keep full-resolution masters without making copies first. The broader guide to shrinking photos on a Mac for free covers quality settings for different kinds of images.
Switching in 10 minutes
You do not have to remove ImageOptim from your Dock. The quickest route is to move the resize and format steps into Operimage and keep ImageOptim for the jobs it does best.
Switching in 10 minutes
- Note the largest display size your site or shop actually uses
- Install Operimage from the Mac App Store and load a test folder of 20 images
- Resize to that display size with Manual resize
- Compress to WebP around 80%, or set a target file size
- Enable metadata stripping, as ImageOptim does by default
- Compare total folder size against your old ImageOptim output
- Save the steps as a Workflow; keep ImageOptim for PNG and SVG polish
When ImageOptim alone is the right choice
Stay with ImageOptim when your images are already the right size and in the right format, and the only goal is to make them lighter without any risk to quality. That describes many developer workflows: icons, sprites, interface PNGs and SVG illustrations checked into a project, where file names and formats must not change and every byte saved is a bonus.
ImageOptim is also a good fit when you want zero decisions. There is no quality slider to tune in the default lossless mode, so anyone on a team can drop files on it safely. If you never resize, never need WebP or AVIF, and never face an upload limit, a second app adds little. The reasons to add Operimage are specific: camera-size photos, modern formats, size budgets, or extra steps such as watermarks, renaming and background removal in the same batch.
Using ImageOptim and Operimage together
The two apps combine well because they work at different stages. Use Operimage to get images to the right dimensions and format, then use ImageOptim on output it handles especially well: PNG graphics, screenshots and icons, where lossless tools like Zopfli and pngquant can still shave bytes, and SVG files, which Operimage does not write.
Keep ImageOptim on its own for already-sized assets in a code repository, where changing format would break references and lossless savings are exactly what you want. Choose Operimage alone when the output is WebP or AVIF, when files must fit a size limit, or when the same batch also needs watermarks or renaming. For other converters that can sit in the same toolbox, see the comparison of offline Mac image converters.
Step by step
Load the folder
Open Operimage, choose Compress in the sidebar and drag in the images or click Folder to load a directory with its subfolders.
Pick the output format
Choose JPEG or WebP for photos, or another of the nine formats, so the compression and format change happen in one pass.
Set quality or a size budget
Use the quality slider, around 80% for WebP, or turn on Target file size (AI optimizer) and enter the budget, for example 200 KB.
Strip metadata
Enable metadata stripping to remove EXIF and GPS data, as ImageOptim does by default.
Compare and run
Click an image to compare Before and After, then click Compress. New files are written; originals stay untouched unless you choose otherwise.
Reveal the output
Click Reveal output to open the results in Finder and check the file sizes.
FAQ
Is ImageOptim still free?
Yes. ImageOptim for Mac is free, open-source software released under the GPL v2 or later.
Does ImageOptim convert images to WebP?
No. ImageOptim optimizes JPEG, PNG, GIF and SVG files in their existing formats. Use a converter such as Operimage to create WebP or AVIF files.
Can ImageOptim resize images?
ImageOptim's Mac app is built around optimizing files at their existing dimensions and does not list resizing as a feature. Resize first in another tool, then optimize.
Does ImageOptim remove EXIF data?
Yes. ImageOptim removes private EXIF metadata, embedded thumbnails, comments and unnecessary color profiles by default.
Does ImageOptim overwrite my original files?
Yes. It replaces each file with the optimized version and moves the original to the Trash, so work on copies if you need to keep originals.
Is lossless optimization enough for a fast website?
Usually not on its own. Serving images at the size they are displayed and in a modern format like WebP or AVIF typically saves far more than lossless recompression.