The quickest ways to compress images on a Mac
You can compress images on a Mac for free without installing anything: Preview exports a JPEG at any quality you choose, Photos exports at Low, Medium, High or Maximum quality, and the sips command in Terminal compresses whole folders. For regular work with many files, a free offline app such as Operimage adds batch processing, modern formats like WebP and AVIF, and a target file size option.
Compression is only half the story. The largest savings come from reducing pixel dimensions first, then choosing an efficient format, then setting quality. Doing those three steps together is what batch image processing on a Mac is designed for, and it is how you get files that are both small and sharp.
This guide covers each built-in method, which settings to use, and a repeatable offline workflow for folders of hundreds or thousands of images.
- 1Resize4032 px → 2048 px long side
- 2Choose formatJPEG, WebP or AVIF
- 3Set qualityAbout 80%, or a KB target
- 4Strip metadataDrop EXIF and GPS
How to compress a photo in Preview
Preview is the fastest way to compress one image. Open the file, choose File → Export, set Format to JPEG, and drag the Quality slider to the left. Preview shows the resulting file size under the slider, so you can stop as soon as it is small enough. Click Save to write a new file; the original stays as it was.
To also reduce the dimensions, choose Tools → Adjust Size before exporting. Preview can do this for several images at once if you open them together and select all the thumbnails in the sidebar, but each export still needs its own Save dialog, and resizing overwrites the originals when the window closes.
Preview is ideal for a handful of images. It does not offer WebP or AVIF export, and it has no way to apply one quality setting across a folder. For attachments specifically, follow the steps to shrink photos before emailing them.
Photos, Quick Actions and sips: other free options
Photos on macOS compresses during export. Select the pictures, choose File → Export → Export Photos, set Photo Kind to JPEG, JPEG Quality to Medium or High, and Size to Large or a custom maximum. This works well for sharing a set of iPhone photos, and it converts HEIC to JPEG at the same time.
Finder's Convert Image Quick Action, available on macOS 12 and later, writes smaller copies next to the originals: select images, right-click, choose Quick Actions → Convert Image, and pick a smaller size and JPEG. It does not let you set a quality percentage.
For scripting, sips is built into every Mac. In Terminal, sips -s format jpeg -s formatOptions 75 photo.png --out photo.jpg writes a JPEG at 75% quality, and the same command with *.png and an output folder handles a whole directory. sips is precise and free but has no preview, so test it on copies.
Preview, Photos, sips
Built into macOS
- Free and already installed
- JPEG, PNG and HEIC output; no WebP or AVIF export
- Preview and Photos work best a few files at a time
- No target file size; you check sizes by hand
Operimage Compress
Free Mac app
- Whole folders in one run, keeping the folder structure
- JPEG, WebP, AVIF, PNG, HEIC and more
- Target file size finds the best quality under a budget
- Before/After preview and metadata stripping
Verdict: Use Preview for one-off exports; use a batch compressor when you compress folders regularly or must meet a size limit.
Online compressors vs compressing locally on your Mac
Browser-based compressors are convenient, but every image is uploaded to someone else's server before it comes back smaller. For personal photos, client work, unreleased products or anything with location data, that is an unnecessary risk, and many free web tools also limit file count or size per session.
A local compressor processes files on your own hardware. Operimage, a free Mac app on the Mac App Store, never uploads images; the window shows Local engine active while it works. It is also faster for large folders because nothing has to travel over the network in either direction.
- Privacy: local tools keep files on your Mac; web tools upload them.
- Volume: local batch tools handle thousands of files; web tools often cap uploads.
- Speed: no upload or download time, which adds up on large sets.
- Consistency: the same settings apply to every file, every time.
- Offline use: local compression works on a plane, on a slow hotel connection or on a locked-down office network.
- Metadata control: you decide whether EXIF, camera and GPS data stay in the file instead of trusting a web service to remove it.
How to compress images in batch with Operimage
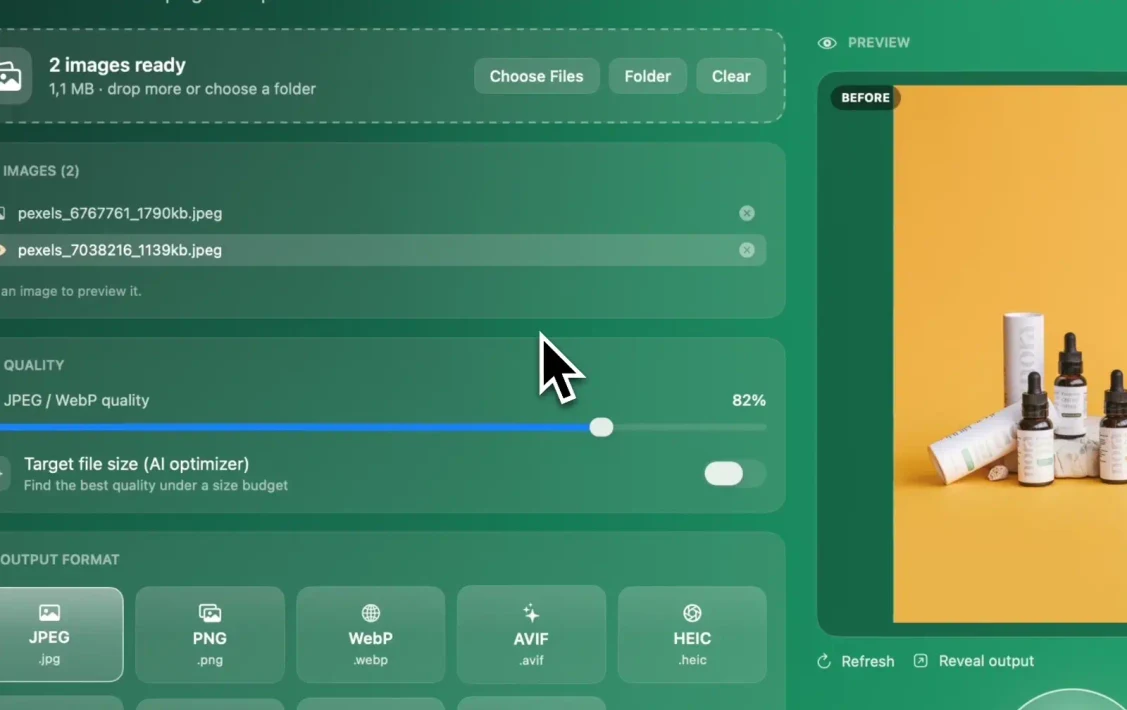
Open Compress in Operimage's sidebar and drop in images or a folder; the status line shows how many are ready. Pick the output format, then either set the quality slider or turn on Target file size, the AI optimizer that finds the best quality under a size budget such as 200 KB. Turn on metadata stripping to remove EXIF and GPS data.
Click any file in the list to compare Before and After, then click Compress. Operimage writes compressed copies without overwriting the originals and can keep the source folder structure, so a catalog organized by product or date comes out organized the same way. Reveal output opens the results in Finder. If you compress the same kind of folder every week, save the steps as a Workflow and rerun it.
What quality setting should you use?
For JPEG photos, a quality between 75% and 85% is the usual sweet spot: files shrink dramatically compared with 100%, and differences are hard to see at normal viewing size. Around 90% is a good choice for images with fine text, logos or product detail. Below about 60%, blocky artifacts and banding in skies and gradients start to appear.
WebP and AVIF use their own quality scales, so the same number does not mean the same result. Start WebP around 75–80% and AVIF lower, then compare at 100% zoom. When a destination has a hard limit, such as a form that rejects files over 200 KB, use target-size compression instead of guessing a percentage.
Starting points for compression
| Use | Format | Quality | Long side |
|---|---|---|---|
| Website photos | WebP or JPEG | 75–82% | 1600–2560 px |
| Email attachments | JPEG | 70–80% | 1200–1600 px |
| Product photos with fine detail | JPEG or WebP | 85–90% | 2000–2048 px |
| Screenshots and UI | PNG or WebP | Lossless or 90% | Native size |
| Archive or print | Original or HEIC | High | Full size |
Which image format compresses best?
JPEG is the universal choice: every browser, app, email client and upload form accepts it. WebP produces noticeably smaller files at similar visual quality and is supported by all current browsers, which makes it the default for websites; the guide to converting JPG to WebP covers the switch. AVIF is usually smaller again, at the cost of slower encoding and patchier support outside browsers. The detailed comparison of AVIF and WebP for the web explains when each is worth it.
PNG is lossless and is the right choice for transparency, screenshots and flat graphics, but it is a poor format for photos, which often end up several times larger than a JPEG. If you have a folder of mixed formats, an image format converter for Mac can normalize them in the same pass.
Typical file size at similar visual quality
Resize before you compress
Compression reduces bytes per pixel; resizing reduces the number of pixels. A 12-megapixel iPhone photo displayed at 1200 pixels wide on a website carries more than ten times the pixels it needs, and no quality setting can make up for that. Cutting the long side to the largest size it will actually be shown is the single biggest saving.
As a rule of thumb, size images for where they appear: about 1200–1600 pixels on the long side for blog and email images, 1920–2560 for full-width website heroes, and 1080 pixels wide for Instagram. Retina screens benefit from roughly twice the CSS display width for key images, but rarely more. Never enlarge a small image to reach a target; that adds kilobytes without adding detail.
Operimage's batch resize tool handles the first step, and a saved Workflow can chain resize and compress so both happen in one run.
Troubleshooting compressed images
If compressed images look wrong or are not as small as expected, the cause is usually one of these.
- Blocky edges or banding: quality is too low. Raise it 5–10 points, or resize smaller and keep quality higher.
- Files barely got smaller: they were already compressed, or they are PNG photos. Convert to JPEG or WebP.
- Transparency turned white or black: JPEG has no alpha channel. Use PNG, WebP or AVIF for transparent images.
- Colors look washed out on the web: export Display P3 photos to sRGB for consistent color in browsers.
- Location still embedded: metadata stripping was off. The guide to removing EXIF and GPS data shows how to check.
- Animated GIF stopped moving: still-image formats keep only one frame. Keep animations as GIF.
A batch-safe compression checklist
Large compression runs fail quietly: one wrong setting can degrade thousands of images before anyone looks. Test on a sample that includes your most detailed images, such as fabrics, hair, text overlays and skies, then run the full set. For website uploads specifically, the walkthrough on preparing images for WordPress adds platform-specific sizes.
Before compressing the full folder
- Images resized to the largest size they will be displayed
- Format chosen for the destination (JPEG, WebP, AVIF or PNG)
- Quality or target file size set and checked at 100% zoom
- Metadata stripping on for anything published
- Output goes to a separate folder; originals kept
- Sample of 10–20 detailed images reviewed first
Step by step
Open Compress and add images
In Operimage, open Compress in the sidebar and drop in images, or use Choose Files or Folder to load a whole directory.
Choose the output format
Keep JPEG for maximum compatibility or pick WebP or AVIF for smaller web files. PNG stays available for images that need transparency.
Set quality or a target file size
Start the quality slider around 80%, or switch on Target file size and enter a budget such as 200 KB to let Operimage find the best quality that fits.
Strip metadata and preview
Turn on metadata stripping to drop EXIF and GPS data, then click a few files to compare Before and After at full size.
Compress and reveal the output
Click Compress, then use Reveal output to open the smaller copies in Finder. Your originals are not overwritten.
FAQ
How do I compress a photo on a Mac?
Open it in Preview, choose File → Export, select JPEG and lower the Quality slider while watching the file size, then save. For many photos, use a batch tool such as Operimage.
Is there a free image compressor for Mac?
Yes. Preview, Photos and the sips command are built into macOS, and Operimage is a free Mac app on the Mac App Store that compresses whole folders offline.
How do I reduce the file size of a JPEG on Mac without losing quality?
Resize it to the size it will be displayed and export at 80–85% quality. The file shrinks a lot while the difference stays hard to see at normal viewing size.
What is the best quality setting for JPEG compression?
75–85% works for most photos. Use around 90% for images with fine text or product detail, and avoid going below about 60%.
Are online image compressors safe?
They upload your files to a third-party server, which is a risk for private or client images. A local Mac app compresses on your computer and keeps files private.
How do I compress multiple images at once on a Mac?
Use the sips command in Terminal or a batch app. In Operimage, drop the folder into Compress, set quality or a target file size, and click Compress.
Does compressing images remove EXIF data?
Not always. Many tools keep EXIF and GPS data unless you turn on metadata stripping, which Operimage offers as an option in Compress.