The quick answer: 1600 px and JPEG 80%
To reduce photo size for email on a Mac, resize each photo so its longest side is about 1600 pixels and save it as a JPG at around 80% quality. A modern phone or camera photo shrinks from several MB to typically a few hundred KB, and it still looks sharp full-screen on a laptop or phone.
For a single message, Apple Mail can do it for you: attach the photos, then use the Image Size menu in the message header to choose Small, Medium or Large. For more control, use Preview's Adjust Size and Export. For a whole folder, a batch tool such as Operimage, a free Mac app, resizes and compresses every photo in one pass and leaves the originals untouched.
Shrinking is one job among many you can automate on a Mac; the guide to batch processing images on Mac shows how resize, compress, convert and rename combine into one repeatable routine.
- 1Original photos24 photos, about 3–6 MB each
- 2Resize and compress1600 px long edge, JPEG 80%
- 3Ready to attachA few hundred KB each
Why photos are too big to email
Phone and camera photos are made for printing and cropping, not for inboxes. A 12-megapixel iPhone photo is 4032 × 3024 pixels, and recent iPhones can capture 48-megapixel images at 8064 × 6048. A laptop screen shows roughly 1500 to 3000 pixels across, so most of those pixels are never seen in an email.
Mail services cap the total size of a message. Gmail allows attachments up to 25 MB per message, other providers set similar limits, and many company mail servers set their own, sometimes as low as 10 MB. Attachments are encoded for sending, which makes them about a third larger in transit, so a message that looks like 20 MB in Finder can exceed a 25 MB limit.
Photos also arrive in formats that are not friendly to every recipient. iPhone photos are HEIC by default, which opens on Apple devices but often not on Windows PCs. If your recipients are on Windows, read why HEIC photos fail on Windows PCs and send JPG.
- 25 MBGmail attachment limit per message
- 10 MBCommon lower limit on company servers
- About +33%Encoding overhead in transit
- 1600 pxLong edge that looks sharp on screen
What size should photos be for email?
The right size depends on what the recipient will do with the photo. Viewing on a screen needs far fewer pixels than printing or editing. The table below gives practical starting points; file sizes are typical ranges for JPG photos and vary with detail, noise and lighting.
If a recipient may print the photos or needs the full-resolution file, do not shrink them at all. Send a link through Mail Drop or a file-sharing service instead, so they get the originals without any inbox limit getting in the way.
Email photo sizes by purpose
| Purpose | Long edge | JPEG quality | Typical size per photo |
|---|---|---|---|
| Quick look on a phone | 1024 px | 75% | About 100–250 KB |
| Viewing on a laptop or monitor | 1600 px | 80% | About 250–600 KB |
| Large screens, client proofs | 2048 px | 85% | About 400 KB–1 MB |
| Forms with a strict KB limit | As needed | Target file size | Fixed budget, e.g. 200 KB |
| Printing or editing | Original | Original | Send via Mail Drop or a link |
Built-in ways to shrink photos for email on a Mac
macOS includes several free ways to make photos smaller. They differ in how much control they give you and how many photos they handle comfortably. All of them run locally, so nothing is uploaded to a resizing website.
- Apple Mail Image Size: attach photos to a new message, then choose Small, Medium, Large or Actual Size from the Image Size menu on the right of the message header. Mail shows the total message size so you can check it before sending.
- Preview: open the photo, choose Tools → Adjust Size, enter 1600 pixels with Scale proportionally ticked, then File → Export as JPEG with the Quality slider. Select several thumbnails in the sidebar to resize them together.
- Photos app: select photos, choose File → Export → Export Photos, set Photo Kind to JPEG, JPEG Quality to Medium or High, and Size to Medium or Custom with a maximum dimension.
- Finder Quick Action: select photos, right-click → Quick Actions → Convert Image, choose JPEG and an Image Size of Small, Medium or Large. Copies are saved next to the originals.
- Terminal: sips -Z 1600 *.jpg resizes every JPG in the current folder so the longest side is 1600 px. It overwrites the files, so run it on a copy.
How to batch shrink photos for email with Operimage
Built-in tools work for a few photos, but a full holiday album, a set of client proofs or a weekly site report quickly becomes repetitive. Operimage handles whole folders in one pass on your Mac, writes new files and never overwrites the originals.
Open Resize and drop the photos or a folder onto the window. Choose Manual resize, set the long edge to 1600 px and use fit so portrait and landscape photos keep their proportions. Press Resize. Then open Compress with the resized photos, choose JPEG output and set quality to about 80%. If a form or mail server has a strict limit, use Target file size, the AI optimizer that finds the best quality under a size budget such as 300 KB.
Turn on metadata stripping so the photos do not carry GPS location, then click Reveal output and drag the files into your message. To run the same steps next time with one click, save resize → compress as a Workflow. The bulk image resizer guide for Mac explains fit and fill in more detail.
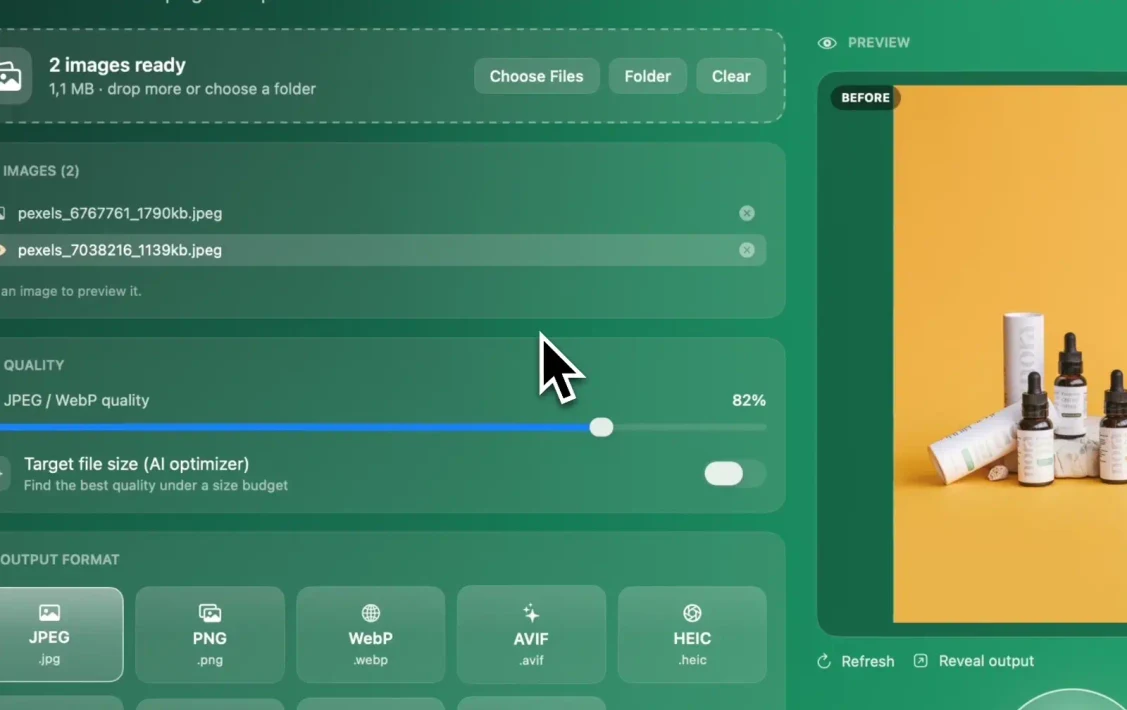
Shrinking to a specific file size
Some destinations care about kilobytes rather than pixels: a school portal that accepts 500 KB, an insurance form with a 2 MB cap, or a mail server that rejects anything over 10 MB in total. For these, a fixed quality setting is guesswork, because a detailed outdoor photo and a plain indoor one compress to very different sizes.
A target-size compressor solves this by trying quality levels until each file fits the budget at the highest quality that still fits. Work out the budget from the limit: for 20 photos and a 10 MB server limit, allow for encoding overhead and aim for about 350 KB per photo. The guide to compressing an image to an exact KB size shows how to choose budgets and when to resize first.
Privacy, formats and other details
A few details make the difference between photos that arrive cleanly and photos that cause follow-up questions.
- Location: iPhone photos record GPS coordinates. Strip them before emailing photos taken at home or at a client's site; the guide to removing EXIF and GPS data on a Mac covers each method.
- HEIC: convert to JPG for recipients on Windows or Android, and for web forms that only accept JPG or PNG.
- Screenshots: keep them as PNG if they contain text, or convert to JPG if they are mostly photos; PNG text stays crisper.
- File names: rename photos with a clear prefix such as kitchen-01.jpg so the recipient can refer to them.
- Order: email apps generally show attachments in the order you add them, so add them in the order you want them read.
Troubleshooting: still too big, or blurry after shrinking
Most problems after resizing come from a setting that did not apply or from shrinking further than the photo can take. Check the real dimensions and file size in Finder with Get Info before attaching, so you know what the recipient will receive.
- Message still too large: count the total, not the per-photo size. Twenty photos at 1 MB each is already 20 MB before encoding; drop to 1600 px or split the set into two emails.
- Files barely smaller: the export may have kept the original pixel size or used maximum quality. Confirm the long edge is 1600 px and quality is around 80%.
- PNG instead of JPG: photos exported as PNG stay large. Export photos as JPEG and keep PNG for screenshots with text.
- Photos look soft: 1024 px is small on a large monitor. Use 1600 or 2048 px for anything viewed on a laptop or desktop screen.
- Blocky skies or gradients: quality below about 70% shows banding. Raise quality and reduce pixel size instead.
Checklist before you hit Send
Run through this list once per batch. It takes less than a minute and avoids bounced messages and missing photos.
Email-ready photos
- Long edge about 1600 px, or 2048 px for proofs
- JPG at about 80% quality, or a target KB size
- Total message under about 15 MB, or less for strict company servers
- GPS location stripped
- HEIC converted to JPG for non-Apple recipients
- Originals kept, or shared by link if needed
Step by step
Load the photos into Resize
In Operimage, choose Resize in the sidebar and drop the photos onto the window, or click Folder to load an album.
Set the long edge to 1600 px
Under Manual resize, set the size to 1600 px on the long edge with fit, so portrait and landscape photos both keep their shape. Press Resize.
Compress to JPEG at about 80%
Open Compress with the resized photos, choose JPEG output and set the quality slider to about 80%, or use Target file size for a fixed KB budget.
Strip location data
Turn on metadata stripping so GPS coordinates and camera details are not sent with the photos.
Reveal output and attach
Click Reveal output, select the new files in Finder and drag them into your email. Save the steps as a Workflow to reuse next time.
FAQ
How do I reduce the size of a photo to email on a Mac?
Attach it in Apple Mail and choose a smaller option from the Image Size menu, or open it in Preview, use Tools → Adjust Size, then export as JPEG. For many photos, use a batch resizer.
What size should a photo be for email?
About 1600 pixels on the long edge at JPEG 80% is sharp on screens and usually a few hundred KB. Use the original size only when the recipient needs to print or edit the photo.
How many photos can I email at once?
It depends on the total size. Gmail allows 25 MB per message, so at about 400 KB each you can send roughly 30 to 40 resized photos; other services may allow less.
Why is my email too large to send with photos?
Full-size phone and camera photos are several MB each, and attachments grow by about a third when encoded. Resize the photos or send them with Mail Drop.
Does Apple Mail compress photos automatically?
Apple Mail sends photos at their original size unless you choose Small, Medium or Large in the Image Size menu for that message.
What is Mail Drop?
Mail Drop is an Apple Mail feature that uploads large attachments to iCloud and sends a download link. It supports files up to 5 GB, and links expire after 30 days.
Does resizing a photo reduce its quality?
It reduces resolution, not visible quality on screen. A 1600 px photo looks the same as the original in an email, but it is not suitable for large prints.