How to remove backgrounds on a Mac without uploading
You can remove image backgrounds on a Mac entirely offline in two ways. For a single image on macOS Ventura (13) or later, right-click the file in Finder and choose Quick Actions → Remove Background; macOS saves a new transparent PNG next to the original. For a folder of images, use an app that runs the segmentation model on your Mac, such as Operimage, a free Mac app that removes backgrounds in batches with nothing leaving the machine.
Most background removers on the web work by uploading each photo to a server, running the AI there, and sending the cutout back. That is convenient for one picture, but it adds upload and download time for every file, often caps how many images you can process, and puts client photos, unreleased products or personal pictures on someone else's server. On-device processing removes all three problems because the model runs on your Mac's own processor.
Background removal is usually one step in a larger job: cut out the subject, then resize, convert, compress or watermark the result. If you are planning that whole chain, the guide to batch image tools for Mac shows how the steps fit together so you only handle the files once.
- 1Product folder120 photos on a gray backdrop
- 2Remove backgroundSmart mode, default edges
- 3Preview check5–10 images at 100% zoom
- 4Transparent PNGNew files; originals untouched
Built-in macOS options: Finder, Preview, Photos and Instant Alpha
macOS already includes an on-device subject-lifting model, and for occasional cutouts it is often all you need. The automatic options below arrived with macOS Ventura (13) and are available in later versions too. They are fully automatic: there is no quality mode, no edge setting and no way to tell the model which object you meant if it picks the wrong one.
Preview's older Instant Alpha tool is the manual fallback and works on earlier macOS versions as well. It selects pixels by color similarity rather than by recognizing the subject, so it works well on flat, evenly lit backdrops and poorly on photos with gradients, shadows or busy scenes.
- Finder Quick Action: right-click an image, choose Quick Actions → Remove Background, and a new PNG with a transparent background is saved beside the original.
- Preview: open the image and choose Tools → Remove Background (Shift-Command-K). Save or export as PNG to keep the transparency.
- Photos: Control-click a photo and choose Copy Subject, then paste the subject into another app. This copies the subject to the clipboard rather than creating a file.
- Instant Alpha in Preview: click the Markup toolbar, choose the Instant Alpha wand, drag across the background until it is highlighted, then press Delete. Preview offers to convert JPEGs to a format that supports transparency.
- Limits of the built-in tools: one image at a time in most cases, no control over edges, and no preview of a whole batch before files are written.
Finder / Preview Remove Background
One-off cutouts
- Built into macOS Ventura and later
- Fully automatic, no settings
- Best for a handful of clear subjects
- No batch preview or quality modes
Operimage Remove background
Folders and catalogs
- Works on macOS 12 or later, Apple Silicon and Intel
- Smart, Fast, Balanced and Best quality modes
- Edge detail options including hair/fabric
- Before/After preview for every image in the batch
Verdict: Use the built-in Quick Action for a few images; switch to a batch app once you are cutting out a whole folder or need to tune edges.
What on-device AI handles well, and where it struggles
Every automatic background remover, local or cloud, works the same way: a segmentation model predicts for each pixel whether it belongs to the subject, producing a mask with soft values at the edges. The mask is excellent when the subject has a clear outline and good contrast, and it degrades when the boundary itself is ambiguous. Knowing which side of that line your images fall on tells you how much manual review a batch needs.
Being honest about the limits saves time. Fine hair against a busy background is still the hardest case: individual strands mix subject and background colors in the same pixel, so the model has to guess and often either clips the flyaways or leaves a tinted halo. Glass, clear plastic and liquids are hard because the background genuinely shows through them, and a correct result needs partial transparency that most cutouts flatten. Low-contrast scenes, such as a white product on a white sweep or a black jacket in shadow, give the model too little edge information to work with.
The practical fix is upstream: shoot on a plain backdrop with some separation between the subject and the background, light the edges, and avoid backdrops that match the product color. A five-minute change to the shooting setup improves every cutout in the batch more than any setting does after the fact.
How automatic cutouts typically handle common subjects
| Subject | Typical result | What to check |
|---|---|---|
| Boxes, bottles, electronics on a plain backdrop | Clean and reliable | Contact shadows at the base |
| People against a plain wall | Good | Hair outline and gaps between arms and body |
| Fine or curly hair against a busy background | Often imperfect | Missing strands, halos, background color in hair |
| Knitwear, fur, plush toys | Good with hair/fabric edge detail | Fuzzy edges turning hard or blotchy |
| Glass, clear plastic, liquids | Frequently wrong | Background visible through the object, or object removed |
| Low contrast (white on white, dark on dark) | Unreliable | Edges eaten into the subject or background left behind |
Which quality mode and edge setting should you use?
Operimage's Remove background tool has four quality modes and separate edge detail options. The quality mode controls how much effort the model spends on the mask; the edge setting controls how soft, semi-transparent boundaries such as hair and fabric are treated. Choosing both by subject type, rather than using one setting for everything, is the single biggest factor in cutout quality.
Speed differs between modes and between Macs; Apple Silicon Macs generally process faster than older Intel models. If a batch is large, run your test images in Best and in Balanced and compare them side by side: if you cannot see a difference at 100% zoom, the faster mode is the right choice for that set.
- Smart: the default starting point; it suits most mixed folders and is the setting to test first.
- Fast: quick drafts and simple, hard-edged products on clean backdrops, where edge detail matters least.
- Balanced: a middle ground for mixed catalogs that combine products and people.
- Best: portraits, pets, detailed products and anything where the edges will be seen up close.
- Hair/fabric edge detail: turn it on for people, animals, knitwear, fur and feathers; leave it off for boxes, bottles and electronics, where a crisp outline looks cleaner.
- Mixed folders: split the images into subfolders by subject type and run each with its own settings instead of compromising on one.
How to batch remove backgrounds from multiple images on Mac
A batch cutout is less forgiving than a batch format conversion, because a weak mask is a visible defect rather than a few extra kilobytes. The workflow below keeps the review step small and puts it before the long run, not after.
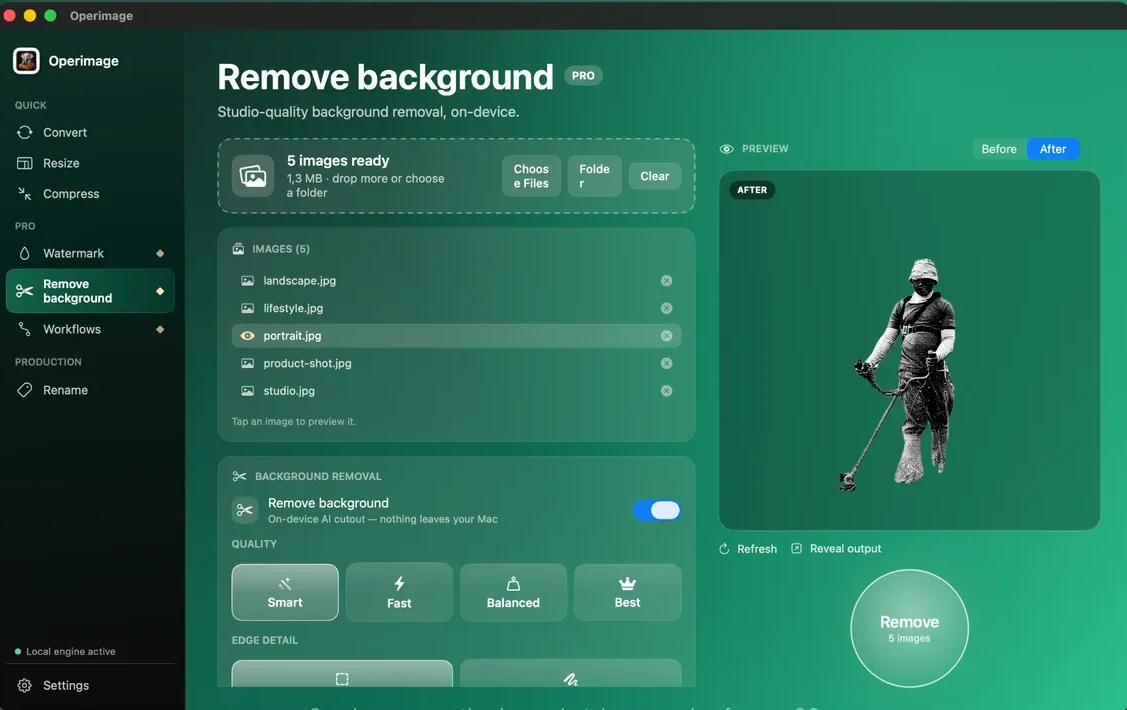
Start by choosing Remove background in the Operimage sidebar and loading your files or a folder; the header confirms how many images are ready. Pick 5 to 10 images that represent the hardest cases in the set (the curliest hair, the shiniest product, the lowest contrast) and click through them in the Before/After preview. Adjust the quality mode or edge detail until those look right, then run the whole folder with Remove. When it finishes, Reveal output opens the results in Finder.
Because Operimage writes new files and leaves your originals in place, a bad mask is never destructive. Sort the outputs by eye, move the few failures into a separate folder, and rerun just those with a higher quality mode or fix them by hand. Re-running only the failures is far faster than re-running the whole batch.
Before you run a full cutout batch
- Split subjects that need different settings into separate folders
- Test the hardest 5–10 images at 100% zoom
- Check edges on both a light and a dark background
- Choose PNG or WebP so transparency is kept
- Confirm originals stay untouched and outputs go to a new location
- Plan resize, compression or watermark steps for after the cutout
Which format to export: transparent PNG, WebP, or a white background
A cutout is only useful if the format keeps the transparency. PNG is the safest choice for design handoff, print layouts and anything a designer will open in another app, because every editor reads PNG alpha channels correctly. WebP also supports transparency and produces much smaller files, which makes it a good choice for websites; the guide on how to turn transparent PNGs into WebP covers the quality settings.
JPEG has no alpha channel, so a cutout saved as JPEG gets a solid fill wherever the background used to be. That is exactly what you want for marketplaces that require a plain white background, but it should be a deliberate choice, made after the cutout is approved. For storefront rules such as Amazon's pure white main image, see the Amazon product photo requirements guide, and check Seller Central for the current limits, which change from time to time.
If you need both versions, keep the transparent PNG as your master and derive JPEG or WebP copies from it. That way a later change of background color never means cutting the subject out again. The step-by-step for flattening transparent files is in the guide to converting PNG cutouts to JPG.
- Design handoff and print: transparent PNG.
- Website product images and overlays: transparent WebP for smaller files.
- Marketplaces that require white: flatten an approved cutout onto white and export JPEG.
- Archive: keep the original photo plus the transparent PNG master.
How to fix halos, fringes and missing pieces
Most cutout problems fall into a few recognizable patterns, and each has a specific fix. Look for them at 100% zoom on a background color that contrasts with the subject's edge: a white product will hide a light halo on a white page and reveal it on dark gray.
When a batch has a consistent problem, fix the cause rather than the symptom. A halo on every image usually means the backdrop color is spilling onto the subject edges during the shoot; fixing the lighting fixes the next hundred images, while retouching only fixes this batch.
- Light or colored halo: the backdrop color is mixed into edge pixels. Try a higher quality mode, and for future shoots add distance between subject and backdrop.
- Hair clipped into a helmet shape: turn on hair/fabric edge detail and use Best; for hero images, finish the flyaways by hand in an editor.
- Holes in the subject: usually low contrast, such as a white logo on a white backdrop. Re-shoot on a contrasting backdrop or repair the mask manually.
- Background left between arms, handles or straps: the model treated the enclosed gap as part of the subject. Check gaps on every image with handles or loops.
- Glass or clear packaging removed or opaque: automatic cutouts rarely handle transparency correctly; plan to retouch these by hand.
- Floating products with no shadow: the cutout removes the natural contact shadow. Add a soft shadow in your layout tool if the product looks pasted on.
What to do after the cutout
Background removal works best as the first step in a short chain. Cut out first, at full resolution, so the model has the most detail to work with; then resize, convert and compress the approved cutouts. Resizing before removal throws away the edge detail the model needs, and compressing before removal adds artifacts that the mask can mistake for edges.
For storefronts, the usual next step is resizing to the platform's square or portrait frame; the guide to resizing product photos for Shopify covers the common sizes. If the cutouts are portfolio or stock images you will share publicly, add a mark afterward with batch watermarking so the watermark sits on the final composition rather than on a background you are about to delete.
If you are comparing this approach with web services, the trade-offs are covered in more depth in the guide to an offline alternative to online image tools. For a small number of clear subjects, either route produces similar results; the difference shows up in volume, privacy and how much control you have over edges.
Step by step
Open Remove background and add your images
Choose Remove background in the Operimage sidebar, then drop files or click Folder to load a whole shoot or product set.
Pick a quality mode
Start with Smart. Use Fast for quick drafts of simple products, Balanced for mixed sets, and Best for portraits or detailed subjects.
Set edge detail for the subject
Turn on the hair/fabric edge detail option for people, pets, knitwear and fur; leave the default for hard-edged products like boxes and bottles.
Check the Before/After preview
Click several images in the list and inspect edges at 100% zoom, especially hair, transparent parts and areas with low contrast.
Remove and reveal the output
Choose transparent PNG or WebP, click Remove, then use Reveal output to open the cutouts in Finder. Originals are not overwritten.
FAQ
How do I remove a background from a picture on a Mac for free?
On macOS Ventura or later, right-click the image in Finder and choose Quick Actions → Remove Background, or open it in Preview and choose Tools → Remove Background. Both run on your Mac and save a transparent PNG.
Can I remove backgrounds from multiple images at once on a Mac?
The built-in macOS options are designed around single images. A batch app such as Operimage loads a whole folder, lets you preview every cutout, and exports all of them in one run on your Mac.
Does background removal on a Mac work offline?
Yes. The Finder, Preview and Photos options and Operimage all run the AI model on the Mac itself, so no internet connection is needed and no image is uploaded.
Why does the cutout look bad around hair?
Fine strands mix subject and background colors in the same pixels, especially against busy backgrounds. Use a hair/fabric edge setting and the highest quality mode, and shoot against a plain, contrasting backdrop when you can.
Can AI remove the background from glass or transparent objects?
Usually not well. Automatic cutouts tend to make glass fully opaque or remove parts of it, so transparent products generally need manual retouching.
What format keeps a transparent background?
PNG and WebP both keep transparency. JPEG does not, so transparent areas are filled with a solid color when a cutout is saved as JPEG.
What is Instant Alpha in Preview?
Instant Alpha is a manual tool in Preview's Markup toolbar that selects and deletes areas of similar color. It works well on flat, evenly colored backgrounds and poorly on complex scenes.