
What size should Shopify product images be?
Shopify recommends square product images of 2048×2048 px. That size gives themes enough resolution for zoom and full-screen galleries while staying far below Shopify's upload ceiling of 20 MB and 20 megapixels. Shopify then generates smaller versions for collection grids, cart thumbnails and mobile screens automatically, so you only upload one size per photo.
The second half of the answer is consistency. Every product in a collection should use the same ratio and similar framing, because product cards sit side by side and differences jump out. This guide covers the resizing and cropping part of that job; the wider pipeline for compression, color and metadata lives in the e-commerce image optimization hub.
- Shopify product (recommended)2048 × 2048 · 1:1
- iPhone photo, 12 MP4032 × 3024 · 4:3 source
- Small square (too low for zoom)800 × 800 · avoid as master
Why square images keep a Shopify store looking consistent
Most Shopify themes lay out collection pages as a grid of product cards. Many, including Shopify's free Dawn theme, let you set the card image ratio to square, portrait or adapt to image. With adapt, mixed photo shapes produce cards of different heights; with a fixed ratio, the theme crops or letterboxes photos that do not match. Either way, mismatched uploads look uneven.
Exporting every product photo at the same ratio removes the problem at the source. Square is the safest default because it matches Shopify's recommendation, works in most themes and suits most product shapes. If your theme is set to portrait cards, export at that ratio instead, and keep it fixed for the whole store.
Framing matters as much as dimensions. Aim for the product to fill a similar share of the frame on every image, with a similar margin, so a small ring and a large bag both read clearly at thumbnail size.
Fit or fill: how to resize without cutting off the product
When the source photo is not already square, resizing to 2048×2048 forces a choice. Fill scales the photo until it covers the whole square and crops whatever overflows, so a 4:3 landscape photo loses some of its left and right edges. Fit scales the photo so the entire image fits inside the box, so nothing is cropped, but the result keeps the photo's original shape rather than becoming a true square.
Fill is the right choice when products were shot centered with generous background around them, which is the case for most studio and tabletop photography. Fit is the safer choice for items that touch the edges of the frame, or when you will place the result on a square canvas later. When in doubt, preview the tallest and the widest product in the batch before running it.
Fill
Exact square
- Output is exactly 2048 × 2048
- Crops overflow from the long side
- Needs margin around the product
Fit
Nothing cropped
- Whole photo is kept
- Longest side scales to the target
- Output keeps the source ratio
Verdict: Use fill for centered studio shots; use fit when the product reaches the edges.
Shoot for the square to avoid crop problems
The easiest way to get clean squares is to plan for them at capture. Phones shoot 4:3 by default, and a square crop removes a quarter of the long side, so place the product in the middle of the frame and leave space on both sides. Many camera apps, including the iPhone Camera app, can also shoot in a square 1:1 format directly.
Keep the camera distance and zoom the same across a product line so items appear at a consistent scale, and use the same background throughout. If a series was shot on an inconsistent backdrop, an offline background remover for Mac can cut products out so you can place them on a uniform color before resizing.
- Center the product: the square crop trims the long edges equally.
- Leave roughly 10–15% margin on every side so fill never touches the product.
- Lock focal length and distance per product line for consistent scale.
- Shoot at full resolution; downscaling is safe, upscaling is not.
Do variant, detail and lifestyle shots need the same size?
Every image in a product's gallery should share the same ratio, because themes show the gallery in one frame and switch between images in place; a landscape lifestyle shot between square packshots makes the frame jump or crop. Keep variant photos, close-up details and lifestyle scenes at the same 2048×2048 square as the main image.
What changes between roles is framing, not size. Detail crops should be cut from the full-resolution master so the close-up still has 2048 px of real detail, and lifestyle scenes need their subject centered so the square crop keeps it. Variant images benefit from identical camera position, so switching color in the variant picker looks like the same product changing color rather than a new photo.
Resize settings by gallery role
| Image role | Output size | Suggested mode | Framing tip |
|---|---|---|---|
| Main product photo | 2048 × 2048 | Fill | Centered, consistent margin |
| Variant color | 2048 × 2048 | Fill | Same camera position as main |
| Detail close-up | 2048 × 2048 | Fill | Crop from the full-size master |
| Lifestyle scene | 2048 × 2048 | Fill or fit | Subject in the middle third |
| Size chart or graphic | Theme-dependent | Fit | Never crop text |
How to resize Shopify product images on Mac with built-in tools
Preview on macOS can resize several images at once: select the photos in Finder, open them together in Preview, select all thumbnails in the sidebar, then choose Tools › Adjust Size and enter a width. Preview resizes proportionally, so it only produces 2048×2048 if the originals are already square, and it saves over the originals unless you export copies.
The sips command in Terminal is faster for big folders. A command such as sips -Z 2048 *.jpg scales each image so its longest side is 2048 px, and sips can also crop to a fixed size, but it modifies files in place unless you add --out with a destination folder, so always work on copies.
Both approaches are fine for tidy, already-square sources. For mixed shapes, a Before/After preview and exact square output in one step save a lot of trial and error.
Batch resizing Shopify photos in Operimage
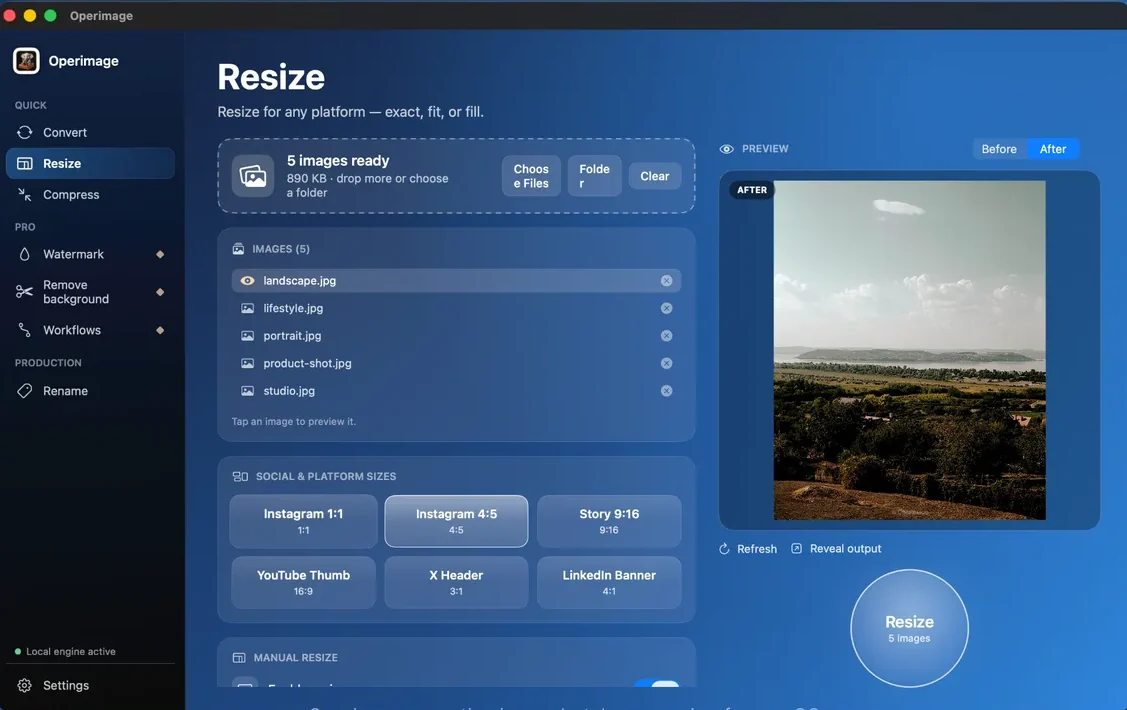
Operimage, a free Mac app, resizes whole folders on-device. Drop the product folder onto the Resize tool, ignore the Social & platform sizes presets (they target Instagram, YouTube, X and LinkedIn) and open Manual resize. Enter 2048 for width and height, choose fill or fit, then click through a few images in the list to check the Before/After preview.
Press Resize and the batch is written to a separate output, with the source folder structure kept if you want it, and Reveal output opens the result in Finder. For background on resizing folders in general, including very large ones, see the guide to batch resizing photos on a Mac.
If your masters are organized one folder per product, keep that structure in the output so each product's resized gallery stays together, ready to drag into its Shopify product page. Because processing is on-device, a catalog of several thousand photos never has to be uploaded to a web service before it reaches Shopify, and the status line shows how many images are queued before you start.
Resize first, then compress and rename
Resizing is one step of three. After the square export, compress the files to a sensible budget, usually a few hundred KB for a 2048 px JPG at around 80% quality, and strip EXIF and GPS data. Format choice, compression budgets and color conversion for Shopify are covered in the guide to optimizing Shopify images on Mac.
Finally, rename the output so each file maps to its product, for example canvas-tote-natural-01.jpg. The guide to SKU-based filenames for product photos has patterns for variants and gallery order. In Operimage you can save resize, compress and rename as one Workflow and rerun it for every new product drop.
- 1MastersFull-resolution JPG or HEIC
- 2Resize2048 × 2048, fill or fit
- 3CompressJPG ~80%, metadata stripped
- 4RenameShopify pack, product-handle names
Selling on other channels too
A 2048 px square also clears Amazon's 1000 px zoom minimum, so the same export often works there, provided the main image sits on a pure white background. Etsy is different: it shows listing photos at 4:3 in search and recommends at least 2000 px on the shortest side, so a separate landscape export usually looks better. The guide to Etsy listing photo dimensions covers that crop.
Keep each channel's export in its own folder, derived from the same masters, rather than resizing a resized copy. Every resize from an already-reduced file loses a little more detail.
Troubleshooting resized Shopify images
Most resize problems show up only after upload, when the image sits next to others in a grid. These are the common ones and their fixes.
- Product cut off at the edges: fill cropped a photo with too little margin. Switch that product to fit or reshoot with more space.
- Cards of different heights: some exports are not square, or the theme is set to adapt to image. Re-export at one ratio and set the theme to match.
- Soft or pixelated zoom: the source was smaller than 2048 px and was upscaled. Use the original full-resolution file.
- Product looks tiny in the card: the item fills too little of the frame. Crop tighter on the master before resizing.
- Files are still large after resizing: resizing reduces pixels, not compression. Run a compression step at around 80% quality.
Step by step
Drop the product photos into Operimage
Drag a folder onto the Resize tool or click Folder. Keep products with unusual shapes, such as very tall or very wide items, in a separate folder.
Open Manual resize and enter 2048 × 2048
Skip the social presets and use Manual resize with an exact width and height of 2048 px, or the ratio your theme uses.
Choose fit or fill
Choose fill for an exact square when products have margin around them, or fit when nothing may be cropped.
Check the Before/After preview
Click several images in the list, including the tallest and widest products, and confirm nothing important is trimmed.
Resize and reveal the output
Press Resize, then use Reveal output to open the new folder in Finder. Originals stay untouched unless you chose to overwrite them.
Save it as a Workflow
Add compression and Shopify renaming, then save the chain as a Workflow so the next product drop is resized identically.
Ways to resize Shopify product images on Mac
| Path | Batch resize | Exact square output | Catalog-safe export | Best fit |
|---|---|---|---|---|
| Preview (Adjust Size) | Yes, proportional only | Only if source is square | Overwrites unless exported | A few already-square photos |
| Terminal sips | Yes | Longest side only by default | Edits in place unless --out | Users comfortable with commands |
| Browser resizer | Medium | Varies | Low | Quick one-off uploads |
| Operimage Resize | Yes, whole folders | Yes, fit or fill | Separate output, preview first | Repeatable Shopify catalog preparation |
FAQ
What size should Shopify product images be?
Shopify recommends 2048×2048 px square images. That size supports zoom in most themes and Shopify generates the smaller versions for grids and thumbnails automatically.
Do Shopify product images have to be square?
No, but square is recommended and is what most themes expect. Whatever ratio you choose, use the same one for every product so collection grids stay aligned.
How do I make all my Shopify product images the same size?
Resize every photo to the same exact dimensions, such as 2048×2048, in one batch from full-resolution masters, and use the same framing and margin when shooting.
Will resizing to a square crop my product?
With fill, the long sides of a non-square photo are trimmed, so leave margin around the product. With fit, nothing is cropped, but the output keeps the original ratio.
Can I resize product photos in Preview on Mac?
Yes. Open several images in Preview, select them all and use Tools › Adjust Size. Preview resizes proportionally, so it only gives exact squares when the originals are already square.
Should I upscale small product photos to 2048 px?
Upscaling does not add real detail, so a small photo stays soft at 2048 px. Use the largest original you have, or reshoot the product at full resolution.