The quickest way to convert HEIC to JPG on a Mac
The quickest built-in way to convert HEIC to JPG on a Mac is Finder: select the photos, right-click, choose Quick Actions → Convert Image, set Format to JPEG and click Convert to JPEG. Finder saves a JPG copy next to each original. It works on macOS Monterey and later and needs no app.
For one photo where you want control over quality, open it in Preview, choose File → Export, set Format to JPEG and drag the Quality slider. For a folder of hundreds or thousands, use a batch converter such as Operimage, a free Mac app that converts locally, keeps folder structure and never overwrites the originals.
Every method on this page runs on your Mac, so your photos are never uploaded. If you are still deciding between JPG, PNG and WebP, start with the overview of HEIC converters for Mac, which compares all the output formats.
- 1HEIC folder412 iPhone photos, 1.9 GB
- 2Convert to JPEGQuality 82%, GPS stripped
- 3JPG folderSame structure, originals kept
Why iPhone photos are HEIC, and why you convert them
Since iOS 11, iPhones save photos as HEIC (High Efficiency Image Container) by default. HEIC stores a picture in roughly half the space of a JPG at similar quality, which matters when a phone holds tens of thousands of photos.
Outside Apple devices, support is patchy. Many web forms, marketplaces, print services, email recipients on Windows and older design tools still reject HEIC or show a blank icon. JPG has none of those problems: it has been the universal photo format for decades and opens everywhere.
Converting therefore trades some disk space for compatibility. That is a good trade for anything leaving your Mac, and a bad one for your archive, which is why the standard advice is to keep the HEIC originals and convert copies. Sending the photos to someone on a PC? See how to make iPhone photos open on Windows.
Five ways to convert HEIC to JPG on macOS
Each method below is free and works offline. They differ in how many files they handle comfortably and how much control you get over quality, naming and metadata.
- Finder Quick Action: select files, right-click → Quick Actions → Convert Image → JPEG. Choose Small, Medium, Large or Actual Size, and tick or untick Preserve Metadata. Fast, but no quality slider and copies land next to the originals.
- Preview: open the HEIC, File → Export, Format JPEG, set Quality. To convert several, open them together, select all thumbnails in the sidebar, then File → Export Selected Images.
- Photos app: select photos, File → Export → Export Photos, set Photo Kind to JPEG, pick JPEG Quality and Size, and untick Location Information if needed. Applies your Photos edits.
- Terminal with sips: sips -s format jpeg -s formatOptions 82 IMG_4021.HEIC --out IMG_4021.jpg converts one file at 82% quality; wrap it in a for loop to convert a folder.
- Operimage: drop a folder into Convert, pick JPEG, set quality once, preview, then convert hundreds or thousands of photos with folder structure kept and optional metadata stripping.
Which HEIC to JPG method fits your job
| Method | Comfortable batch size | Quality control | Metadata control | Best for |
|---|---|---|---|---|
| Finder Quick Action | Up to a few dozen | Size presets only | Preserve on or off | Quick one-off selections |
| Preview | One to a few dozen | Quality slider | None | A single photo you want to tune |
| Photos export | Albums of any size | Low to Maximum | Location on or off | Edited photos in your library |
| sips in Terminal | Unlimited | Exact percentage | Manual | Scripted, repeatable jobs |
| Operimage | Thousands | Quality slider with preview | Strip EXIF and GPS | Large folders and recurring batches |
How to batch convert HEIC to JPG with Operimage
Batch conversion is where the built-in tools start to strain. Finder writes copies into the source folder, Preview gets slow with hundreds of open files, and a Terminal loop gives you no visual check. A batch app is built for the case where a photo shoot, a phone backup or a client delivery arrives as one big folder.
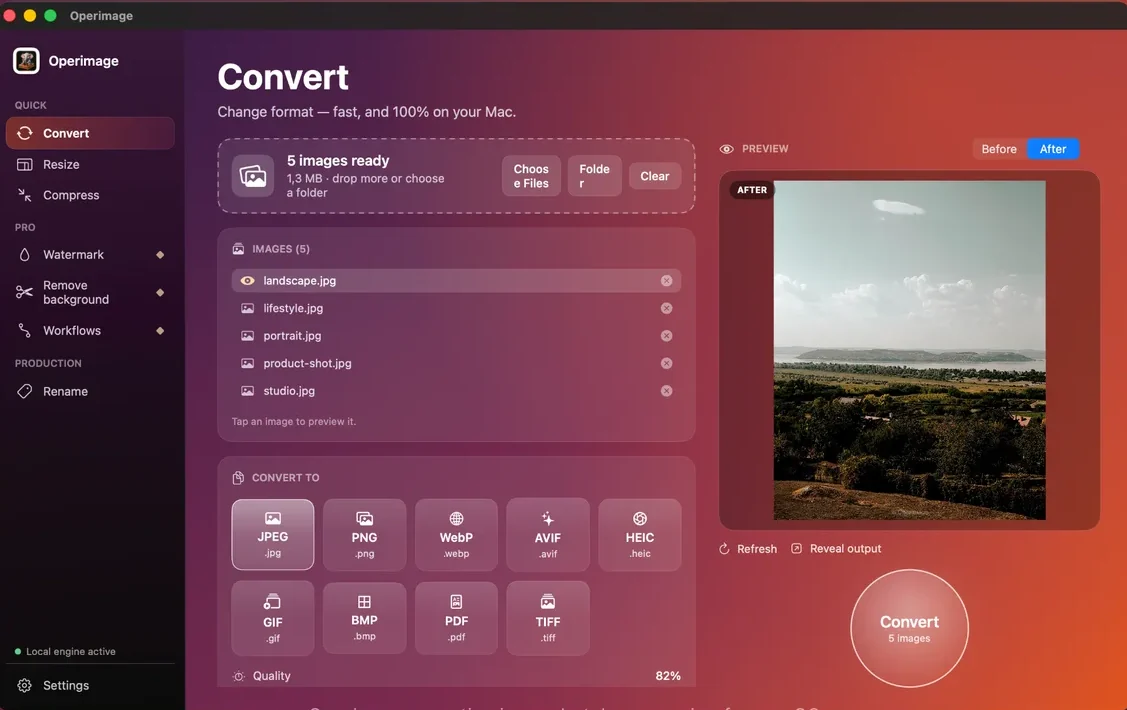
In Operimage, open Convert and drop the photos onto the window, or click Folder to load a whole directory including subfolders. The status line confirms how many images are ready. Choose JPEG, set the quality slider, click a photo in the list to check the Before/After preview, and press Convert. Reveal output opens the results in Finder.
The app runs entirely on your Mac and shows Local engine active while it works, so nothing is uploaded. It can keep the source folder structure, which matters when photos are organized by date or event, and it does not overwrite your originals unless you tell it to. Similar habits apply to any mixed batch, as covered in the guide to batch converting mixed image folders.
Converting HEIC to JPG with Terminal or Shortcuts
If you are comfortable with Terminal, sips (scriptable image processing system) ships with every Mac and converts HEIC without installing anything. To convert every HEIC in the current folder into a JPG at 82% quality, run: for f in *.HEIC; do sips -s format jpeg -s formatOptions 82 "$f" --out "${f%.*}.jpg"; done. Note that iPhone files often use the uppercase .HEIC extension, and the pattern is case-sensitive in many shells.
The Shortcuts app offers the same idea with a visual editor: a shortcut that receives images from Finder, runs Convert Image to JPEG and saves the result can be added to the Quick Actions menu. Both approaches are free and repeatable once set up, but they give you no before/after view, no progress you can easily inspect, and nested subfolders need extra scripting. They suit people who run the exact same job every week; a batch app suits people who want to see what they are doing.
What JPG quality setting should you use?
JPG quality is a trade between file size and fine detail. For iPhone photos, 82% is a reliable default: at normal viewing sizes it is indistinguishable from the HEIC, and the files stay reasonably small.
Raise quality to 88–92% for product photos, portfolio pieces, hero images and anything that will be printed, where smooth gradients such as skies and skin tones benefit from the extra data. Go down to 70–75% only for thumbnails or when a hard upload limit forces it. Above about 95% the file grows quickly for almost no visible gain.
If a destination imposes a hard limit such as 1 MB or 500 KB, resizing usually helps more than cutting quality: a 4032 × 3024 photo resized to 2000 pixels wide holds about a quarter of the pixels. When you need an exact ceiling, a size-budget compressor finds the highest quality that still fits.
82% quality
Everyday default
- No visible difference at normal size
- Good for email, social and marketplaces
- Noticeably smaller than 90%
90% quality
Hero and print
- Cleaner gradients in skies and skin
- Safer for zoom-heavy product pages
- Larger files; check upload limits
Verdict: Start at 82% and raise quality only for images where people will look closely.
Does converting HEIC to JPG keep EXIF and GPS data?
Usually, yes. Preview, Photos and most converters copy the EXIF block into the JPG, including camera model, capture time and, if location services were on, the GPS coordinates where the photo was taken. Anyone who downloads the file can read those coordinates.
For public photos, strip the metadata during conversion. Untick Preserve Metadata in Finder's Convert Image, untick Location Information in the Photos export, or turn on metadata stripping in Operimage. For your private archive, keep the metadata: capture dates and locations are what make an old library searchable. The guide to clearing EXIF and location data on Mac covers every method in detail.
Keeping colors, orientation and file names right
iPhone photos are tagged with the Display P3 color profile, a wider gamut than the sRGB most of the web assumes. Good converters keep that profile in the JPG, and modern browsers display it correctly. Problems appear when a site or app strips the profile, which can make reds and greens look duller. If you see that, convert those specific images to sRGB before uploading.
Orientation is stored as an EXIF flag on many photos. Older software that ignores the flag shows portrait shots sideways. After converting, open one portrait photo in a different app to confirm it is upright.
iPhone file names such as IMG_4021.HEIC become IMG_4021.jpg. Keep them if you need to match files back to the originals; otherwise rename the batch into something descriptive. If the photos are heading to a website, resizing at the same time saves bandwidth, and the batch resizing walkthrough shows how to apply one long-edge size to a whole folder.
Check these on a 10-photo sample first
- A low-light photo shows no blocky noise at 100% zoom
- A portrait-orientation photo opens upright in another app
- Reds, greens and skin tones match the original
- GPS is gone if the photos are going public
- JPGs landed in the expected folder with sensible names
Troubleshooting HEIC to JPG problems
Most conversion problems come from iCloud downloads, color profiles, size expectations or data that JPG simply cannot hold.
- Some files will not convert: photos stored in iCloud with Optimize Mac Storage may only be placeholders. Download the originals in Photos first, or export from Photos directly.
- JPGs are bigger than the HEIC files: that is expected. Lower quality slightly, resize, or use a target file size if space matters.
- Colors look washed out after upload: the destination stripped the Display P3 profile. Convert to sRGB for that destination.
- Live Photos lost their motion: only the still is converted. The video is a separate MOV file with the same name; keep it alongside.
- Portrait blur cannot be changed any more: depth data is not stored in a JPG. Keep the HEIC if you may want to edit the blur later.
- Duplicates such as IMG_4021 and IMG_4021 (1): you converted the same folder twice into the same place. Use a dedicated output folder for each run.
When WebP is a better target than JPG
If the photos are going onto a website you control, consider WebP instead. It is typically around 25–35% smaller than JPEG at similar visual quality, and every current major browser supports it. The HEIC to WebP guide covers settings and caveats.
For email, marketplaces, print services, clients on unknown devices or anything you cannot test first, JPG remains the safer default. Choose the format for the receiving system, not for the smallest possible number.
Step by step
Open Convert and add the HEIC photos
In Operimage, choose Convert in the sidebar. Drag HEIC files into the window, or click Folder to load an entire iPhone export with its subfolders.
Choose JPEG as the output format
Select JPEG. Every photo in the list will be written as a .jpg, however many HEIC files you added.
Set quality to about 82%
Drag the quality slider to 82% for everyday photos, or about 90% for product and hero shots. Turn on metadata stripping if the photos will be published.
Check one photo in Before/After
Click a representative photo in the list, ideally a low-light or detailed one, and compare Before and After. Use Refresh after changing a setting.
Convert and open the results
Press the round Convert button. The HEIC originals stay untouched; click Reveal output to open the new JPGs in Finder.
Batch HEIC to JPG paths on Mac
| Path | Folder-safe | Preview | Repeatability | Best fit |
|---|---|---|---|---|
| Preview | Low | Low | Low | Tiny one-off HEIC sets |
| Finder Quick Action | Low | None | Medium | Quick conversions of a small selection |
| Shortcuts or sips | Medium | None | High | Scripted automation if the job never changes |
| Operimage | High | High | High | Large HEIC folders that need consistent output |
FAQ
How do I convert HEIC to JPG on a Mac for free?
Select the photos in Finder, right-click and choose Quick Actions → Convert Image → JPEG. Preview, the Photos app and the sips command also convert for free, and Operimage is a free Mac app for large batches.
How do I convert multiple HEIC files to JPG at once?
Select them all in Finder and use the Convert Image Quick Action, or export them together from Photos. For hundreds or thousands of files, load the folder into a batch converter such as Operimage.
Do I lose quality converting HEIC to JPG?
JPG is lossy, so a little data is discarded, but at 82–90% quality the result is visually indistinguishable at normal viewing sizes. Keep the HEIC originals as master copies.
Why is my JPG larger than the original HEIC?
HEIC uses more efficient compression, so the same photo usually takes about half the space. A JPG at similar quality is therefore larger; lower quality slightly or resize if size matters.
Will the JPG keep my photo's location?
Usually yes, because EXIF data including GPS is copied over. Turn off Preserve Metadata in Finder, untick Location Information in Photos, or strip metadata in your batch app before sharing.
Can I make my iPhone take JPG photos instead?
Yes. Go to Settings → Camera → Formats and choose Most Compatible. New photos are saved as JPG, at the cost of roughly twice the storage per photo.
Should I delete the HEIC files after converting?
Not until you have checked the JPGs. The HEIC originals are smaller and hold depth and HDR data the JPGs lack, so most people keep them as the archive.