What is the best HEIC converter for Mac?
The best HEIC converter for a Mac depends on how many photos you have. For one to twenty images, the tools already built into macOS are enough: Preview exports a HEIC as JPEG or PNG in a few clicks, and Finder's Convert Image Quick Action converts a selection without opening any app. For folders of hundreds or thousands of iPhone photos, a batch converter that processes everything locally, keeps your folder structure and never overwrites the originals saves real time.
HEIC (High Efficiency Image Container) has been the default photo format on iPhone since iOS 11 in 2017. It stores an image compressed with HEVC, and Apple's own figure is that it takes up to half the space of a comparable JPEG. That efficiency is why your phone uses it, and also why it causes friction: many web uploaders, marketplaces, Windows PCs without Microsoft's HEIF extensions, and older design tools still refuse the file.
This hub maps every route, explains which output format to choose, and links to the step-by-step guides. If you also convert PNG, TIFF, WebP or SVG files, the wider Mac image format conversion hub covers the full set of formats.
- iOS 11HEIC became the iPhone default (2017)
- ~50%Apple's size saving vs JPEG at similar quality
- 4032 × 3024Typical 12 MP iPhone photo in pixels
Which format should you convert HEIC to?
Let the destination decide. Convert to the most compatible format the receiving system accepts, and only move to a heavier or newer format when you need lossless editing, transparency or the smallest possible web file.
JPG is the answer for most people. It opens on every phone, PC, browser, email client and marketplace, and at 82–90% quality a JPG made from an iPhone photo is visually indistinguishable from the HEIC at normal viewing size. The full walkthrough is in the guide to turning iPhone HEIC photos into JPG.
WebP is the better choice when the photos go straight onto a website you control. WebP files are typically around 25–35% smaller than JPEG at similar visual quality, which helps page speed and Core Web Vitals. The HEIC to WebP walkthrough covers settings, and the AVIF and WebP comparison explains when AVIF squeezes out even more.
PNG is lossless, so it suits screenshots, images you will edit again, or handoff to a designer, but a photo saved as PNG is often several times larger than the HEIC it came from. TIFF and PDF make sense for print workflows and document packs.
Output formats for HEIC photos
| Format | Compression | Typical size vs HEIC | Best for |
|---|---|---|---|
| JPG | Lossy | About 1.5–2× larger | Uploads, email, marketplaces, Windows users |
| WebP | Lossy or lossless | Somewhat larger | Websites, blogs, Core Web Vitals |
| AVIF | Lossy or lossless | Similar | Modern websites chasing the smallest files |
| PNG | Lossless | Several times larger | Editing, screenshots, design handoff |
| TIFF | Lossless (usually) | Much larger | Print and archival masters |
| Container | Depends on content | Sending photos as a single document |
Typical file size for the same photo
Free ways to convert HEIC on a Mac without extra software
macOS reads HEIC natively on macOS High Sierra and later, so every Mac already has several free converters. Each one is fine for a small job; none of them offers presets, folder mirroring or a before/after check.
Opening a HEIC file needs no converter at all: double-click it and it opens in Preview, press the Space bar in Finder for a Quick Look, or import it into Photos. You only need to convert when the file has to leave your Mac, go into an app that does not read HEIC, or be uploaded to a site that rejects it.
Preview on macOS opens any HEIC. Choose File → Export, set Format to JPEG, PNG or TIFF, drag the Quality slider for JPEG, and save. You can select many HEIC files, open them together in Preview, select all thumbnails in the sidebar and export them in one go, but the naming and destination choices are basic.
Finder's Convert Image Quick Action (macOS Monterey and later) is the quickest route for a selection: right-click the files, choose Quick Actions → Convert Image, pick JPEG, PNG or HEIF, choose a size and decide whether to preserve metadata. Finder writes the copies next to the originals.
The Photos app exports with File → Export → Export Photos. Set Photo Kind to JPEG, TIFF or PNG, choose JPEG Quality and Size, and untick Location Information if the photos will be shared. Export Unmodified Original gives you the HEIC back, not a JPG.
Terminal users can run sips, the image tool built into macOS. A command such as sips -s format jpeg photo.heic --out photo.jpg converts one file, and a short shell loop converts a folder. Shortcuts can do the same with its Convert Image action. Both are free and scriptable, but they are less forgiving when something goes wrong mid-batch.
- Preview: best for one image where you want a quality slider.
- Finder Quick Action: best for a quick selection of up to a few dozen files.
- Photos export: best when the pictures already live in your Photos library.
- sips or Shortcuts: best when you are comfortable scripting and the job never changes.
How to batch convert a whole folder of HEIC photos
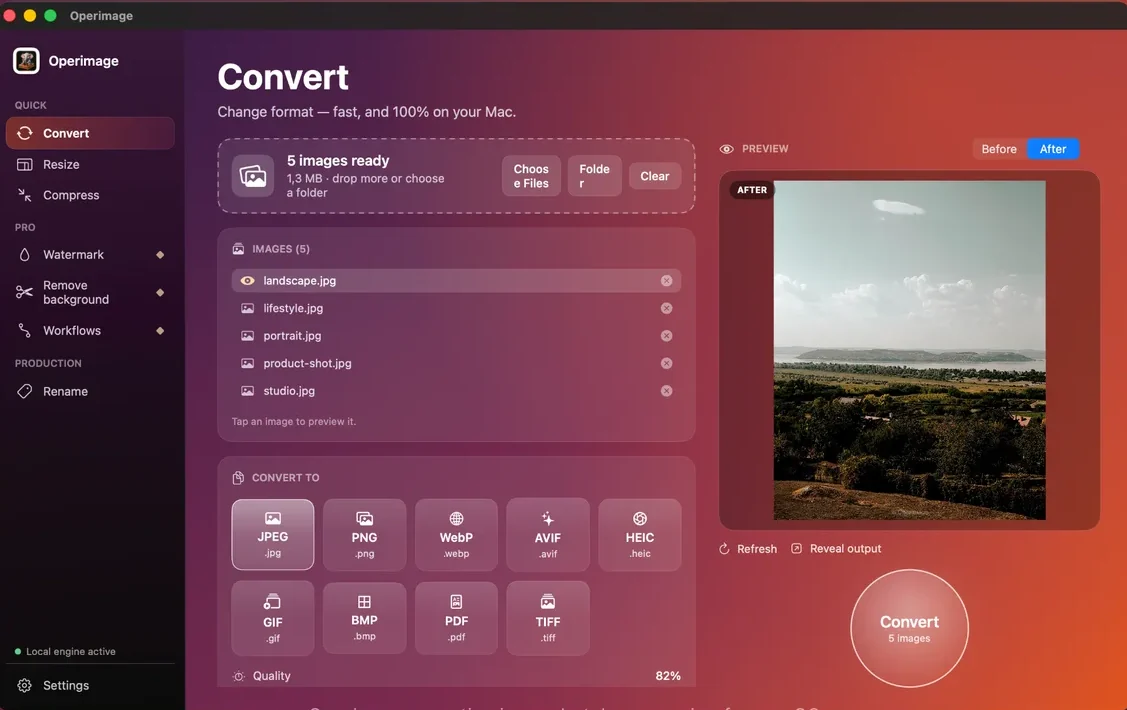
When the job is an entire iPhone export, a client folder or a year of photos, use a dedicated batch tool. Operimage, a free Mac app on the Mac App Store, converts HEIC to JPEG, PNG, WebP, AVIF, GIF, BMP, PDF or TIFF entirely on your Mac. Nothing is uploaded, and the app shows Local engine active while it works.
Open the Convert tool, drop the photos in or click Folder to load a directory with its subfolders, pick the output format and set the quality slider. Click any photo in the list to see the Before/After preview, then press the round Convert button. The originals are not overwritten unless you choose to, and Reveal output opens the results in Finder. The guide to converting many images at once on a Mac goes deeper into large-batch habits.
A batch tool earns its place on three points: it handles thousands of files in one run, it can keep the source folder structure so an organized library stays organized, and it applies identical settings to every file, so you never end up with a mix of quality levels.
What quality, color and metadata settings should you use?
A few settings decide whether converted iPhone photos look right and stay safe to share. Lock them in before you convert a large batch, and test them on a small sample first.
Quality: 82% is a strong default for JPEG and WebP from iPhone photos. Raise it to 88–92% for hero images, product photos and anything that will be printed. Going above 95% mostly adds file size without visible gain.
Color: iPhone photos are usually tagged with the Display P3 color profile. Browsers and most apps read that profile correctly, but some upload pipelines strip it, which can make colors look dull or shifted. If a destination is known to mishandle profiles, convert those files to sRGB first, for example with sips and its --matchTo option pointing at the sRGB profile in /System/Library/ColorSync/Profiles.
Metadata: every iPhone photo carries EXIF data, and unless location access is off, that includes the GPS position where it was taken. Strip it for anything public. Operimage can remove EXIF and GPS during the batch; the guide to removing photo metadata on Mac explains what is stored and every way to clear it.
Before you convert a big HEIC batch
- Originals are backed up and will not be overwritten
- Output format matches what the destination accepts
- Quality set to 82% (88–92% for hero or print images)
- GPS and EXIF stripped for anything public
- Ten-photo sample checked at 100% zoom, including a low-light shot
- Output folder chosen and folder structure kept if the library is organized
What you lose when you convert HEIC
A HEIC file from a modern iPhone can contain more than one picture. Knowing what is inside helps you decide what to archive before you convert.
Live Photos are a pair: a HEIC still and a separate short MOV video with the same base name, such as IMG_4021.HEIC and IMG_4021.MOV. A still conversion only touches the HEIC, so keep the MOV if you want the motion.
Portrait mode photos store depth data alongside the image so the Photos app can change the blur later. JPG and PNG exports flatten that to a single image with whatever blur was applied.
Recent iPhones also record HDR information that lets compatible screens show brighter highlights. After conversion to a standard JPG, highlights can look flatter on an HDR display. That is normal; the converted file still looks right on ordinary screens.
Edits made in the Photos app are another trap. If you copy HEIC files out of the Photos library folder by hand, you may get the unedited original. Export from Photos instead, so crops and adjustments are baked in.
HEIC original
Keep as archive
- About half the size of a JPG
- Can include depth data and an HDR gain map
- Pairs with a MOV file for Live Photos
- Patchy support outside Apple devices
Converted JPG
Deliver this
- Opens on every device, browser and uploader
- A single flattened still image
- Larger file at the same visual quality
- Keeps EXIF unless you strip it
Verdict: Archive the HEIC originals and send converted copies. You keep the small, rich masters and everyone else gets a file that just opens.
How to stop your iPhone from creating HEIC files
If you never want to deal with HEIC, change the camera format on the iPhone: Settings → Camera → Formats → Most Compatible. New photos are then saved as JPG. The trade-off is that each photo takes roughly twice the storage, and some features, such as certain high-resolution and HDR capture modes, need High Efficiency.
A gentler option keeps HEIC on the phone and converts on transfer. Settings → Photos → Transfer to Mac or PC → Automatic tells the iPhone to send compatible JPG files when you import over a cable with Image Capture or similar tools. Keep Originals sends the HEIC files unchanged.
Neither setting converts photos already in your library or photos that arrive by AirDrop, iCloud Photos or messaging apps, so a converter on the Mac is still useful for anything you already have.
After conversion: resize, compress and rename
Format is rarely the only requirement. A 12 MP iPhone photo is 4032 × 3024 pixels, far more than most websites, listings or social posts need, and newer 48 MP modes produce 8064 × 6048 pixel images.
Resize first: most blog layouts look sharp at 1600–2400 pixels on the long edge, and social presets such as Instagram 4:5 at 1080 × 1350 are a fixed size anyway. The batch photo resizing workflow shows how to apply one size to a whole folder.
Then compress. If a form or CMS has a hard size limit, shrinking images on a Mac without visible loss covers quality sliders and target file sizes.
Finally rename. iPhone names such as IMG_4021.HEIC tell nobody anything; descriptive names help search engines and your future self. Renaming a batch of photos on Mac covers patterns, counters and folder sorting. In Operimage you can save the whole chain as a Workflow and rerun it on the next export.
- 1HEIC folderiPhone export, 4032 × 3024 px
- 2ConvertJPEG or WebP at 82%, GPS stripped
- 3Resize2000 px long edge for the blog
- 4RenameSEO names with a counter
Troubleshooting HEIC conversion on Mac
Most problems fall into a handful of patterns. These fixes apply whichever converter you use.
- HEIC will not open: the file may still be downloading from iCloud Photos, or it may be truncated. Open it in Photos first, or export again from the source device.
- Converted JPG is bigger than the HEIC: expected, because HEIC compresses better. Lower the quality a little or resize if the size matters.
- Colors look dull after upload: the destination likely discarded the Display P3 profile. Convert those images to sRGB before uploading.
- Photos appear rotated: some older apps ignore the EXIF orientation tag. A converter that writes pixels in their upright orientation avoids it; check one portrait shot in the preview.
- Files keep their location: metadata was preserved. Turn on metadata stripping, or untick Location Information in the Photos export dialog.
- Windows colleagues cannot open your files: send JPG rather than asking them to install HEIF support.
Step by step
Open the Convert tool and add your HEIC photos
In Operimage, select Convert in the sidebar, then drag HEIC files into the window or click Folder to load an entire iPhone export, including subfolders.
Pick the output format for the destination
Choose JPEG for uploads and compatibility, PNG for lossless editing, or WebP for the smallest web files. The output format applies to every image in the list.
Set the quality slider
Start at 82% for JPEG or WebP and raise it to about 90% for hero or product photos. PNG is lossless, so quality does not apply.
Check the Before/After preview
Click a representative photo in the image list and compare Before and After to confirm color and detail before converting the whole batch.
Convert and reveal the output
Press the round Convert button. The originals stay untouched; click Reveal output to open the converted files in Finder.
FAQ
Can a Mac open HEIC files?
Yes. Every Mac running macOS High Sierra or later opens HEIC in Preview, Photos and Quick Look without any extra software.
How do I convert HEIC to JPG on a Mac for free?
Open the photo in Preview, choose File → Export and set Format to JPEG, or right-click it in Finder and choose Quick Actions → Convert Image. For whole folders, Operimage is a free Mac app that converts in batches locally.
How do I convert HEIC to PNG on a Mac?
In Preview choose File → Export and pick PNG, or use Finder's Convert Image Quick Action and choose PNG. Expect the PNG to be several times larger than the HEIC because PNG is lossless.
Does converting HEIC to JPG lose quality?
JPG is lossy, so a small amount of data is discarded, but at 82–90% quality the difference is not visible at normal viewing sizes. Keep the HEIC originals as your master copies.
Can I batch convert HEIC files without uploading them?
Yes. Preview, Finder, Photos, sips and Operimage all convert on your Mac, so the photos never leave your computer.
What happens to Live Photos when I convert them?
Only the still image is converted. The motion lives in a separate MOV file with the same name, so keep that file if you want the Live Photo effect.
Should I switch my iPhone to Most Compatible instead?
Only if converting is more of a burden than storage. Most Compatible saves photos as JPG but uses roughly twice the space; many people keep HEIC and convert only what they share.