How to convert multiple images on Mac: the quick answer
There are four practical ways to convert many images at once on a Mac. Finder's Convert Image Quick Action is the fastest for a selection of photos. Preview's Export Selected Images works for a few dozen files. Shortcuts and the sips command in Terminal can process a whole folder with fixed rules. A batch app such as Operimage, a free Mac app, handles very large folders, writes WebP and AVIF, and shows Before/After before you commit.
Whichever method you choose, the safe pattern is the same: write converted copies to a new folder, test a small sample first, and keep the originals. Converting to a lossy format such as JPEG never restores quality later, so the source files are your master copies. If you are still deciding on a target format, the hub on choosing and batch converting image formats compares JPEG, PNG, WebP, AVIF, HEIC and TIFF.
- 1Select240 mixed HEIC and PNG files
- 2Choose formatJPEG at 82% quality
- 3TestConvert 10 files, check them
- 4Run allCopies in a new output folder
Method 1: Finder Quick Action (fastest for a selection)
Since macOS Monterey, Finder can convert images without opening any app. It is the quickest route when you have a selection of photos and need JPEG, PNG or HEIF copies right now. If you build node workflows today, the Retrobatch alternative comparison explains the trade-offs.
- Select: highlight the images in Finder (Command-A selects everything in a folder).
- Open the action: right-click the selection and choose Quick Actions → Convert Image.
- Choose format and size: JPEG, PNG or HEIF, at Small, Medium, Large or Actual Size.
- Metadata: tick or untick Preserve Metadata depending on whether the copies will be shared publicly.
- Result: converted copies appear next to the originals in the same folder, which can get messy in large folders.
Method 2: Preview's Export Selected Images
Preview converts several images in one pass if you open them together. Select the files in Finder and open them in Preview, click into the thumbnail sidebar, press Command-A to select every image, then choose File → Export Selected Images. Pick a destination folder, click Options, and choose the format. Preview writes JPEG, PNG, HEIC, TIFF, PDF and JPEG 2000.
Preview is excellent for a quick job, but it has clear limits for batch work. It cannot export WebP or AVIF, it does not remember settings between sessions, it flattens all files into one destination with no subfolder structure, and opening several hundred large photos at once can make it sluggish. There is also no side-by-side Before/After check across the batch; you only see results after export.
Method 3: Shortcuts or sips for scripted conversions
If the same conversion happens regularly, Shortcuts can automate it. A simple shortcut takes the selected Finder files, runs the Convert Image action (JPEG, PNG, HEIF, TIFF, GIF, BMP, PDF and more, with a quality setting) and saves the results to a chosen folder. You can enable it as a Quick Action so it appears in Finder's right-click menu.
Terminal users can use sips, the scriptable image tool built into macOS. To convert every HEIC in a folder to JPEG at 85% quality into a subfolder, run mkdir jpeg, then for f in *.HEIC; do sips -s format jpeg -s formatOptions 85 "$f" --out "jpeg/${f%.*}.jpg"; done. sips is fast and private, but it gives no preview, cannot write WebP or AVIF, and mistakes in a loop apply to every file, so test it on a copied folder first.
If your photos are still in the Photos app
Images that live in the Photos library are not ordinary files in a folder, so Finder and Preview cannot reach them directly. Select the photos in Photos, choose File → Export → Export Photos, and pick JPEG, TIFF or PNG, a size, and whether to include location information. Photos writes converted copies to the folder you choose and leaves the library untouched.
For large exports, a cleaner path is to export the unmodified originals first (File → Export → Export Unmodified Original), which gives you the HEIC files exactly as the iPhone captured them, then convert that folder in one batch with the format, quality and metadata rules you want. This also keeps edits and conversions separate, so you can redo the conversion later without exporting from Photos again.
Method 4: Convert a whole folder with a batch app
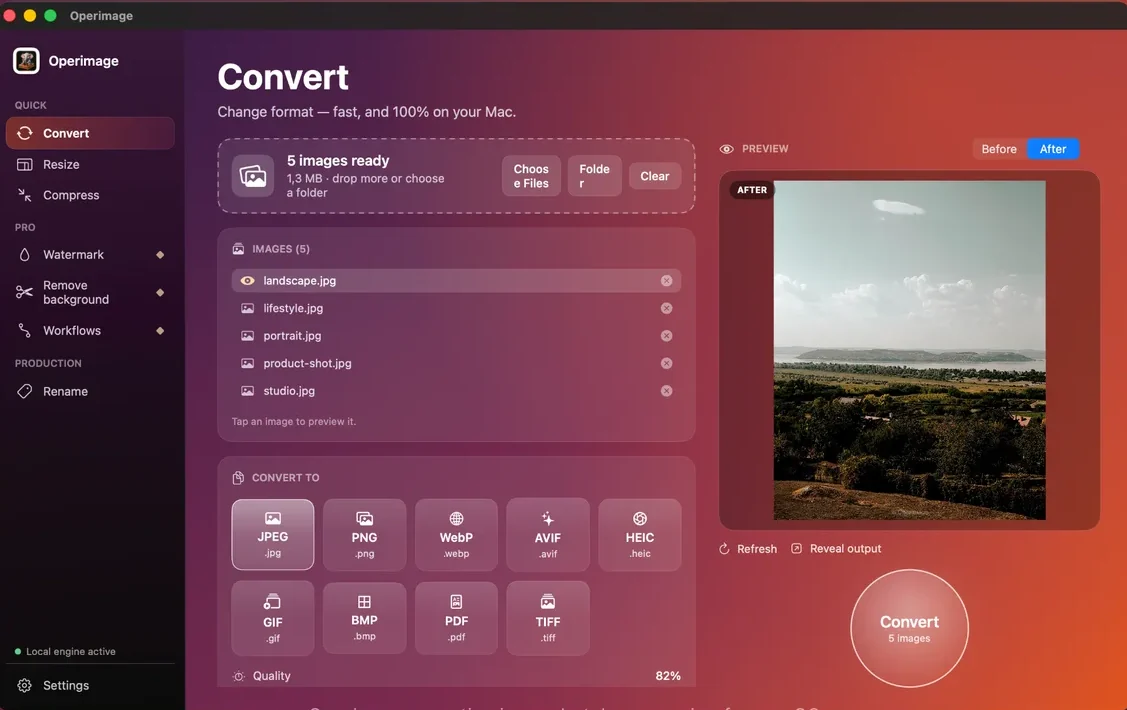
A dedicated batch converter is the better route when the folder is large, the sources are mixed, the destination needs WebP or AVIF, or the job will repeat. In Operimage, choose Convert in the sidebar and drag files onto the window or click Folder. The header confirms how many images are ready, and you can drop more or clear the list at any time.
Pick one of the nine output formats and set the quality slider; 82% is a good default for JPEG and WebP. Click any file in the image list to compare Before and After at full detail, and press Refresh after changing settings. When the sample looks right, click the round Convert button. Operimage writes new files rather than replacing originals, can keep the source folder structure, and Reveal output opens the result in Finder. Everything runs on the Mac, so nothing is uploaded.
Which method should you use?
Match the method to the size and frequency of the job. A dozen iPhone photos for an email: Finder Quick Action. Thirty screenshots to JPEG for a document: Preview. A nightly conversion on a server-like Mac: a Shortcut or sips script. A product shoot of 600 images to WebP with subfolders per product, or the same conversion every week: a batch app with saved settings.
The hidden cost of the built-in routes is repetition rather than speed. Each Preview export starts from scratch, each Quick Action run asks the same questions, and scripts need maintenance when a folder layout changes. If you convert similar folders more than once a month, saving the exact recipe once, then rerunning it, removes most of the decisions and most of the mistakes. That is the main reason teams and store owners move to a batch app, not raw conversion speed.
If you want to compare desktop converters in more depth, including Permute, Retrobatch and XnConvert, see the review of offline converter apps for Mac.
Preview and Quick Actions
Small one-off jobs
- Already installed, no setup
- JPEG, PNG, HEIC/HEIF, TIFF only; no WebP or AVIF
- Flat output, no subfolder structure
- Settings chosen again every time
Batch app
Large or repeated jobs
- Whole folders, structure kept
- Nine formats including WebP and AVIF
- Before/After check before the run
- Saved Workflows for next time
Verdict: Under about 30 files and one common format, the built-in tools are enough. Above that, or for web formats, a batch app saves time.
Keep folders and file names under control
Conversion itself is rarely what goes wrong in a big batch; the output organization is. When source images live in subfolders by client, product or date, keep that structure in the output so you do not end up with one flat folder of 2,000 files. When you merge folders, duplicate names such as IMG_0001.jpg can collide, so add a counter or folder name.
If the converted files need readable or SEO-friendly names, run a rename step after conversion. The guide to giving a whole folder of photos consistent names covers patterns, counters and sorting into folders, and Operimage's Rename tool shows a live preview of every new name before anything changes.
Convert and resize in the same run
Many conversions also need new dimensions: iPhone photos are 4032 × 3024 pixels, far larger than an email, a web page or a marketplace needs. Converting and then resizing in a separate app means two passes and two chances to lose names. Instead, resize after converting in the same session, or chain both steps in an Operimage Workflow such as convert → resize → compress, then rerun it on the next folder.
For web use, 2048 pixels on the long edge is a safe default; 1600 pixels is plenty for most blog images. The bulk resizing guide explains fit versus fill, aspect-ratio presets and why you should never upscale small images.
Common problems when converting many images
A few edge cases cause most failed batches. Include examples of each in your test subset.
- iPhone HEIC files: portrait photos rely on an orientation tag, and Live Photos contain a separate video that conversion drops. The HEIC to JPEG walkthrough covers both.
- Downloaded WebP images: many older apps cannot open them. See turning saved WebP images into JPEGs for settings that avoid quality loss.
- Transparency: PNG logos converted to JPEG get a solid background. Keep PNG, WebP or AVIF if you need transparency.
- Location data: converted copies may keep GPS coordinates. Follow the steps for stripping EXIF and GPS before sharing.
- Colors look flat: Display P3 photos can look duller if the color profile is dropped. Compare one output in Safari and Chrome.
- Files bigger than before: converting JPEG photos to PNG or TIFF increases size because those formats are lossless.
Before converting the full folder
- Originals backed up or left untouched; output goes to a new folder
- Test subset includes a portrait photo, a transparent PNG and the largest file
- Quality set deliberately (about 82% for web, 90% for hero images)
- Metadata kept or stripped on purpose
- Output names and subfolders checked in Finder after the test run
Step by step
Open Convert and load the images
Launch Operimage, choose Convert in the sidebar, then drag files onto the window or click Folder to load a whole directory, including subfolders.
Pick the output format
Choose one of the nine formats: JPEG, PNG, WebP, AVIF, HEIC, GIF, BMP, PDF or TIFF.
Set the quality
For lossy formats, set the quality slider around 82%; raise it for hero images, lower it for thumbnails.
Check a sample in Before/After
Click a detailed or unusual file in the image list and compare Before and After. Press Refresh after changing settings.
Convert the batch
Click the round button, for example Convert 240 images. New files are written and the originals stay untouched.
Reveal the output
Click Reveal output to open the converted files in Finder and spot-check names, folders and file sizes.
Ways to convert multiple images on Mac
| Method | Output formats | Comfortable batch size | Preview before export | Best fit |
|---|---|---|---|---|
| Finder Quick Action | JPEG, PNG, HEIF | Up to a few dozen | No | Fast right-click conversions |
| Preview | JPEG, PNG, HEIC, TIFF, PDF, JPEG 2000 | Up to a few dozen | Per file only | Small one-off jobs |
| Shortcuts or sips | JPEG, PNG, HEIC, TIFF, GIF, BMP and more | Large | No | Scripted jobs with fixed rules |
| Operimage | JPEG, PNG, WebP, AVIF, HEIC, GIF, BMP, PDF, TIFF | Very large folders | Yes, Before/After | Big, mixed or repeated batches |
FAQ
How do I convert multiple images to JPG on a Mac?
Select the images in Finder, right-click, choose Quick Actions → Convert Image and pick JPEG. For a quality setting or large folders, use Preview's Export Selected Images or a batch converter such as Operimage.
Can Preview batch convert images?
Yes. Open the images in Preview, select all thumbnails in the sidebar, then choose File → Export Selected Images and pick a format. It works best for a few dozen files and cannot export WebP or AVIF.
Where does Finder save converted images?
The Convert Image Quick Action saves the new files in the same folder as the originals, with the new extension. Move them to a separate folder if you want to keep things tidy.
How do I convert multiple images to WebP on a Mac?
macOS cannot write WebP with its built-in tools. Load the images into a converter such as Operimage, choose WebP, set quality around 80% and convert.
Can I convert a folder with subfolders in one go?
Built-in tools work on a flat selection, but a batch app such as Operimage can load a whole folder and keep its subfolder structure in the output.
Does converting images on a Mac delete the originals?
No. Preview, Finder Quick Actions and Operimage all create new files by default. Only a script or setting that explicitly overwrites files replaces originals.