How to batch process images on Mac: the short answer
Batch processing images on a Mac means applying the same change to many files in one run instead of opening and exporting each image by hand. The reliable method has four parts: load the whole folder, choose the operations in a sensible order, check one representative image before and after, then export to a separate output folder so the originals stay untouched.
macOS already includes some batch ability. Preview can export a selection of images to another format, Finder Quick Actions can convert or resize a handful of photos, Shortcuts can loop over files, and the sips command in Terminal can resize or reformat a folder. Those routes are fine for dozens of files and a single step. They get awkward when you need several steps together, modern formats such as WebP or AVIF, a fixed file-size budget, watermarks or consistent naming.
Operimage, a free Mac app, puts every common batch task in one window: Convert, Resize, Compress, Watermark, Remove background and Rename, plus Workflows that chain them and rerun on the next folder. All processing happens on the Mac, so client photos, product shots and personal images are never uploaded anywhere.
- 1Source foldere.g. 412 iPhone photos in HEIC
- 2StepsConvert to JPEG · resize to 2048 px · compress at 82%
- 3CheckBefore/After on one portrait and one landscape shot
- 4Output folderOriginals untouched, same subfolders
The batch image tools and the problem each one solves
Most people arrive with one symptom: an upload is rejected, a page loads slowly, a client cannot open the files, or a folder of 300 images has meaningless names. Each symptom maps to one tool. Identify the blocker first, then add only the steps you actually need, because every extra step is one more thing to check.
The list below covers every tool category in this guide library, with the detailed guide for each. For every platform at once, keep the 2026 social media image size cheat sheet open while you resize.
- Convert: the file type is the problem, for example HEIC that Windows colleagues cannot open or PNG photos that are too heavy. Start with the image format conversion hub to pick the right target.
- Resize: pixel dimensions or aspect ratio are wrong for the destination. The guide to resizing a whole folder of photos covers long-edge rules, fit versus fill and upscaling risks.
- Compress: files are too heavy for an upload limit, an email or page speed. See shrinking image file sizes on Mac for quality settings that do not show artifacts.
- Watermark: you need a logo or copyright line on every image of a set. The batch watermarking guide covers placement, opacity and sizing that survives cropping.
- Remove background: product or portrait shots need a transparent or white background. The offline background removal workflow explains quality modes and edge detail for hair and fabric.
- Rename: names like IMG_4821.HEIC are useless downstream. Learn renaming a batch of photos with patterns, counters and SEO-friendly names.
- Workflows: the same two or three steps happen every week. A saved Workflow chains them (for example resize → compress → rename) so one click repeats the whole recipe.
Batch tasks at a glance
| Task | Use it when | Typical starting setting |
|---|---|---|
| Convert | The destination rejects or cannot open the format | JPEG at 82% for sharing, PNG for transparency |
| Resize | Dimensions or aspect ratio are wrong | 2048 px long edge for web, preset for social |
| Compress | Files exceed an upload or page-weight budget | 80–85% quality or a target size such as 200 KB |
| Watermark | A set needs consistent branding | Logo bottom-right, 30–50% opacity |
| Remove background | Products or portraits need a clean cutout | Balanced mode, transparent PNG or WebP |
| Rename | Names must be readable or follow a store pattern | product-name_001.jpg style counters |
Format problems: HEIC, WebP, AVIF, PNG and JPEG
Format conversion is the most common batch job on a Mac because iPhones save photos as HEIC by default and the web increasingly serves WebP and AVIF. HEIC is efficient but many Windows apps, older web uploaders and some marketplaces still expect JPEG. WebP files saved from websites often refuse to open in older desktop software. PNG screenshots and exports are lossless but frequently three to five times heavier than they need to be for a photo.
If your photos come from an iPhone, the HEIC converter guide explains when to keep HEIC for your archive and when to convert to JPEG, PNG or WebP. If your problem is web images, the WebP conversion guide covers converting to WebP for faster pages and back to JPEG for compatibility. For a mixed folder of many source types, the walkthrough on converting many images in one pass shows the queue, destination and naming setup step by step.
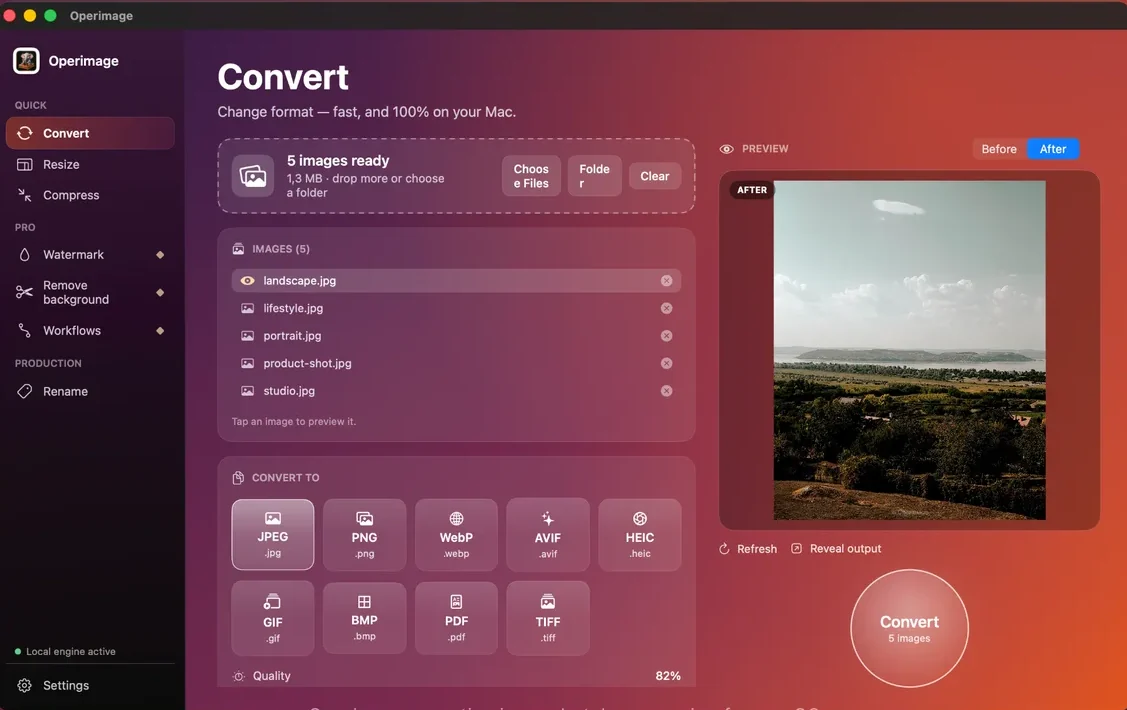
Operimage's Convert tool exports to nine formats: JPEG, PNG, WebP, AVIF, HEIC, GIF, BMP, PDF and TIFF, with a quality slider for the lossy ones. A useful rule: pick the lightest format the receiving system fully supports, and move to a heavier one only when you need lossless quality or transparency.
Size problems: pixel dimensions and file weight
Size problems come in two kinds, and they need different tools. Pixel dimensions are about width and height: a 4032 × 3024 iPhone photo is far larger than any web page or social feed displays. File weight is about kilobytes: a 1 MB hero image slows a page even if its dimensions are reasonable. Resize first to fix dimensions, then compress to fix weight, because shrinking pixels already removes most of the bytes.
Social platforms each prefer specific shapes. Operimage's Resize tool has presets for Instagram 1:1 and 4:5, Story 9:16, YouTube Thumb 16:9, X Header 3:1 and LinkedIn Banner 4:1, plus manual width and height with fit or fill. The guide to preparing Instagram posts in bulk covers crop-safe framing, and the YouTube thumbnail dimensions guide covers the 1280 × 720 frame and its file-size limit.
When a form, a marketplace or a CMS gives you a hard ceiling such as 100 KB or 2 MB, guessing quality settings wastes time. Hitting an exact file-size budget explains how a target-size optimizer searches for the highest quality that still fits. Site owners should also read optimizing uploads for WordPress, which covers how WordPress generates its own resized copies.
- Instagram square1080 × 1080 · 1:1
- Instagram portrait1080 × 1350 · 4:5
- Story / Reel1080 × 1920 · 9:16
- YouTube thumbnail1280 × 720 · 16:9
- X header1500 × 500 · 3:1
- LinkedIn banner1584 × 396 · 4:1
Privacy, branding and naming: the steps people forget
Photos from a phone or camera carry EXIF metadata: camera model, capture time and often GPS coordinates precise enough to locate a home. Anything published publicly, sold on a marketplace or sent to strangers should have that stripped. The guide to removing location and camera data shows how to check what a file contains and how to clean a whole folder; in Operimage, metadata stripping sits in the Compress tool.
Watermarks and names are the other two steps that turn a pile of exports into a deliverable. A watermark applied to the whole batch keeps placement, opacity and size identical across portrait and landscape shots. A naming pattern applied at the end gives every file a readable, sortable name and avoids collisions when two source folders both contain IMG_0001.
Product photos and store catalogs
Online stores combine every batch task at once: consistent square or 4:5 crops, white or transparent backgrounds, a file-size budget for fast pages, and names that match SKUs. Each marketplace also has its own rules for minimum dimensions and background color.
The e-commerce image optimization hub collects the store-specific guides for Shopify, Amazon, Etsy and WooCommerce. If you sell on Amazon, start with Amazon's main-image requirements, because a non-compliant main image can keep a listing from showing properly. Operimage's Rename tool includes Shopify, Amazon and WooCommerce naming packs with a live name preview, so you can see product-shot.jpg become product/product_shot_004.jpg before running the batch.
What built-in macOS tools can batch, and where they stop
macOS has more batch ability than most people realize, and for small, single-step jobs it is enough. Preview can open dozens of images, select them all in the sidebar and use File → Export Selected Images to write JPEG, PNG, HEIC, TIFF or PDF copies; Tools → Adjust Size works on a selection too. Finder Quick Actions (select files, right-click, Quick Actions → Convert Image) convert to JPEG, PNG or HEIF at a few preset sizes. The Photos app exports selections as JPEG, TIFF or PNG with a size setting and an option to drop location data.
For repeatable automation, Shortcuts has Convert Image and Resize Image actions that can run on a folder, Automator still offers image actions, and sips in Terminal can process a whole directory, for example sips -Z 2048 *.jpg to fit every JPEG inside 2048 pixels. These are free and private, but none of them exports WebP or AVIF, none offers a target file size, and chaining watermark, rename and folder-structure rules requires building and maintaining your own scripts.
A dedicated batch app earns its place when the job repeats or needs more than one step. If you are weighing options, the comparison of the best offline converters for Mac looks at Preview, Permute, Retrobatch, XnConvert and Operimage side by side.
Preview, Quick Actions, sips
Fine for small one-step jobs
- Already installed and fully offline
- Export to JPEG, PNG, HEIC, TIFF; no WebP or AVIF output
- One operation at a time; chaining needs Shortcuts or scripts
- No target-size compression, watermarks or naming packs
Operimage batch app
Built for repeat folders
- Nine output formats including WebP and AVIF
- Resize, compress, watermark and rename in one place
- Before/After check before the full run
- Saved Workflows rerun the same recipe on the next folder
Verdict: Use the built-in tools for a quick one-off; switch to a batch app when the job has two or more steps or comes back every week.
In what order should batch steps run?
Order matters because each step works on the output of the previous one. Compressing before resizing wastes effort and can add a second round of compression artifacts. Watermarking before resizing scales the watermark down with the photo, so it ends up a different size on every image. Renaming in the middle can break the link between a source file and its processed copy.
The order below works for nearly every job, from a family photo export to a product catalog.
- 1. Convert: decode the source format once, so later steps work on clean pixels.
- 2. Remove background: cut out subjects at full resolution, where edges have the most detail.
- 3. Resize: set final dimensions or aspect ratio for the destination.
- 4. Watermark: add branding at the final size so it looks identical on every image.
- 5. Compress: choose quality or a target size last, since it determines the final bytes.
- 6. Rename: apply the naming pattern to the finished files, optionally sorting them into folders.
Safe defaults for large batches
A batch of 5,000 images that goes wrong costs far more time than a batch of 50, so treat big runs like a production job. Load the source, set the steps, validate a small subset that includes the awkward files, then release the full queue. Keeping originals untouched means any mistake is fixed by running again, not by restoring from a backup.
For web and catalog delivery, these settings are a reliable starting point: 2048 pixels on the long edge, 80–85% JPEG or WebP quality (90% for hero images), metadata stripped, source folder structure kept, and output written to a separate folder.
Before you run a big batch
- Test 10–20 files, including a portrait, a landscape, a PNG with transparency and the largest file
- Write output to a separate folder; do not overwrite originals
- Keep the source folder structure if subfolders mean something (clients, products, dates)
- Strip EXIF and GPS from anything that will be published
- Check one output at 100% zoom for artifacts, banding and correct orientation
- Save the steps as a Workflow so the next batch is identical
Troubleshooting common batch problems
Most failed batches come down to a handful of edge cases. Checking for them in the test subset saves a full rerun.
- Colors look dull after export: iPhone and many Mac screenshots use the Display P3 color space. Check that web exports look the same in Safari and Chrome; if they look washed out, the color profile was dropped rather than converted.
- Transparent areas turn black or white: JPEG has no transparency. Keep PNG, WebP or AVIF for logos and cutouts, or accept a solid background.
- Animated GIF or WebP becomes a still: converting to JPEG or PNG keeps a single frame. Leave animations in an animated format.
- Portrait photos appear sideways: the camera stored rotation as a metadata tag. Check a portrait image in the preview before running everything.
- Live Photos lose their motion: a Live Photo is a HEIC still plus a short video. Converting the HEIC keeps only the still image.
- CMYK TIFFs look wrong on screen: print files in CMYK should be converted to RGB for web use; check a sample carefully.
- Duplicate names overwrite each other: when merging folders, add a counter or folder name in the naming step.
Step by step
Drop the files or choose a folder
Open Operimage, drag images from Finder onto the window or click Folder to load a whole directory. The header confirms how many images are ready.
Pick the tool for your first step
Choose Convert, Resize, Compress, Watermark, Remove background or Rename in the sidebar and set its options, such as output format and quality.
Check one image in Before/After
Click a representative file in the image list, compare Before and After, and press Refresh after changing a setting.
Run the batch
Click the round action button, for example Convert 120 images. Originals stay untouched unless you chose to overwrite them.
Reveal the output and save the recipe
Click Reveal output to inspect the results in Finder. If the job will repeat, save the steps as a Workflow so next time is one click.
FAQ
How do I batch edit photos on a Mac without extra software?
Open the photos in Preview, select them all in the sidebar, then use Tools → Adjust Size to resize or File → Export Selected Images to change format. For simple conversions you can also select files in Finder and choose Quick Actions → Convert Image.
Can Preview batch convert images to WebP?
No. Preview can open WebP files but exports only formats such as JPEG, PNG, HEIC, TIFF and PDF. To write WebP or AVIF in bulk you need a dedicated converter such as Operimage.
Can I resize, convert and compress in a single run?
Yes. In Operimage you can chain steps in a saved Workflow, for example resize, compress and rename, and run them on a whole folder in one go.
Is there a free app to batch process images on Mac?
Yes. Operimage is a free Mac app on the Mac App Store that converts, resizes, compresses, watermarks, renames and removes backgrounds in batches, entirely offline.
Will batch processing overwrite my original photos?
Not unless you choose to. Operimage writes processed copies and leaves the originals in place by default, so you can rerun a batch with different settings at any time.
How many images can I batch process at once on a Mac?
Batch apps such as Operimage handle very large folders of thousands of files; the practical limit is disk space and time. Test a small subset first so mistakes are cheap to fix.
Does batch processing remove EXIF and GPS data?
Only if you ask it to. Converting or resizing may keep metadata, so enable metadata stripping explicitly for anything you publish.