How to batch watermark photos on a Mac
To watermark many photos at once on a Mac, you need a tool that applies one watermark rule to a whole folder, because macOS itself does not include a batch watermark feature. Operimage, a free Mac app, has a Watermark tool that does exactly this: load the photos, enable the watermark, choose a text or logo mark, set placement, opacity, size and padding, preview it, and apply it to every image in one run, all on your Mac.
Consistency is the whole point. A watermark looks professional when it sits in the same place, at the same opacity and visual weight, across an entire set; it looks careless when it drifts from corner to corner or is huge on one photo and tiny on the next. Doing that by hand in an editor takes minutes per image and still produces small variations. A batch rule takes the same few seconds whether the folder holds ten photos or a thousand.
Watermarking is usually one step in a chain that also resizes, compresses and renames. If you are planning that whole process, the guide to batch processing images on a Mac explains how to order the steps so each file is only handled once.
- 1Edited exports240 JPEGs from a shoot
- 2Resize2048 px on the long edge
- 3WatermarkLogo PNG, bottom corner, 40%
- 4CompressWeb-ready copies in a new folder
Can you watermark photos on a Mac without extra software?
You can add a watermark to a single image with tools already on your Mac, but none of them is built for batches. Knowing their limits helps you decide when a dedicated tool is worth it.
Preview is the most common route. Open the image, click the Markup toolbar button, add a text box or paste a logo, adjust it and save. It works, but each image is edited by hand and there is no way to copy the exact position and size to the next file. For more than a handful of photos, small inconsistencies are almost guaranteed.
Shortcuts can automate parts of the job; its Overlay Image action places one image on top of another, and with some effort you can build a shortcut that loops over a folder. Expect to spend time on positioning math and testing, and to have no visual preview before files are written. Photos for Mac has no watermark feature, and Automator's watermark action is meant for PDF documents rather than photos.
- Preview Markup: fine for one or two images; manual placement each time.
- Shortcuts with Overlay Image: automatable but fiddly to position and test.
- Photos for Mac: no watermark option.
- Dedicated batch tool: one rule, a preview of every image, and the whole folder in one run.
Text or logo: which watermark should you use?
A text watermark is the fastest to set up and the easiest to read at small sizes. Your name, studio name, website or a copyright line such as "© 2026 Jane Doe Photography" needs no extra file and stays crisp at any size. It is a good default for photographers sharing proofs and for anyone who mainly wants credit when an image is reposted.
A logo watermark carries brand recognition that text cannot, which matters for businesses whose images circulate on social media or in marketplaces. The logo file needs a transparent background: a PNG logo with a white rectangle behind it will show that rectangle on every photo. If your logo only exists on a white background, cut it out first with an offline background remover and export it as a transparent PNG.
For logos, prepare a single-color version (all white or all black) in addition to the full-color mark. Single-color logos read better at low opacity and over varied photo content, while full-color logos often clash with the image beneath them.
Text watermark
Credit and proofs
- No asset needed; type it once
- Stays sharp at any size
- Best for names, URLs and copyright lines
- Easy to change per client or year
Logo watermark
Brand recognition
- Needs a transparent PNG logo
- Recognizable when images are shared
- Single-color versions read best at low opacity
- Keep it simple; fine details blur when small
Verdict: Use text for proofs and photographer credit; use a transparent single-color logo for brand content.
Where to place a watermark, and what opacity to use
Placement is a trade-off between protection and presentation. A small mark in a corner looks polished and keeps attention on the photo, but it is also the easiest to crop off. A larger mark near the center is much harder to remove and is the right choice for client proofs and previews you do not want used as finished images, but it gets in the way of the viewer. Decide which goal matters for this batch before choosing settings.
Opacity between 30% and 60% covers most needs. Around 30–40% gives a subtle signature on marketing images and portfolio pieces; 50–60% is clearer for proofs and stock previews. Below roughly 20% the mark becomes hard to read on busy photos; above about 70% it starts to dominate the image.
Padding keeps the mark away from the edge so it does not look jammed into the corner and survives slight cropping by platforms that trim previews. A margin of a few percent of the image width is a good starting point; check it on your narrowest image, because portrait crops leave less room.
- Marketing and portfolio images: corner placement, 30–40% opacity, modest size.
- Client proofs and previews: center or near-center, 50–60% opacity, larger size.
- Product photos for your own store: small corner logo or no watermark; many marketplaces restrict watermarks on main product images, so check the platform's current rules.
- Busy or textured photos: raise opacity slightly or use a single-color logo for contrast.
- Avoid placing the mark over faces, products or text in the photo.
How to keep a watermark consistent across portrait and landscape photos
Mixed aspect ratios are where batch watermarking goes wrong. The same mark that looks right on a 3:2 landscape can look oversized on a 9:16 story and lost on a wide banner. The reliable fix is to resize the batch to its final dimensions first, then apply the watermark, so every image has the same width or long edge when the mark is added.
Operimage's Resize tool includes presets such as Instagram 1:1, Instagram 4:5, Story 9:16 and YouTube Thumb 16:9, and the guide to resizing images for Instagram in bulk covers which frame to choose. Once sizes are consistent, check the watermark preview on one image of each shape before you click Apply.
If the folder genuinely mixes orientations, split it into a portrait folder and a landscape folder and run each with its own size and placement. Two short runs with the right settings are better than one run with a compromise.
- Instagram square1080 × 1080 · 1:1
- Instagram portrait1080 × 1350 · 4:5
- Story / Reel1080 × 1920 · 9:16
- YouTube thumbnail1280 × 720 · 16:9
- 4×6 print at 300 ppi1800 × 1200 · 3:2
Step by step: watermark a folder in Operimage
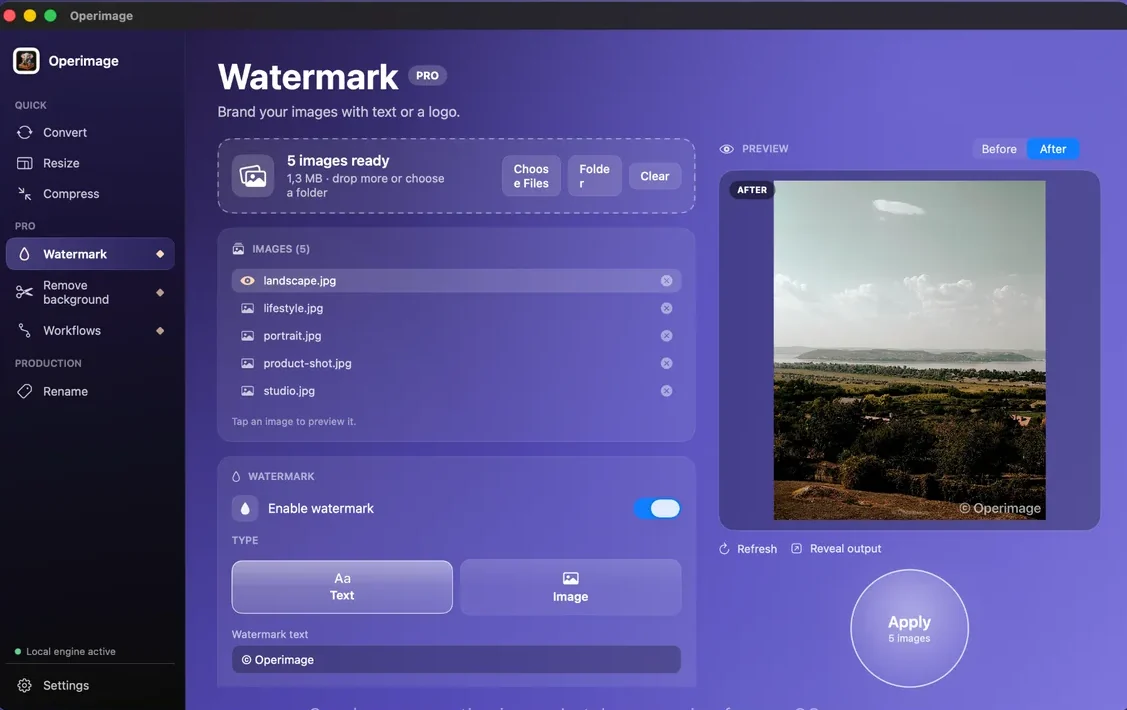
Choose Watermark in the Operimage sidebar and drop your photos in, or click Folder to load a whole directory. Enable the watermark, then pick Text and type your mark, or Image and choose your transparent PNG logo. Set placement, opacity, size and padding with the controls on the right.
Before applying, click through the image list and use the Before/After preview on at least four photos: the brightest, the darkest, one portrait and one landscape. A white mark that is perfect on a dark photo can vanish on a snowy one, so this check catches most problems. When every test image looks right, click Apply. Operimage writes watermarked copies and leaves the originals untouched; Reveal output opens the results in Finder.
All processing happens on your Mac, so unreleased product shots or client photos are never uploaded. That also means there is no waiting for uploads on large folders.
What a watermark can and cannot protect
A visible watermark credits you when an image is shared, discourages casual reuse and makes a proof obviously unfinished. It does not prevent determined copying: corner marks can be cropped, and modern AI retouching tools can paint over many watermarks. Treat the watermark as attribution and deterrence, not as security, and never share your clean high-resolution originals until a client has approved the final delivery.
Hidden metadata is a separate issue. Your camera or phone may have embedded the location, date and device in each file, and a watermark does nothing about that. If the watermarked copies are going public, strip that data in the same session; the guide on how to strip GPS and EXIF data from photos explains what to remove and what to keep.
Finally, give the outputs names that make it obvious they are watermarked versions, for example by adding a "-wm" suffix or using a separate folder. The guide to renaming a batch of photos with consistent rules shows how to do that without collisions, and a final pass to compress the watermarked copies keeps them light for the web.
Before you click Apply
- Images are resized to their final dimensions
- Logo is a transparent PNG, ideally single-color
- Mark checked on a bright, a dark, a portrait and a landscape photo
- Mark does not cover faces, products or in-image text
- Outputs go to a separate location; originals stay clean
- Metadata plan decided for public copies
Step by step
Open Watermark and load your photos
Choose Watermark in the Operimage sidebar, then drop files or click Folder. The header shows how many images are ready.
Enable the watermark and choose Text or Image
Turn the watermark on, then type your name, studio or URL in the text field, or choose Image and pick a transparent PNG logo.
Set placement, opacity, size and padding
Place the mark where it will not cover the subject, start around 40% opacity, size it so it reads at the final display size, and add padding so it never touches the edge.
Check the preview on different photos
Click a bright image, a dark image, a portrait and a landscape in the list and compare Before and After for each.
Apply and reveal the output
Click Apply to watermark the whole batch, then use Reveal output to open the watermarked copies in Finder.
FAQ
How do I add a watermark to multiple photos at once on a Mac?
Use a batch tool such as Operimage's Watermark tool: load the folder, choose a text or logo watermark, set placement and opacity, preview a few images, and apply it to the whole set in one run.
Does macOS have a built-in watermark tool?
Not for batches. Preview's Markup tools can add text or a logo to one image at a time, and Shortcuts can be scripted to overlay an image, but there is no built-in batch watermark feature.
What opacity should a photo watermark be?
Between 30% and 60% works for most photos. Use around 30–40% for portfolio and marketing images and 50–60% for proofs that should be clearly unfinished.
Where is the best place to put a watermark?
A corner is subtle and suits finished images, but it is easy to crop. A larger mark near the center is harder to remove and better for client proofs.
How do I make a logo watermark with a transparent background?
Export your logo as a PNG with transparency, or cut it out with a background remover and save it as PNG. A JPEG logo always carries a solid background box.
Will watermarking overwrite my original photos?
Not in Operimage, which writes watermarked copies and leaves originals untouched. Keep those clean originals for printing, client delivery and future edits.
Can a watermark be removed?
Corner watermarks can be cropped out, and AI retouching tools can remove many others. A watermark is a deterrent and a credit, not copy protection.