Instagram image sizes in 2026 at a glance
Instagram displays feed photos at 1080 pixels wide and accepts aspect ratios from 1.91:1 landscape to 4:5 portrait. Stories and Reels are full-screen vertical at 9:16. If you upload anything outside those ratios, Instagram crops it; if you upload something wider than 1080 pixels, Instagram downsizes and recompresses it on its servers.
The practical sizes are 1080 × 1350 for portrait feed posts, 1080 × 1080 for square posts, 1080 × 566 for landscape posts, and 1080 × 1920 for Stories and Reels covers. Exporting at exactly these sizes means Instagram has nothing to crop and you decide how the image is framed. Doing it for a whole shoot is a classic job for batch image processing on a Mac: one rule, applied to every file.
Instagram image sizes
| Placement | Size (px) | Ratio | Operimage preset |
|---|---|---|---|
| Portrait feed post | 1080 × 1350 | 4:5 | Instagram 4:5 |
| Square feed post | 1080 × 1080 | 1:1 | Instagram 1:1 |
| Landscape feed post | 1080 × 566 | 1.91:1 | Manual resize |
| Story / Reel cover | 1080 × 1920 | 9:16 | Story 9:16 |
| Profile grid thumbnail | Shown at 3:4 | 3:4 | Keep subject centered |
- Square post1080 × 1080 · 1:1
- Portrait post1080 × 1350 · 4:5
- Landscape post1080 × 566 · 1.91:1
- Story / Reel1080 × 1920 · 9:16
Which Instagram ratio should you use?
Portrait 4:5 at 1080 × 1350 is the best default for feed photos. It occupies more vertical space in the scrolling feed than a square or landscape image, which gives the photo more presence on a phone screen. It also sits closest to the 3:4 profile grid, so very little is hidden when someone visits your profile.
Square 1:1 at 1080 × 1080 is still the safest choice for graphics, quote cards and anything designed edge to edge, because it displays the same everywhere in the feed. Landscape 1.91:1 suits wide scenes but appears small on a phone, so use it sparingly. If the same shoot is also headed to TikTok, Pinterest or LinkedIn, the cheat sheet of social media image sizes lists the matching ratio for each network.
Stories and Reels use 9:16 at 1080 × 1920. A feed photo shared to Stories without resizing appears as a smaller card with a background, which is fine for reposts but wastes the screen for original content.
- 4:5 portrait: maximum feed presence and the smallest grid crop; the default for photos.
- 1:1 square: predictable everywhere; good for text graphics and product tiles.
- 1.91:1 landscape: wide scenes only; smallest on screen.
- 9:16 vertical: Stories, Reels and Reel covers; full-screen.
How the 3:4 profile grid crops your posts
Instagram's profile grid now shows posts as 3:4 portrait thumbnails rather than squares. Your post is still published at its full ratio in the feed, but the grid preview is a center crop, so planning for it matters if your profile layout is part of your brand.
The arithmetic is straightforward. A 1080 × 1350 portrait post is only slightly wider than 3:4, so the grid trims about 34 pixels from each side. A 1080 × 1080 square post loses about 135 pixels from each side, a quarter of the width in total. A 1080 × 1920 Reel cover keeps its full width but loses about 240 pixels at the top and bottom.
The rule that covers every case: keep faces, products and any text inside the central area of the frame. If you design square graphics, leave the outer 135 pixels on the left and right free of anything essential.
- ≈34 pxTrimmed per side from a 4:5 post in the 3:4 grid
- ≈135 pxTrimmed per side from a 1:1 post
- ≈240 pxTrimmed top and bottom from a 9:16 Reel cover
How to batch resize photos for Instagram on a Mac
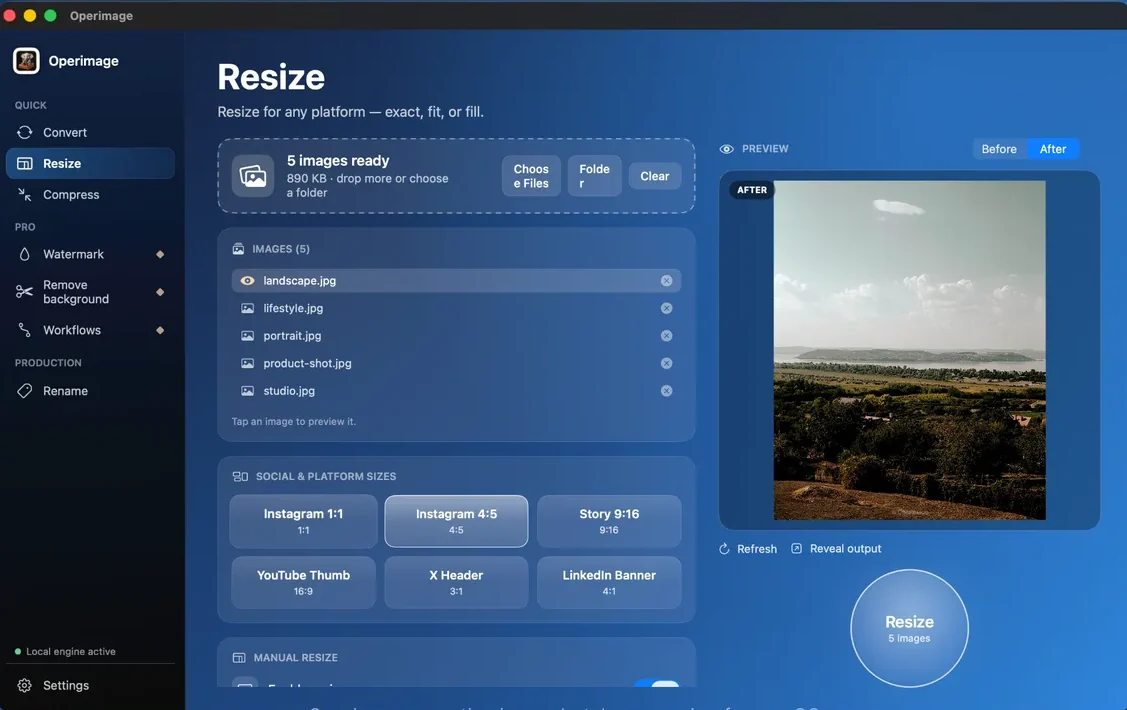
Operimage, a free Mac app, has Instagram sizes built into its Resize tool. Open Resize, drop in the shoot or choose the folder, and pick Instagram 4:5, Instagram 1:1 or Story 9:16 under Social & platform sizes. Set the mode to Fill so every output is exactly the preset size, then click through a few images in the Before/After preview to confirm the crop.
Click Resize and Operimage writes 1080-pixel copies to a separate output, leaving the originals untouched; Reveal output opens them in Finder. Because processing is on-device, unreleased campaign images and client photos are never uploaded. For landscape posts, use Manual resize with 1080 × 566 and Fill. The same approach works for other networks; the general batch resize workflow for Mac covers Fit, Fill and web sizes in more detail.
Can you resize for Instagram with Preview or Photos?
Preview on macOS can resize a selection of images with Tools → Adjust Size, but it only scales; it cannot crop a batch to 4:5 or 9:16. To get an exact 1080 × 1350 frame in Preview you have to draw a selection on each image, crop it, and then resize it, one file at a time. That is workable for three photos and painful for thirty.
Photos on macOS has a crop tool with aspect presets such as Square, 8:10 (the same shape as 4:5) and 16:9, which can be flipped to portrait for 9:16, and File → Export can set a custom maximum size. Again, the crop is per photo, so it suits a careful edit of a few hero images rather than a whole shoot. The sips command in Terminal resizes in bulk but has no notion of aspect ratio or cropping around a subject.
A batch resizer combines both steps: it crops to the ratio and scales to 1080 pixels in one pass for every file in the folder, with a preview so you can catch bad crops before exporting.
- Preview: scales many images at once; no ratio crop; overwrites originals on save.
- Photos: precise per-photo crop to 8:10 (4:5) or 9:16; slow for large sets.
- Batch resizer: crop and scale every file in one run; best for shoots and campaigns.
Getting the crop right: safe zones for feed and Stories
Fill crops whatever does not fit the new ratio, and it crops from the center. A 3:2 camera photo going to 4:5 loses a slice from the left and right; a landscape photo going to 9:16 loses most of its width. Subjects placed near the edge of the original are the ones that get cut.
Stories add a second constraint: Instagram's interface covers part of the screen. The profile name and progress bar sit at the top and the reply bar at the bottom. A widely used rule of thumb is to keep text and faces out of roughly the top and bottom 250 pixels of a 1080 × 1920 frame.
Sort the source folder by orientation before resizing. Vertical photos convert to 4:5 and 9:16 with little loss, while horizontal photos often work better as 1:1 or as a landscape post. Running each group as its own batch avoids the worst crops.
Crop check before you post
- Faces and products sit in the central area of every frame
- No text in the outer 135 px left and right of square graphics
- Story text kept out of roughly the top and bottom 250 px
- Horizontal photos sent to 1:1 or 1.91:1 rather than squeezed into 9:16
- Carousel slides all resized to the same ratio as the first slide
Carousels, Reels covers and other edge cases
Carousels use the ratio of the first slide for every slide in the post. If the first image is 4:5 and the second is square, Instagram crops the second to 4:5 for you. Resize the whole carousel with one preset so every slide is framed the way you intended.
Reels covers are uploaded at 9:16 but appear as a 3:4 crop on the profile grid and as other crops elsewhere in the app, so keep cover text in the vertical center. Screenshots and text-heavy graphics benefit from PNG or high-quality JPEG; Instagram recompresses everything, so starting with a clean, correctly sized file gives the best result.
- Carousels: one ratio for all slides, set by the first slide.
- Reel covers: 1080 × 1920 with text in the middle band.
- Images from iPhone: HEIC uploads through the app, but for scheduling tools and the web convert HEIC to JPG first.
- Colors: export in sRGB; wide-gamut Display P3 photos can shift when an app ignores the profile.
- Small sources: anything under 1080 px wide is enlarged by Instagram and looks soft, so start from the original, not a downloaded copy.
Why do my Instagram photos look blurry after upload?
Blur on Instagram almost always comes from one of three things: the file was smaller than 1080 pixels wide and got enlarged, it was much larger and got downsized and recompressed by Instagram, or it was already heavily compressed before upload and lost detail twice. Exporting at exactly 1080 pixels wide with a high JPEG quality, around 85–90%, gives Instagram the least work to do.
Fine patterns, small text and thin lines suffer most from recompression. Keep text large, avoid very fine textures in graphics, and check the uploaded post on a phone, where most people will see it. If you also need a lighter file for a website or newsletter, export that version separately rather than reusing the Instagram copy.
A repeatable Instagram batch workflow
Social teams rarely post one size from a shoot. The efficient pattern is to keep the edited originals in one folder and generate each placement from it: a 4:5 set for the feed, a 9:16 set for Stories, and a 1:1 set for anything that needs a square.
Operimage can save that sequence as a Workflow, for example resize to Instagram 4:5, then add a logo, then rename, and rerun it on every new folder. If you brand your images, add a watermark to the whole batch after resizing so the logo sits at the same position and scale on every 1080-pixel output. Then rename files by placement and posting order, such as 2026-10-launch-feed-01.jpg, so nothing gets scheduled in the wrong slot. The same approach produces video covers; see 1280 × 720 thumbnails for YouTube for the 16:9 equivalent.
- 1Edited originals36 photos, mixed orientation
- 2Resize with FillInstagram 4:5 and Story 9:16
- 3Watermark + renameLogo bottom-right, names by slot
- 4Ready to schedule1080 × 1350 and 1080 × 1920
Step by step
Open Resize and load your photos
In Operimage, open Resize in the sidebar and drop in the photos or choose the folder that holds the shoot.
Pick the Instagram preset
Under Social & platform sizes, choose Instagram 4:5 for portrait posts, Instagram 1:1 for square posts or Story 9:16 for Stories and Reels covers.
Use Fill and check the crop
Fill makes every image exactly the preset size. Click through the list in the Before/After preview and make sure faces, products and text stay inside the frame.
Resize, then reveal the output
Click Resize and use Reveal output to open the 1080 px copies in Finder, ready to post or schedule. Originals stay untouched.
Repeat for each placement
Run the same source folder again with Story 9:16 or Instagram 1:1 if the shoot is going to more than one placement.
FAQ
What size should Instagram photos be in 2026?
Use 1080×1350 for portrait 4:5 feed posts, 1080×1080 for square posts, 1080×566 for landscape posts and 1080×1920 for Stories and Reels. Keep the width at 1080 pixels.
What is the best aspect ratio for Instagram posts?
4:5 portrait (1080×1350) is the best default for photos because it fills the most vertical space in the feed and loses very little in the 3:4 profile grid.
Why does Instagram crop my photos on the profile grid?
The profile grid displays posts as 3:4 thumbnails, so square and landscape posts are center-cropped in the grid. The full image still appears in the feed and when someone opens the post.
How do I resize photos for Instagram on a Mac without cropping?
Use Fit instead of Fill, which keeps the whole image but may leave it a different ratio. To get an exact 4:5 or 1:1 frame without losing content, the image needs empty space around the subject to begin with.
Does Instagram reduce photo quality?
Instagram recompresses every upload and downsizes anything wider than 1080 pixels. Uploading a clean 1080-pixel file at the correct ratio gives the least extra processing.
What size is an Instagram Story?
1080×1920 pixels at 9:16. Keep text and faces out of roughly the top and bottom 250 pixels, where Instagram's interface overlaps.
Can I resize a whole folder of photos for Instagram at once?
Yes. Operimage, a free Mac app, resizes a whole folder to the Instagram 1:1, Instagram 4:5 or Story 9:16 preset in one run, entirely on your Mac.