How to compress images for WordPress
The most effective way to optimize WordPress images is to fix them before they reach the site. Resize each image to the largest width your theme actually displays, save it as WebP or JPEG at around 80% quality, and keep most files between about 50 KB and 300 KB. Upload those finished files and WordPress builds its thumbnails from a lean original.
On a Mac, that preparation takes one batch run. Operimage, a free Mac app, resizes, compresses, converts and strips metadata from a whole folder on your computer, without uploading anything to a third-party service. It is one of several Mac tools for batch image work that fit naturally into a publishing routine: write the post, drop the images folder in, upload the output.
The rest of this guide explains what WordPress does with your images, which sizes and formats to use, and how to avoid the common mistakes that make media libraries heavy.
- 1Post images14 photos, 4032 × 3024, ~3 MB each
- 2Resize with FitHero 2048 px, inline 1200 px
- 3CompressWebP, about 80% quality
- 4UploadRoughly 80–250 KB each
What WordPress does with your uploads
When you upload an image, WordPress keeps the original and generates several smaller copies for its built-in sizes: thumbnail (150 × 150), medium (up to 300 px), medium_large (768 px wide), large (up to 1024 px), and 1536 and 2048 px versions. Themes and plugins often register more. WordPress then uses srcset so browsers can pick a suitable size for each screen.
Since WordPress 5.3, images wider or taller than 2560 pixels are scaled down to 2560 pixels and saved as a separate -scaled file that becomes the main image. The original full-resolution upload is still stored on the server. The generated sub-sizes are saved with a default JPEG quality of 82.
This system helps, but it does not replace preparing your files. A 12 MB camera original still takes server space and backup time, the -scaled image is only lightly compressed, and every sub-size inherits whatever was in the original, including EXIF and GPS metadata in the stored file.
WordPress default image sizes
| Size name | Maximum dimensions | Typical use |
|---|---|---|
| thumbnail | 150 × 150 (cropped) | Galleries, admin |
| medium | 300 × 300 | Small inline images |
| medium_large | 768 wide | Responsive srcset |
| large | 1024 × 1024 | Inline content images |
| 1536 × 1536 and 2048 × 2048 | 1536 / 2048 | High-density screens |
| Big image threshold | 2560 px | Larger uploads scaled to this |
- 2560 pxBig image threshold (WordPress 5.3+)
- 82Default JPEG quality for sub-sizes
- 5.8WordPress version that added WebP uploads
What size should images be for WordPress?
The best image size for WordPress is the largest width the image is shown at, allowing for high-density screens where it matters. Check your theme: content columns are commonly 700–1200 pixels wide, and full-width hero or cover blocks stretch to the browser width.
Uploading a 4000-pixel phone photo for a 760-pixel content column wastes storage and makes WordPress do unnecessary work. Resizing the folder before upload with a Fit rule keeps every image's proportions while capping its width.
- Full-width hero or cover images: 1920–2560 px wide.
- Featured images: match your theme's featured image size, often 1200–1600 px wide.
- Inline content images: 1200–1600 px wide covers most themes on high-density screens.
- Thumbnails and galleries: let WordPress generate them from a right-sized original.
- Logos and icons: SVG through a plugin, or PNG or WebP at about twice the display size.
WebP, JPEG, AVIF or PNG for WordPress?
WebP is the best default for WordPress photos. WordPress has accepted WebP uploads since version 5.8, every current browser displays it, and it is typically 25–35% smaller than JPEG at similar visual quality. The guide on batch converting JPGs to WebP covers the switch in detail. JPEG remains the safe fallback for older workflows and for images that will also be emailed or downloaded.
AVIF uploads are supported from WordPress 6.5 when the hosting server's image library supports AVIF. AVIF files are often smaller than WebP, but encoding is slower and not every host can process them; the AVIF versus WebP breakdown helps decide. PNG belongs to screenshots, transparent graphics and flat illustrations, and transparent PNGs can often become much smaller as WebP; see turning PNG graphics into WebP.
Typical file size at similar visual quality
How many KB should WordPress images be?
There is no official WordPress limit beyond the upload maximum your host sets, but fast pages need small images. The hero image is often the Largest Contentful Paint element, and Google's Core Web Vitals treat an LCP of 2.5 seconds or less as good. A heavy hero image is the most common reason a page misses that mark on mobile.
Reasonable budgets are about 150–300 KB for a full-width hero, 100–200 KB for featured images, and 50–150 KB for inline images. Rather than guessing a quality percentage, set a file size budget per image and let the compressor find the best quality that fits. Budgets per role also keep a team's uploads consistent from post to post.
Suggested budgets by image role
| Image role | Width | Format | Budget |
|---|---|---|---|
| Full-width hero | 1920–2560 px | WebP or JPEG | 150–300 KB |
| Featured image | 1200–1600 px | WebP or JPEG | 100–200 KB |
| Inline photo | 1200–1600 px | WebP or JPEG | 50–150 KB |
| Screenshot | Native, up to 1600 px | PNG or WebP | 50–200 KB |
Compress before upload or use a WordPress plugin?
Image optimization plugins compress files on the server or through an external service after upload. They are useful for an existing library you cannot easily reprocess, and some can serve WebP automatically. The trade-offs are extra server work, another plugin to maintain, quotas or paid plans on some services, and the fact that your original still arrives at full size.
Compressing on your Mac before upload avoids those costs and gives you a preview of the exact file visitors will receive. Many sites combine both: a pre-upload batch for new content and a plugin for the back catalog.
Whichever route you take, avoid compressing the same image twice with lossy settings. If you prepare WebP files at 80% on your Mac and a plugin recompresses them again on upload, the second pass adds artifacts for little extra saving. Turn off lossy recompression in the plugin for images you have already optimized.
Before upload on your Mac
New content
- Small originals; less storage and faster backups
- You preview the exact output before publishing
- No server load or third-party processing
- Metadata stripped before files leave your computer
Optimization plugin
Existing library
- Processes images already on the site
- Can automate WebP delivery
- Adds server work or external processing
- Some services have quotas or paid plans
Verdict: Prepare new images on your Mac; use a plugin only if you need to clean up an existing media library.
How to batch prepare WordPress images on a Mac
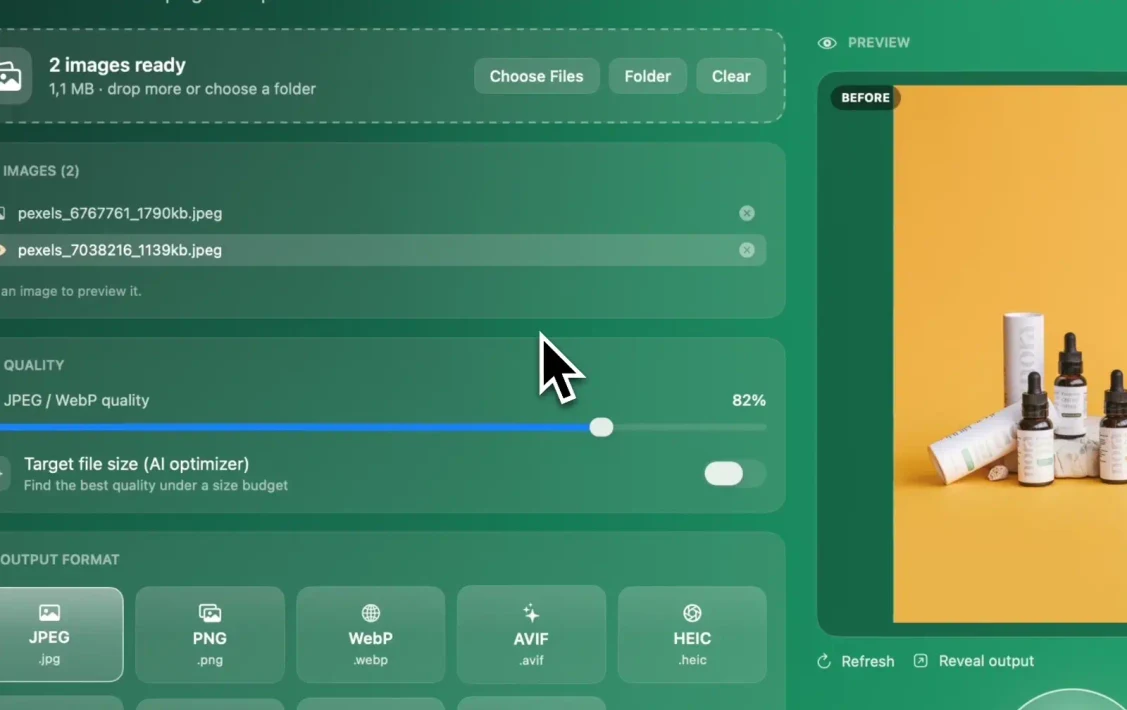
In Operimage, open Resize, choose Manual resize, enter the target width with Fit, and resize the post's folder. Then open Compress, choose WebP or JPEG, set quality around 80% or switch on Target file size with your budget, and turn on metadata stripping. Click a few images to compare Before and After, then click Compress and use Reveal output to open the files in Finder.
Save the sequence as a Workflow, for example resize to 1600 px, compress to WebP under 200 KB, then rename, so each new post's images take one run. Everything is processed on your Mac, which matters for unpublished product launches and client sites.
File names, metadata and other details
WordPress uses the uploaded file name in the image URL, so IMG_4821.jpg becomes a meaningless address. Descriptive, hyphenated names such as walnut-desk-oak-legs.webp are easier to manage and give search engines a small extra clue. You can batch rename images on the Mac in the same session, using Operimage's SEO naming mode.
Photos from phones and cameras carry EXIF data, and often GPS coordinates. WordPress keeps the original file on the server, so clearing location data from photos before upload is the reliable way to keep it private.
- HEIC from iPhone: recent WordPress versions can convert HEIC on upload only if the server supports it; converting iPhone photos to JPG first is more predictable.
- Colors: export in sRGB so photos look the same in every browser.
- Alt text: compression does not touch it; write it in WordPress for every meaningful image.
- Lazy loading: WordPress lazy-loads images by default, but small files still matter for the first screen.
- Re-uploads: replacing an image creates new files; delete unused originals to keep the library lean.
Troubleshooting WordPress image problems
Most WordPress image issues trace back to file size, dimensions or what the hosting server supports. Check these before installing another plugin.
- Upload rejected for exceeding the maximum upload size: the limit is set by your host, shown in Media → Add New. Resize and compress the file, or ask the host to raise it.
- HTTP error during upload: very large images can exhaust server memory while WordPress generates sub-sizes. Uploading images resized to 2560 px or less usually fixes it.
- Image looks blurry on the page: the theme displays it wider than the uploaded file, or a small sub-size was chosen in the block settings. Upload a wider original or pick the Large or Full size.
- WebP uploads but thumbnails are missing: the server's image library lacks WebP support. Ask the host to enable it, or upload JPEG.
- Old posts are still heavy: pre-upload compression only affects new uploads. Re-export and replace the largest images, or use a plugin for the existing library.
Pre-upload checklist for WordPress images
Run through this list for each post, or build it into a saved Workflow so it happens automatically. For broader compression settings outside WordPress, see the guide to shrinking image files on a Mac without uploading them.
Before you upload to WordPress
- Width matches how the theme displays the image
- WebP or JPEG for photos; PNG or WebP for graphics
- Within budget: about 150–300 KB hero, 50–150 KB inline
- EXIF and GPS data stripped
- Descriptive, hyphenated file names
- Most detailed image checked at 100% zoom
Step by step
Put the post's images in one folder
Collect every image for the article or page in a folder on your Mac, separating hero images from inline images if their sizes differ.
Resize to your theme's display width
In Operimage, open Resize, choose Manual resize, enter the width your theme displays (for example 2048 px for heroes, 1200 px for inline) and use Fit.
Compress to WebP or JPEG
Open Compress, pick WebP (or JPEG for maximum compatibility), and set quality around 80% or a target file size such as 200 KB.
Strip metadata and preview
Turn on metadata stripping to remove EXIF and GPS data, then compare Before and After on the most detailed images.
Export and upload to WordPress
Click Compress, use Reveal output to open the files in Finder, and drag them into Media → Add New in WordPress.
FAQ
Should I compress images before uploading to WordPress?
Yes. Compressing and resizing before upload keeps the stored originals small, avoids extra server work, and lets you check the exact files visitors will download.
What is the best image size for WordPress?
Use the largest width your theme displays: about 1920–2560 px for full-width heroes and 1200–1600 px for featured and inline images. WordPress creates smaller sizes automatically.
Does WordPress compress images automatically?
Partly. WordPress generates resized copies at JPEG quality 82 and scales uploads over 2560 px, but it keeps your original upload and does not convert to WebP by default.
Should I use WebP or JPG in WordPress?
WebP for most photos, since it is supported since WordPress 5.8 and is usually smaller at similar quality. Use JPEG when an image also needs to work outside the browser.
How many KB should a WordPress image be?
Roughly 150–300 KB for a full-width hero image and 50–150 KB for inline images. Smaller images help pages meet the 2.5-second Largest Contentful Paint target.
Do I need an image optimization plugin for WordPress?
Not for new images if you optimize them before upload. A plugin is mainly useful for compressing an existing media library.
Does compressing images help WordPress SEO?
Indirectly, yes. Smaller images make pages load faster, which improves Core Web Vitals and the experience that search engines measure.