How to convert JPG to WebP on Mac
To convert JPG to WebP on a Mac, you need a tool with a WebP encoder, because macOS can open WebP but not save it. Preview's export formats include JPEG, PNG, HEIC and TIFF, and Finder's Convert Image Quick Action offers JPEG, PNG and HEIF, but neither lists WebP. The practical options are Google's free cwebp command-line tool, an online converter, or a Mac app such as Operimage.
In Operimage, a free Mac app, the whole job is: choose Convert, drop the JPG folder, pick WebP, set quality to about 80%, check one image in the Before/After preview and click Convert. Everything runs on your Mac. If you also need the reverse direction or want to understand where WebP fits overall, start from the WebP converter hub.
- 1JPG folder180 photos, 4032 px wide, about 3 MB each
- 2ResizeLong edge 2000 px for the layout
- 3Convert to WebPQuality 80%
- 4WebP outputSame names, ready to upload
Is it worth converting JPG to WebP?
For images you serve on your own website, usually yes. Google's published study found lossy WebP files 25–34% smaller than JPEG at equivalent quality, and smaller images mean faster page loads, better Largest Contentful Paint scores and less bandwidth. Every current version of Chrome, Safari, Firefox and Edge displays WebP, so a WebP-only site works for practically all visitors.
For images going somewhere else, often no. Marketplaces, print services, email newsletters and many older systems still prefer or require JPG. Converting those to WebP just creates files someone will have to convert back. Keep the JPGs as masters and generate WebP copies only for the places that benefit.
If you want even smaller files and can manage more complexity, AVIF goes further than WebP. The JPG to AVIF guide covers that route and when it is worth it.
Typical file size relative to JPEG
Why Preview and Finder can't save WebP
Apple added WebP decoding to macOS in Big Sur (11), so Preview, Quick Look, Finder thumbnails and Safari all display WebP files. Apple has not added a WebP encoder to the system image framework that Preview, Finder Quick Actions, Shortcuts and sips share, which is why none of them offer WebP as an export option. This is a common surprise, and it explains why searches for “save as WebP Mac” lead to third-party tools.
If you prefer Terminal, Google's cwebp encoder is free and well documented. With Homebrew installed, brew install webp adds it, and cwebp -q 80 photo.jpg -o photo.webp converts one file. A shell loop handles a folder. cwebp gives fine control but no visual preview, and you have to script subfolders and naming yourself.
Batch convert JPG to WebP in Operimage
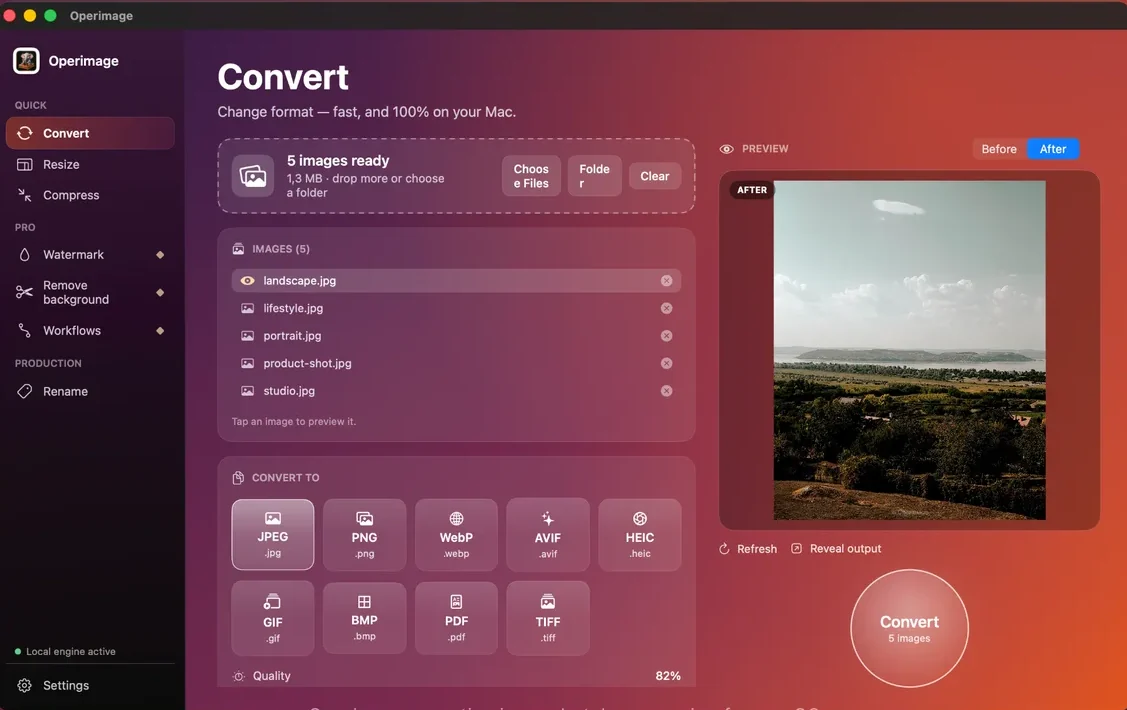
Operimage handles JPG to WebP as a normal batch. Select Convert in the sidebar and drop a folder on the window; the header confirms how many images are ready, and you can drop more or click Clear to start again. Choose WebP as the output format and set the quality slider.
Click a few images in the list to check them in the Before/After preview. Pick the most demanding ones: a sky gradient, a face, a close-up of fabric or a photo with text on it. If those look clean, the rest will too. Click Convert, and Operimage writes WebP files while keeping your folder structure and leaving the JPGs untouched. Reveal output opens the result in Finder.
If the same conversion happens every week, for example new blog photos or product shots, save the steps as a Workflow such as resize → convert to WebP → rename so the next batch is a single run.
What WebP quality setting should you use?
For photographs, a WebP quality of 75–82% is the usual sweet spot: files are clearly smaller than the source JPG and differences are hard to spot at normal viewing size. Google's cwebp tool defaults to 75, which is a reasonable reference point. Quality scales are not identical between encoders, so confirm with your own eyes in a side-by-side preview.
Raise the setting for images where flaws are obvious: product photos people zoom into, portraits with smooth skin, and images with text overlays. Lower it for large background images behind text, where softness is invisible. If the destination sets a hard size limit, such as 150 KB per image, a target-size approach is simpler than guessing; the compress-to-a-size-budget guide shows how.
- Blog and article photos: 75–80%.
- Product photos and portfolio work: 82–85%.
- Full-width hero images: 80% after resizing to the displayed width.
- Images with small text or UI: 85–90%, or keep them as PNG.
- Thumbnails under 400 px: 70–75% is usually enough.
Resize before you convert: the bigger win
Format change alone typically saves a quarter to a third of the file size. Resizing often saves far more. A 12-megapixel photo is 4032 × 3024 pixels, while most blog content columns display images at well under 1200 pixels wide and full-width heroes rarely need more than 2000–2560 pixels. Sending a 4032-pixel image to a 1200-pixel slot wastes most of the bytes, whatever the format.
The efficient order is resize first, then convert to WebP. Operimage's Resize tool sets an exact width or height before conversion, and the bulk image resizing guide covers fit, fill and choosing dimensions. Combine both in a saved Workflow so you never upload an oversized WebP again.
- 12 MP photo4032 × 3024 · camera original
- Full-width hero2000 × 1500 · 4:3
- Blog column1200 × 900 · 4:3
What changes after JPG to WebP conversion
The picture should look the same; what changes is the file size and where the file can be used. Pixel dimensions stay the same unless you resize. The file name keeps its base and gains a .webp extension, so product-01.jpg becomes product-01.webp, which matters if your site or CMS references images by name.
Color: JPGs from cameras and iPhones are often tagged Display P3. Browsers handle tagged WebP correctly, but if colors look different after upload, convert the source to sRGB first. Metadata: EXIF such as camera model and GPS location can travel into WebP; strip it for public pages unless you have a reason to keep it.
Quality: a JPG is already lossy, so converting it to WebP compresses an already-compressed image. Detail the JPG lost cannot come back, which is why starting from the highest-quality JPG you have gives the best WebP.
Uploading WebP to WordPress, Shopify and other platforms
WordPress has accepted WebP uploads since version 5.8, provided the server's image library supports WebP, which most hosts do. The WordPress image compression guide covers file size targets and plugins that create WebP automatically.
Shopify accepts WebP uploads and its CDN can also serve modern formats automatically from JPG uploads, so converting first is optional there; see image formats and sizes for Shopify stores for details. For other platforms, check the current help page for accepted formats and size limits, since these change. When a platform converts images itself, uploading a well-sized, high-quality JPG is often the better choice.
Before a JPG to WebP batch
- Confirm the destination accepts WebP
- Resize to the largest size the layout actually displays
- Set quality to 75–82% for photos, 85% for products
- Keep folder structure on and overwrite off
- Preview a sky, a face and a text overlay at 100% zoom
- Strip GPS metadata for public images
- Keep the original JPGs as masters
Lossy or lossless WebP for JPG sources?
WebP has two modes. Lossy WebP works like JPEG and is what you want for photographs. Lossless WebP works like PNG, keeping every pixel exactly, and is designed for graphics, screenshots and images with flat color.
For a JPG source, lossless WebP is almost always the wrong choice. The JPG already contains compression artifacts, and a lossless encoder faithfully preserves all of that noise, often producing a file larger than the original JPG. Use lossy WebP at a sensible quality for JPG photos, and reserve lossless output for PNG-style artwork.
The same logic applies to the source. Every lossy step costs a little detail, so convert from the best original you have. If your photos started on an iPhone as HEIC and were exported to JPG along the way, going straight from HEIC to WebP skips one generation of compression and usually gives a cleaner result at the same file size.
Troubleshooting JPG to WebP conversions
If the output is not what you expected, these are the usual causes and fixes.
- WebP is larger than the JPG: the JPG was already heavily compressed, or quality is set near 100%. Lower quality to around 80%, or keep the JPG for that file.
- Photos look rotated: the JPG relied on an EXIF orientation tag. Check the preview before converting and fix orientation at the source if needed.
- Colors look flat on the website: the source was Display P3 and the pipeline dropped the profile. Convert the masters to sRGB first.
- Banding in skies: quality is too low for smooth gradients. Raise it to 85% for those images.
- Upload form rejects .webp: that platform does not accept WebP yet. Upload the JPG instead.
Step by step
Open Convert and load the JPGs
In Operimage, choose Convert in the sidebar, then drop JPG files on the window or click Folder to load a directory and its subfolders.
Choose WebP as the output
Pick WebP from the output formats so every image in the list is encoded to WebP with the same settings.
Set quality to 75–82%
Start at about 80%. Use the lower end for large background photos and up to 85% for product and portrait images.
Check Before and After
Click a detailed image in the list and compare at full size, looking at skies, skin, fabric and any text overlays.
Convert and reveal the WebP files
Click the round Convert button, then Reveal output to open the WebP folder in Finder. The original JPGs are not overwritten.
JPG to WebP methods on Mac
| Method | Writes WebP | Batch | Preview of result | Privacy |
|---|---|---|---|---|
| Preview / Finder / sips | No | Not applicable | Not applicable | Local |
| cwebp (Terminal) | Yes | With a shell loop | No | Local |
| Online converter | Yes | Usually limited | Varies | Files uploaded |
| Operimage | Yes | Folders and subfolders | Before/After | Local, nothing uploaded |
FAQ
How do I convert JPG to WebP on Mac?
Use a tool with a WebP encoder, since Preview cannot save WebP. In Operimage, choose Convert, add the JPGs, select WebP, set quality to about 80% and click Convert.
Can Preview convert JPG to WebP?
No. Preview opens WebP files but its Export menu does not include WebP. Finder Quick Actions, Shortcuts and sips have the same limitation.
What quality should I use for JPG to WebP?
Start at 75–82% for photos and up to 85% for product shots or portraits. Check a detailed image side by side before converting the whole batch.
How much smaller is WebP than JPG?
Google's published comparison found lossy WebP about 25–34% smaller than JPEG at similar quality. Results vary by image, and resizing often saves more than the format change.
Does converting JPG to WebP lose quality?
Lossy WebP discards some data, but at 75–85% the difference is not visible at normal viewing size. Starting from a high-quality JPG gives the best result.
Should I replace my JPG files with WebP?
Keep the JPGs as masters and use WebP copies for your website. Marketplaces, print services and email often still need JPG.
Do all browsers support WebP?
Yes, every current version of Chrome, Safari, Firefox and Edge supports WebP. Safari added support in version 14 in 2020.