Is there an alternative to Photoshop's Image Processor?
Yes, for most of what people use it for. Photoshop's Image Processor, found under File → Scripts → Image Processor, takes a folder or the open documents, optionally resizes them to fit a width and height, and saves JPEG, PSD and/or TIFF copies, with options to convert to sRGB, add copyright info and run an action on each file. Together with File → Automate → Batch and droplets, it is how many photographers have batch processed for years.
If the batch only converts, resizes, compresses, watermarks or renames, Photoshop is more than the job needs: it has to launch, open every file and, for anything beyond Image Processor's options, rely on a recorded action. Operimage, a free Mac app, does those jobs directly, adds WebP and AVIF output and compression to a target file size, and runs entirely offline. The overview of batch image tasks on Mac maps each of those jobs if you are planning a whole pipeline.
Photoshop Image Processor and Batch
Full editor, scripted
- Image Processor saves JPEG, PSD and TIFF
- Any recorded action can run on every file
- Real editing: layers, adjustments, retouching
- Needs Photoshop open while it runs
Operimage
Dedicated batch tools
- 9 formats incl. WebP, AVIF, PNG, HEIC
- Social resize presets and exact sizes
- Target file size, watermark, rename
- No actions to record; saved Workflows
Verdict: Editing every image: Photoshop. Converting, sizing, compressing and naming a folder: a dedicated batch app is quicker to set up and run.
What Photoshop's Image Processor actually does
Image Processor is a deliberately simple script. Its dialog is split into four numbered areas, and knowing exactly what each offers makes it easier to see what you would need elsewhere. The details below follow Adobe's help page.
- Source: process the open images or a folder, optionally including all subfolders.
- Destination: save in the same location or a chosen folder. Each format goes into its own subfolder named JPEG, PSD or TIFF.
- File types: Save as JPEG (quality 0–12, optional Convert Profile to sRGB), Save as PSD (with Maximize Compatibility) and Save as TIFF (optional LZW compression), in any combination.
- Resize to Fit: for each format, enter a width and height; the image fits inside those dimensions and keeps its proportions.
- Run Action: choose an action set and action loaded in the Actions panel to run on each image.
- Copyright Info and Include ICC Profile: add copyright metadata and embed the color profile in saved files.
- Saved settings: Save and Load keep a configuration in a file for reuse.
Actions, Batch and droplets
Anything Image Processor cannot do goes through actions. You record the steps once in the Actions panel, then run File → Automate → Batch on a folder. Adobe's Batch dialog can include all subfolders, save into a destination folder, override the action's Save As commands and build new file names from the File Naming fields, such as document name plus a serial number. File → Automate → Create Droplet turns the same action into an icon you can drop files onto.
This is also the route for formats Image Processor does not offer. Photoshop has opened and saved WebP natively since version 23.2 in February 2022, so a recorded Save a Copy as WebP step inside an action, run through Batch, produces WebP files. The trade-off is setup: Adobe's own instructions note that the action must include a save step, and file names recorded inside an action's Save As step are not replaced by the Batch override, which is a common source of overwritten files.
Photoshop automation vs Operimage
The table compares the batch jobs people most often run on folders. Photoshop values are based on Adobe's help pages for Image Processor, Batch and droplets as of October 2026. Manual setup means it is possible by recording an action rather than as a built-in option.
Photoshop Image Processor and Batch vs Operimage (as of October 2026)
| Job | Photoshop (Image Processor, Batch) | Operimage |
|---|---|---|
| Convert formats | JPEG, PSD, TIFF in Image Processor; others via actions | Yes, 9 formats incl. WebP, AVIF, PNG |
| Resize presets | Resize to Fit (width × height) | Yes, 6 social presets plus manual sizes |
| Compress to target file size | Not built in | Yes (AI optimizer) |
| Watermark | Manual setup (action) | Yes (text or logo) |
| Rename | Batch File Naming fields | Yes, incl. SEO and shop packs |
| Background removal | Manual setup (action), test reliability | Yes, on-device batch |
| Keeps folder structure | Batch with subfolders and Save and Close; Image Processor adds format subfolders | Yes |
| Editing such as retouching, layers | Yes | Not built in |
| Works offline | Yes | Yes |
| Where to get it | Adobe | Mac App Store (free) |
Where a dedicated batch app is faster
Photoshop is an editor that can batch. A dedicated batch app is built only to batch, so the common jobs take fewer steps and less setup. These are the places users of Image Processor most often notice the difference.
Size limits are a good example. Image Processor's JPEG quality is a single number from 0 to 12 for every file, so a folder of mixed photos comes out at mixed sizes. Operimage's Target file size (AI optimizer) searches for the highest quality under the budget you set, image by image, which is what marketplaces and upload forms actually require.
- Modern formats: WebP and AVIF are choices in the Convert menu, not a recorded save step. Resizing for the web? The guide to resizing a folder of photos on Mac covers fit, fill and long-edge sizing.
- Watermarks: the Watermark tool places text or a logo with placement, opacity, size and padding controls, without building an action. See adding a watermark to a whole folder for placement that survives cropping.
- Naming: the Rename tool's SEO, Canonical and Hybrid modes and Shopify, Amazon and WooCommerce packs go further than serial numbers; the guide on naming image files in bulk covers patterns.
- Cutouts: Remove background runs an on-device model across the batch with Smart, Fast, Balanced and Best modes. The guide to removing backgrounds offline explains the edge options.
- Preview: click any image to compare Before and After before the batch runs, instead of checking output after the fact.
How to redo your Image Processor or Batch workflow in Operimage
Open your Image Processor settings, or the action you run through Batch, and list each step. Source folder becomes the folder you load in Operimage. Resize to Fit becomes Manual resize with the same width and height and fit, so proportions are kept. Save as JPEG becomes Convert with JPEG; as a rough guide, Photoshop's 10 of 12 corresponds to a high setting, so start around 82–85% and compare. Convert Profile to sRGB is worth checking on a few colorful images, since web images look most consistent in sRGB.
Steps from an action map to tools: a watermark layer becomes the Watermark tool, a Save As with a naming pattern becomes Rename, and a Save a Copy as WebP becomes Convert with WebP. If your action strips metadata, enable metadata stripping in Compress; if you rely on Copyright Info to write copyright fields, keep that step in Photoshop, since Operimage strips metadata rather than editing it. Save the chain as a Workflow so the next folder is one click. Steps that edit pixels, such as curves, frequency separation or template layers, are the ones to leave in Photoshop.
Switching in 10 minutes
Start with the batch you run most often that does not edit pixels. Rebuild it once, compare results, and keep Photoshop for the batches that genuinely need it.
Switching in 10 minutes
- Open Image Processor or your batch action and list every step
- Install Operimage from the Mac App Store and load the same source folder
- Match Resize to Fit with Manual resize and the same dimensions
- Pick the output format and start JPEG quality around 82–85%
- Add Watermark or Rename steps that the action used to do
- Compare 20 outputs for size, sharpness, color and names
- Save the steps as a Workflow; keep editing actions in Photoshop
Common Image Processor jobs and their replacements
Most Image Processor and Batch runs fall into a handful of patterns. Here is how each one translates, along with the Photoshop-specific detail worth knowing.
- Client JPEG proofs from TIFF exports: Convert to JPEG at 82–85%, Resize to the proof size, Watermark with your name. Layered TIFFs are read as the flattened image that was visible when the file was saved.
- Web images from camera exports: Resize to 2048 px on the long edge, Convert to WebP around 80%, strip metadata.
- Product photos for a shop: Resize to the platform's square, Compress with a target file size, Rename with the Shopify or Amazon pack. The Shopify product image resizing guide lists common sizes.
- Archive TIFFs: Convert to TIFF when an archive or print workflow expects it, and compare file sizes with your Image Processor output, which may have used LZW compression.
- Format change only: for a quick JPEG, PNG or HEIC conversion of a few files, Preview's File → Export Selected Images on macOS may be enough without either app.
When to keep using Photoshop for batches
Keep Photoshop when each image needs real editing as part of the batch. Actions can apply adjustment layers, run filters, place images into layered templates, use Smart Objects and save layered PSDs, and none of that is what a batch converter does. Image Processor's ability to save JPEG, PSD and TIFF versions in one pass is also handy for photographers who deliver all three.
If you already work in Photoshop all day, running Image Processor on a finished set is a natural last step, and switching apps for it saves little. The case for a dedicated tool is strongest when Photoshop is opened only to batch, when colleagues without Photoshop need to run the job, or when the output must be WebP, AVIF or under a file-size limit. For other dedicated options, see the comparison of offline converters for Mac, and for help choosing formats, the hub on batch converting image formats.
Step by step
Load the folder you used in Image Processor
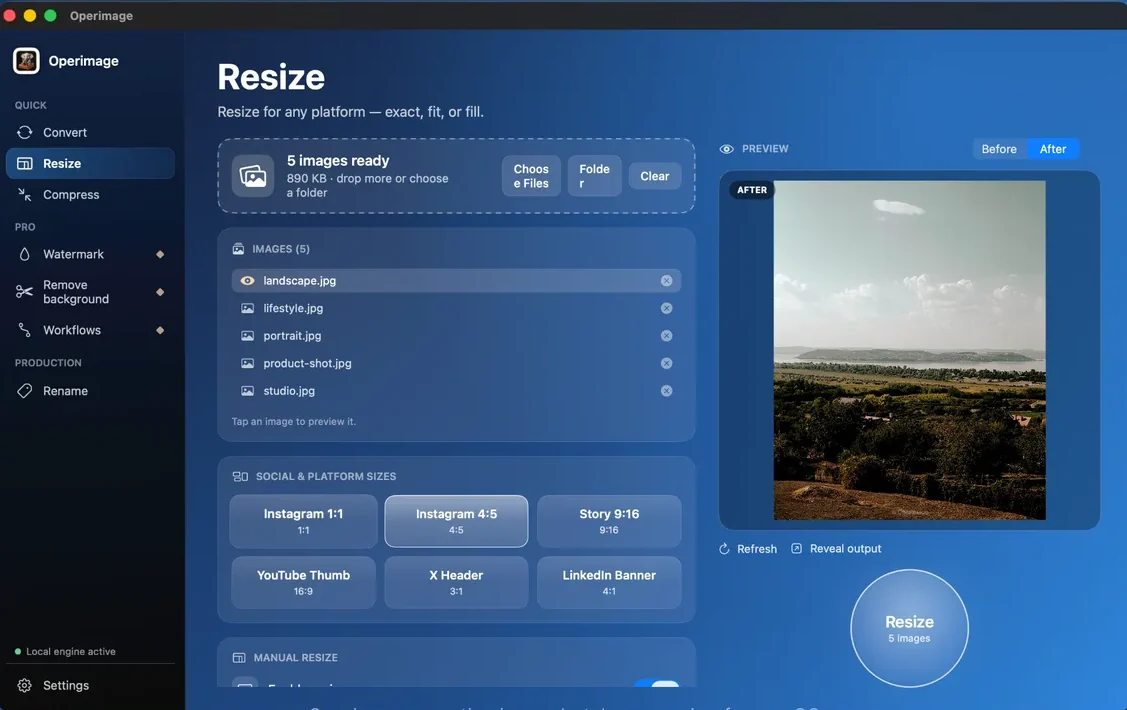
Open Operimage, choose Resize or Convert in the sidebar and click Folder to load the source folder, subfolders included.
Recreate Resize to Fit
In Resize, use Manual resize and enter the width and height you used in Image Processor, with fit to keep proportions.
Pick format and quality
In Convert, choose JPEG, TIFF or another format such as WebP or AVIF, and set the quality slider, for example 82% where you used 10 of 12.
Add watermark or rename steps
Use Watermark for a text or logo mark and Rename for naming patterns that your action used to handle.
Check Before and After
Click a few images in the list to compare Before and After, pressing Refresh after each change.
Run and save a Workflow
Click the round action button, Reveal output to check the files, then save the steps as a Workflow for next time.
FAQ
Where is Image Processor in Photoshop?
Choose File → Scripts → Image Processor. It processes open images or a folder and saves JPEG, PSD and/or TIFF copies.
Can Photoshop's Image Processor save WebP or PNG?
No. Image Processor saves JPEG, PSD and TIFF. To batch save WebP or PNG in Photoshop, record an action with a save step and run it through File → Automate → Batch.
Why does Image Processor create JPEG and TIFF folders?
Image Processor saves each output format into its own subfolder, named JPEG, PSD or TIFF, inside the destination folder.
How do I batch resize images without Photoshop on a Mac?
For a few images, select them in Preview and use Tools → Adjust Size. For whole folders, a batch app such as Operimage resizes with presets or exact dimensions offline.
What is the difference between Image Processor and Batch in Photoshop?
Image Processor is a simple dialog for resizing and saving JPEG, PSD and TIFF with an optional action. Batch runs any recorded action on a folder, with control over destination and file naming.
Can I remove backgrounds in a batch without Photoshop?
Yes. Operimage's Remove background tool processes a whole folder with an on-device AI model and exports transparent PNG or WebP.