How to convert PNG to JPG on a Mac
The simplest way to convert PNG to JPG on a Mac is Preview: open the PNG, choose File → Export, set Format to JPEG, drag the Quality slider to about 80–90% and click Save. For several files, select them in Finder, right-click and choose Quick Actions → Convert Image, pick JPEG and click Convert to JPEG. Finder writes a JPG next to each PNG.
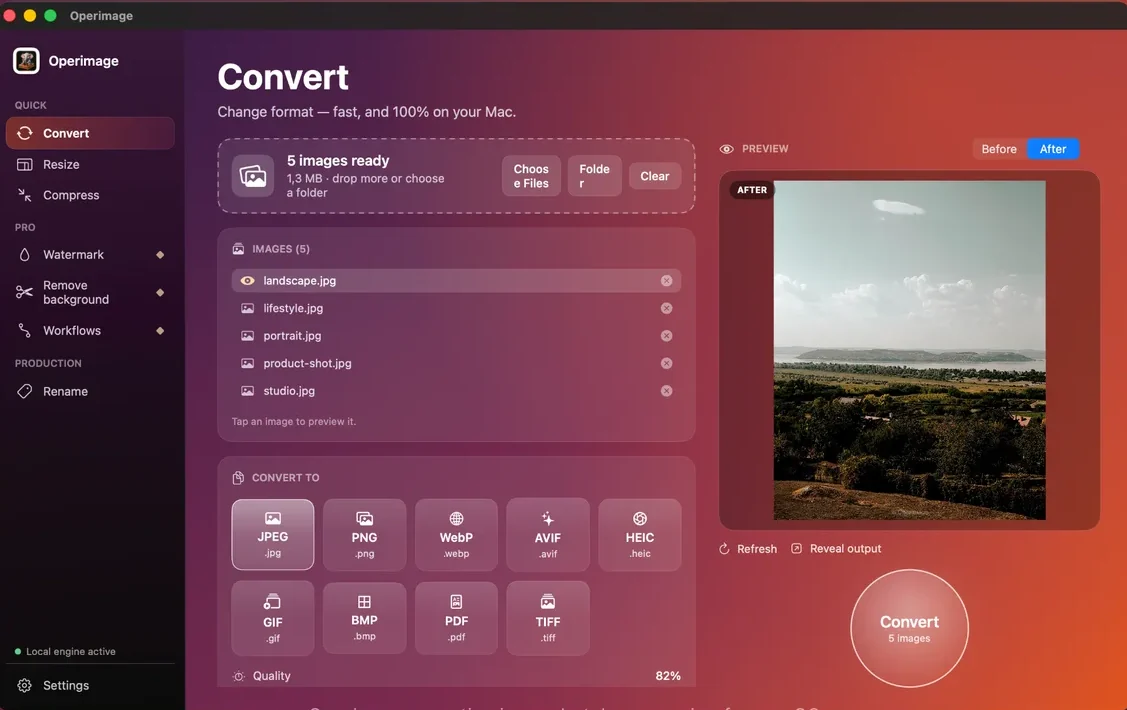
For folders of hundreds or thousands of PNGs, use a batch converter. Operimage, a free Mac app, converts whole folders to JPG on your Mac with one quality setting, a Before/After preview and output that never overwrites the originals. It belongs to a wider family of Mac batch format conversion tools for every common format.
Before you convert, check two things: whether the image is a photo (where JPG saves a lot) and whether it uses transparency (which JPG cannot keep). The sections below cover both.
- 1PNG folder260 product photos, 1.4 GB
- 2Convert to JPEGQuality 82%, metadata stripped
- 3JPG folderSame names, PNG masters kept
Why convert PNG to JPG?
PNG is lossless. Every pixel is stored exactly, which is ideal for screenshots, logos, interface graphics and anything you will edit again. For photographs, though, lossless storage is expensive: a photo saved as PNG is often several times larger than a JPG that looks identical at normal viewing size.
JPG uses lossy compression tuned for photographic content. At 80–90% quality it discards detail the eye does not notice, and the result is a much smaller file. That matters when a marketplace rejects uploads over a size limit, when a web gallery loads slowly, or when an email bounces because the attachments are too big.
Converting is the simplest fix when PNG photos have crept into a workflow, often from screenshots of photos, exports from editing apps that default to PNG, or AI image tools that save PNG.
Compatibility is rarely the reason, since PNG opens almost everywhere. The reason is weight: the same product photo as a JPG uploads faster, loads faster for shoppers, and leaves more room under storage and attachment limits. That is why marketplaces, photo labs and many content systems ask for JPG even when they also accept PNG.
- 82%JPEG quality for web photos
- 90%JPEG quality for product and hero images
- No alphaJPG cannot store transparency
When should you keep PNG instead?
Converting to JPG is not always an improvement. For some images it makes the file larger and the quality worse at the same time.
Flat graphics, screenshots and images with text compress very efficiently as PNG because they contain large areas of identical color. As JPG, they often end up similar in size or bigger, with gray smudges, known as ringing, around letters and sharp edges. If a screenshot needs to be smaller, WebP or a resized PNG usually works better; the guide to converting PNG images to WebP covers that route.
- Logos, icons and graphics with transparent backgrounds: keep PNG or use WebP.
- Screenshots and images with small text or thin lines: keep PNG, or try WebP.
- Flat-color illustrations and diagrams: keep PNG; JPG adds visible artifacts.
- Masters you will edit again: keep the PNG and export JPG copies for delivery.
- Photos, product shots and scans: convert to JPG for a large size saving.
Convert to JPG
Photos
- Photographs and product shots
- Scans and camera exports saved as PNG
- Large size savings at 82–90% quality
Keep as PNG
Graphics
- Logos, icons and transparent cutouts
- Screenshots and images with text
- Flat colors and sharp edges
Verdict: Convert photos, keep graphics. If a graphic is too large, try WebP before JPG.
What happens to transparency when you convert PNG to JPG?
JPG has no alpha channel, so it cannot store transparent or semi-transparent pixels. During conversion, every transparent area is filled with a solid color. Which color depends on the tool: white is the most common, but some tools produce black, which can turn a logo on a transparent background into a logo in a black box.
Semi-transparent edges, such as the soft outline of a product cutout or anti-aliased text, are blended into that fill color. That looks fine on a matching page background and wrong on any other. A cutout flattened onto white will show a white halo when placed on a dark page.
Always check one transparent file in a preview before converting a batch. If the result needs a transparent edge, keep PNG or WebP. If you made the cutouts yourself with a Mac background remover, export them as PNG or WebP rather than JPG for the same reason.
Built-in macOS methods: Preview, Finder and sips
macOS converts PNG to JPG without any extra software. Each method suits a different amount of work.
Preview gives you the most control for one file: File → Export, Format JPEG, and a Quality slider with a live file-size estimate. To convert several, open them together, select all thumbnails in the sidebar and choose File → Export Selected Images, though the quality options are more limited that way.
Finder's Convert Image Quick Action (macOS Monterey and later) handles a selection in seconds: choose JPEG, an image size and whether to preserve metadata. It saves copies next to the originals, which is convenient for a few files and messy for hundreds.
In Terminal, sips converts in bulk: sips -s format jpeg -s formatOptions 85 *.png --out ~/Desktop/jpg converts every PNG in the current folder into the jpg folder at 85% quality. Create the folder first. It is fast and repeatable but offers no preview.
PNG to JPG methods on Mac
| Method | Quality control | Output location | Good for |
|---|---|---|---|
| Preview | Slider with size estimate | Wherever you save | One to a few files |
| Finder Quick Action | Size presets only | Next to the originals | A quick selection |
| sips in Terminal | Exact percentage | Any folder | Scripted, repeat jobs |
| Operimage | Slider with Before/After | Separate output, structure kept | Large folders and recurring batches |
Can you make Mac screenshots save as JPG?
Yes. macOS saves screenshots as PNG by default, which is the right choice for menus, code and interface shots with sharp text. If you mostly screenshot photos or video frames and want smaller files, you can change the default in Terminal: defaults write com.apple.screencapture type jpg, then log out and back in, or run killall SystemUIServer, for the change to take effect. Replace jpg with png to switch back.
The setting only affects new screenshots. Existing PNG screenshots stay as they are, so convert the ones you want to share with any method above, and leave text-heavy ones as PNG where they look sharper.
If you are tidying a Desktop full of old screenshots, sort them first: photo-like captures convert well to JPG, while anything with small text, code or interface elements is better left as PNG or converted to WebP.
Batch converting PNG folders with Operimage
When the PNGs arrive as a folder, such as a product catalog, a photo export or years of saved images, a batch tool keeps the job consistent. Operimage runs entirely on your Mac and shows Local engine active while it works, so nothing is uploaded.
Open Convert, drop the PNGs onto the window or click Folder to load a directory with its subfolders, and choose JPEG. Set the quality slider, click a file in the list to compare Before and After, especially one with transparency, and press the round Convert button. The app can keep the source folder structure, does not overwrite originals unless you choose to, and can strip EXIF and GPS data. Reveal output opens the JPGs in Finder.
For mixed folders that contain PNG, HEIC and WebP together, the same approach works for every file at once; the guide to converting a mixed batch of images on Mac covers how to plan those runs.
What JPG quality setting should you use?
For photos converted from PNG, 82% is a dependable default for the web: the difference from the original is not visible at normal size, and files stay compact. Use about 90% for product photos, portfolio images and anything customers will zoom into. Above 95% the files grow quickly with no visible benefit.
If a platform sets a hard limit, such as a maximum of 1 MB per image, check the pixel dimensions first. A 5000-pixel-wide PNG does not need to be 5000 pixels as a JPG for a web gallery; resizing to 2000 pixels removes over 80% of the pixels before compression even starts. For an exact ceiling, a compressor that targets a file size finds the highest quality that fits.
Before converting a PNG folder
- Logos, icons and screenshots moved out or kept as PNG
- One transparent file checked to see the fill color
- Quality set to 82% for web, 90% for product or hero images
- Pixel dimensions reduced if there is an upload limit
- Output goes to a separate folder; PNG masters kept
- Metadata stripped for anything public
Troubleshooting PNG to JPG conversion
Most surprises come from the content of the PNG rather than the converter.
- The JPG is bigger than the PNG: the image is a flat graphic or screenshot. Keep it as PNG or try WebP.
- Black background where transparency was: the tool filled transparent pixels with black. Use a tool that fills with white, or keep the file as PNG.
- White halo around a cutout: soft edges were blended into a white fill. Keep cutouts as PNG or WebP for dark backgrounds.
- Text looks fuzzy: JPG adds ringing around sharp edges. Raise quality, or keep text-heavy images as PNG.
- Colors shifted: the PNG carried an unusual color profile. Convert to sRGB for web use.
- Need to go the other way: a related guide covers turning WebP files back into JPG, and scanners' TIFF output follows the same JPG rules covered in the TIFF conversion guide.
Step by step
Open Convert and add the PNG files
In Operimage, choose Convert in the sidebar, then drag in PNG files or click Folder to load a whole directory, including subfolders.
Choose JPEG as the output format
Select JPEG. Every PNG in the list will be written as a .jpg copy, and the originals are not overwritten.
Set quality to about 82%
Drag the quality slider to 82% for web photos or about 90% for product and hero images. Turn on metadata stripping for public files.
Check a transparent or detailed file in Before/After
Click a PNG with transparency or fine text in the image list and compare Before and After to see how it flattens.
Convert and reveal the JPGs
Press the round Convert button, then click Reveal output to open the JPG files in Finder.
FAQ
How do I convert PNG to JPG on a Mac?
Open the PNG in Preview, choose File → Export, set Format to JPEG and adjust Quality, then save. For several files, use Finder's Quick Actions → Convert Image.
Can I batch convert PNG to JPG on Mac?
Yes. Finder's Convert Image Quick Action handles a selection, sips converts from Terminal, and Operimage converts whole folders, including subfolders, with one quality setting.
Will converting PNG to JPG lose quality?
JPG is lossy, but at 80–90% quality the difference is invisible for photos. Screenshots and graphics with text show more artifacts and are better kept as PNG.
Does PNG to JPG reduce file size?
For photos, usually by a large margin, often to a small fraction of the PNG size. For flat graphics and screenshots, the JPG can be similar in size or even larger.
What happens to a transparent background when I convert PNG to JPG?
JPG cannot store transparency, so transparent areas are filled with a solid color, usually white. Keep logos and cutouts as PNG or WebP if they need transparency.
Is JPG the same as JPEG?
Yes. .jpg and .jpeg are two extensions for the same format, and every Mac app that reads one reads the other.