How to convert TIFF to JPG on a Mac
To convert a single TIFF to JPG on a Mac, open it in Preview, choose File → Export, set Format to JPEG, drag Quality to about 90% and click Save. To convert several at once without opening anything, select them in Finder, right-click and choose Quick Actions → Convert Image, then pick JPEG. Both methods are built into macOS and work offline.
For a folder of scans, a photographer's delivery or a product image archive, a batch converter is faster and safer. Operimage, a free Mac app, converts whole TIFF folders to JPG on your Mac, writes the results to a separate location and leaves the masters untouched. It is part of a wider set of batch format conversion tools for Mac that cover PNG, HEIC, WebP and more.
The conversion itself is easy. The part that needs thought is what a TIFF can contain that a JPG cannot, which is what the rest of this guide covers.
- 1TIFF masters120 scans, 16-bit, LZW
- 2Convert to JPEGQuality 90%, sRGB checked
- 3Delivery folderJPG copies, masters untouched
Why TIFF files are so large, and when JPG is enough
TIFF (Tagged Image File Format) is a flexible container used by scanners, photo editors, print shops and archives. It usually stores pixels losslessly, either uncompressed or with LZW or ZIP compression, and it can hold 16 bits per channel, layers, multiple pages and alpha channels.
That flexibility costs space. A 24-megapixel image (6000 × 4000 pixels) in 8-bit RGB is 72 MB of raw image data; at 16 bits per channel it doubles to 144 MB. Lossless compression trims that, but TIFF masters of tens of megabytes each are normal.
JPG is enough whenever the file is being viewed rather than edited: website images, product listings, client proofs, email attachments, slideshows and most online print orders. At 90% quality, a JPG of a photograph is visually indistinguishable from the TIFF at normal viewing size while being a small fraction of the size.
- 72 MBRaw data in a 24 MP 8-bit RGB image
- 144 MBSame image at 16 bits per channel
- 8-bitMaximum depth per channel in a standard JPG
What happens to 16-bit, layers, pages and transparency?
JPG is deliberately simple: one image, 8 bits per channel, no transparency. Everything else in a TIFF is flattened or dropped during conversion, so it helps to know what to expect before you run a big batch.
- 16-bit depth: reduced to 8 bits per channel. Fine for viewing, but smooth gradients such as studio backdrops or skies can show slight banding. Use high quality and check gradients in the preview.
- Layers: Photoshop can save layered TIFFs. Converters read the flattened composite image, so what you get is what was visible when the file was saved; hidden layers are ignored.
- Multiple pages: fax-style or scanned-document TIFFs can contain several pages. Most image converters, including Preview's Export, take a single page, so split multi-page files first or export them to PDF instead.
- Alpha channels and transparency: JPG has no transparency, so transparent areas are filled with a solid color. Keep such files as PNG, or check the result in the preview before converting a batch.
- Metadata: EXIF, IPTC captions and copyright fields are often copied over, but not every tool preserves every field. Test one file if your workflow relies on embedded credits.
TIFF features and what JPG keeps
| TIFF feature | In the JPG | What to do |
|---|---|---|
| 8-bit RGB | Kept | Nothing; converts cleanly |
| 16-bit per channel | Reduced to 8-bit | Use 90%+ quality, check gradients |
| CMYK color | May stay CMYK or be converted | Convert to RGB or sRGB for screens |
| Layers | Flattened composite | Save the composite you want before converting |
| Multiple pages | Usually first page only | Split pages or export to PDF |
| Alpha channel | Dropped, filled solid | Keep PNG or WebP if transparency matters |
Converting CMYK TIFFs for screens
TIFFs prepared for offset printing are often CMYK. A JPG can technically be CMYK too, but browsers, marketplaces and many apps display CMYK JPGs inaccurately, often with oversaturated or inverted-looking colors, and some upload forms reject them.
For anything shown on a screen, convert the image to RGB, ideally sRGB. The cleanest place is the application that created the file, because it knows the original print profile. On a Mac without design software, the built-in sips tool can do it: sips --matchTo '/System/Library/ColorSync/Profiles/sRGB Profile.icc' poster.tif --out poster-srgb.tif creates an sRGB copy that then converts to a well-behaved JPG.
After converting, compare the JPG against the original on screen. If the colors differ noticeably, the original likely carried an unusual profile, and it is worth asking whoever supplied the files for RGB exports.
Batch converting TIFF folders with Operimage
TIFF jobs are usually batches: a box of scanned photos, a product shoot delivered as TIFF, or a print archive that now needs web copies. Preview becomes slow with dozens of 50 MB files open, and Finder's Quick Action writes copies into the source folder, mixing masters and deliverables.
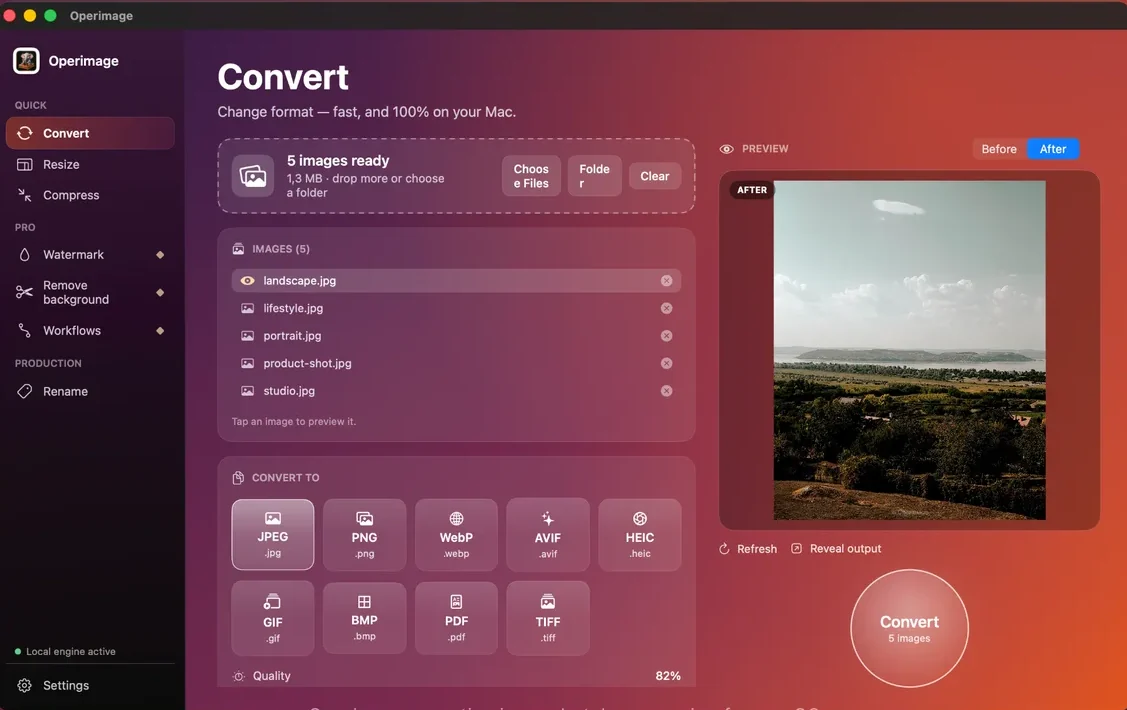
In Operimage, open Convert, drop the TIFF files onto the window or click Folder, and choose JPEG. Set the quality slider, click a demanding file in the list to compare Before and After, and press Convert. The app processes everything locally, can keep the source folder structure, does not overwrite originals unless you choose to, and can strip EXIF and GPS data. Reveal output takes you straight to the results.
If the JPGs are bound for a website, resize at the same time: a 6000-pixel-wide scan is far larger than any layout needs. The guide to resizing photo folders in one pass shows how, and a saved Workflow in Operimage can run resize and convert together every time.
What JPG quality should you use for TIFF masters?
TIFF masters usually exist because someone cared about quality, so be a little more generous than you would with phone photos.
For client delivery, portfolios and archival access copies, use about 90%. For files going to a print lab that requires JPG, use 92–95%; the extra size is worth it on paper. For website images, 80–85% at a sensible pixel width is plenty. Avoid 100%: it can produce files several times larger than 92% for differences nobody can see.
If a destination has a strict upload limit, reduce pixel dimensions before you lower quality. The walkthrough on compressing photos on a Mac explains how to hit a size target without visible artifacts.
TIFF master
Archive
- Lossless, up to 16 bits per channel
- Can hold layers, pages and alpha
- Tens of megabytes per file
- Right for editing and print prep
JPG copy
Deliver
- Lossy, 8 bits per channel
- Single flattened image
- Small enough to email and upload
- Opens everywhere
Verdict: Keep TIFF as the master and treat JPG as a disposable delivery copy you can regenerate any time.
Scanned photos and documents: special cases
Scanners default to TIFF because it is lossless, and a 600 dpi scan of a 6 × 4 inch print is about 3600 × 2400 pixels, which is plenty for sharing, slideshows and reprints at the original size. Converting those scans to JPG at 90% makes a family archive easy to share without giving up the TIFF originals.
Scanned text documents are different. Black-and-white or grayscale pages compress well as TIFF and poorly as JPG, which adds gray smudges around letters. If the goal is to send or archive a document, convert the scans to PDF instead; Operimage's Convert tool can write PDF as well as JPEG.
Resolution numbers such as 300 dpi stored in a file are only a printing hint. They do not change the pixel count, so converting or changing the dpi tag never makes a scan sharper or blurrier on screen.
Converting TIFF to JPG with Terminal
The sips command built into macOS converts many TIFFs in one line. From inside the folder, sips -s format jpeg -s formatOptions 90 *.tif --out ~/Desktop/jpg-copies converts every .tif file into the jpg-copies folder at 90% quality, leaving the originals alone. Create the output folder first, and repeat the command for files with the .tiff extension.
sips is fast and free, but it has no preview, it will not warn you about CMYK or multi-page files, and nested folders need a loop. It is a good fit for a repeated job you have already tested, less so for a first run on an unfamiliar archive.
Metadata, file names and final checks
Scans and studio files can carry more metadata than you expect: scanner models, software history, photographer names and sometimes location. Decide per destination. Keep copyright and caption fields for press and stock delivery; strip everything for anonymous web use. The guide to removing hidden photo data on Mac shows what each field contains.
File names usually carry over with a new extension, so scan_0042.tif becomes scan_0042.jpg. If the same folder also contains PNG graphics headed to the same place, the PNG to JPG guide covers the transparency issue they bring.
Before converting a TIFF archive
- Masters are backed up and the output folder is separate
- CMYK files identified and converted to RGB for screen use
- Multi-page TIFFs split or routed to PDF instead
- A 16-bit gradient file checked for banding at 100% zoom
- Quality set: 90% delivery, 92–95% print, 80–85% web
- Metadata decision made for this destination
Troubleshooting TIFF to JPG conversion
When a TIFF batch misbehaves, the cause is almost always something inside the file rather than the converter.
- A file will not open: some TIFF variants from specialist scientific or GIS software use compression schemes macOS does not read. Re-export them as standard RGB TIFF from the source application.
- The JPG looks darker or more saturated: the source was CMYK or carried a wide-gamut profile such as Adobe RGB. Convert to sRGB for screen use.
- Only one page came out: the TIFF had several pages. Split it or convert it to PDF.
- Transparent areas turned solid: JPG has no alpha channel. Keep PNG or WebP for cutouts and logos.
- Files are still too large to upload: resize to the destination's pixel requirement before lowering quality.
- Gradients show banding: the 16-bit source was reduced to 8-bit at a low quality. Raise quality to 92% for those files.
Step by step
Open Convert and add the TIFF files
In Operimage, choose Convert in the sidebar, then drag in .tif or .tiff files or click Folder to load a scan or master folder with its subfolders.
Choose JPEG as the output format
Select JPEG. Every TIFF in the list will be written as a .jpg copy; the originals are not overwritten.
Set quality to about 90%
Drag the quality slider to 90% for master-quality delivery, or 82% for web use. Turn on metadata stripping if the files will be published.
Check a demanding file in Before/After
Click a TIFF with gradients, skin tones or fine texture in the image list and compare Before and After at full size.
Convert and reveal the JPGs
Press the round Convert button, then click Reveal output to open the JPG folder in Finder and spot-check a few files.
TIFF to JPG workflow comparison
| Path | Batch safety | Output control | Privacy | Best fit |
|---|---|---|---|---|
| Preview | Low | Quality slider per export | Local | One-off TIFF to JPG conversions |
| Finder Quick Action | Low | Size presets, metadata on or off | Local | A quick selection of scans |
| sips in Terminal | Medium | Exact quality, scripted | Local | Repeatable jobs for Terminal users |
| Operimage | High | Quality slider, preview, separate output, metadata stripping | Local | Large TIFF folders converted on a schedule |
FAQ
How do I convert TIFF to JPG on a Mac?
Open the TIFF in Preview, choose File → Export, set Format to JPEG and adjust Quality. For several files, select them in Finder and use Quick Actions → Convert Image, or use a batch app for whole folders.
How do I batch convert TIFF to JPG on a Mac?
Select the files in Finder and choose Quick Actions → Convert Image → JPEG, run sips in Terminal, or load the folder into a batch converter such as Operimage, which writes JPG copies to a separate folder.
Does converting TIFF to JPG lose quality?
Yes, JPG is lossy and 8-bit, but at 90% quality the difference is not visible at normal viewing size. Keep the TIFF as the master for editing and printing.
Is TIF the same as TIFF?
Yes. .tif and .tiff are two extensions for the same format, and every Mac tool that reads one reads the other.
Why do my converted JPGs have strange colors?
The TIFF was probably CMYK or used an unusual color profile. Convert it to RGB or sRGB before or during conversion, ideally in the app that created it.
What happens to a multi-page TIFF?
A JPG can hold only one image, so most converters keep a single page. Split the TIFF into separate pages first, or export it as a PDF to keep every page.