How to convert PNG to AVIF on Mac (and keep transparency)
To convert PNG to AVIF on a Mac, use a converter with an AVIF encoder. AVIF supports an alpha channel, so transparent backgrounds survive the conversion. macOS Ventura (13) and later can open AVIF files, but Preview, Finder's Convert Image Quick Action and sips cannot save them.
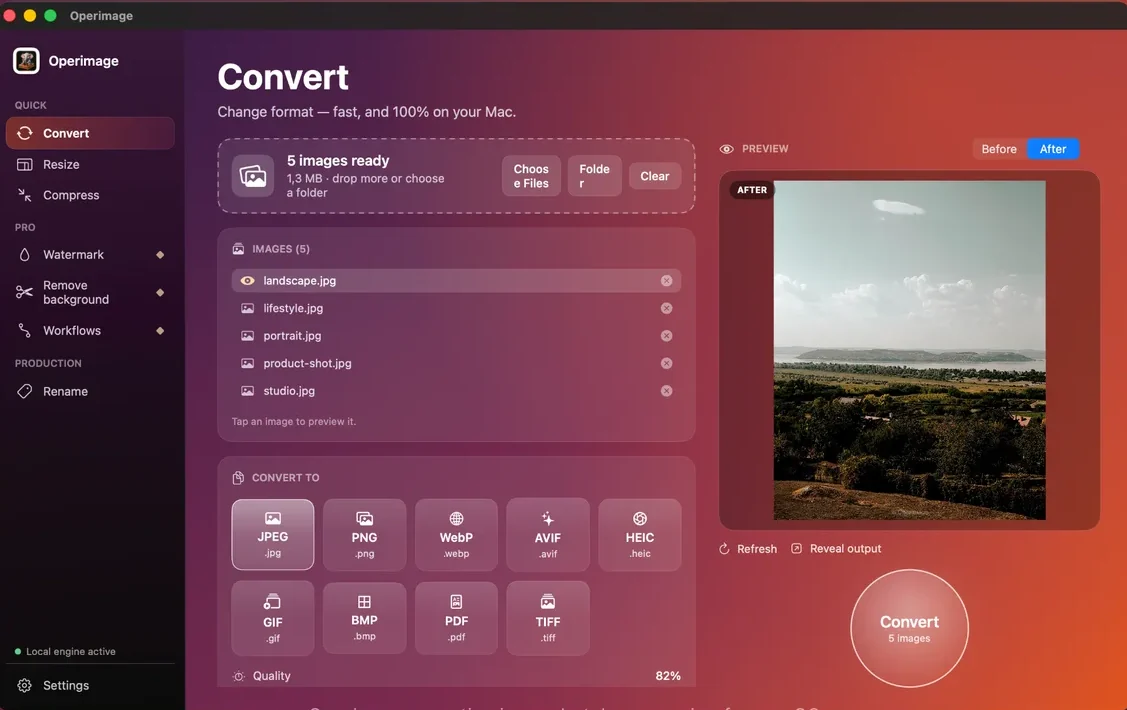
In Operimage, a free Mac app, choose Convert, drop the PNG folder, pick AVIF, set quality around 75%, check a tricky edge in the Before/After preview and click Convert. Everything stays on your Mac, and the PNGs are not overwritten. For an overview of all nine output formats and when each fits, see the guide to converting image formats on Mac.
- 1PNG assets120 cutouts and illustrations
- 2Convert to AVIFQuality 75%, alpha kept
- 3Edge and size checkCompare with WebP on 10 files
- 4AVIF + fallbackServed with PNG or WebP backup
Why convert PNG to AVIF?
PNG is lossless, which makes it ideal for editing and flat graphics but very heavy for anything photographic. A product cutout or portrait with the background removed can be several megabytes as PNG, and a page showing twenty of them becomes slow on mobile connections.
AVIF compresses that color data far more efficiently while keeping a separate, clean alpha channel. For photographic cutouts the AVIF version is commonly a small fraction of the PNG size. AVIF can also keep full-resolution color (4:4:4), whereas lossy WebP always halves color resolution, so saturated text and thin colored lines in graphics can stay sharper in AVIF at the same file size.
The gains are smaller for flat graphics. Simple logos, icons and diagrams with a few solid colors already compress well as PNG, and for vector artwork SVG is usually lighter and sharper than any raster format. When a platform insists on raster files, render the SVG at the exact size you need; the SVG rasterizing guide covers resolution and scale.
For context, AVIF (AV1 Image File Format) was published by the Alliance for Open Media in 2019 and is based on the AV1 video codec. Beyond transparency it supports lossless mode, 10- and 12-bit color, HDR and animation, although for ordinary web graphics only the lossy mode with alpha is usually worth using.
AVIF
Smallest files
- Usually the smallest file for photographic cutouts
- Can keep full-resolution color for crisp colored edges
- Slower to encode; fewer upload tools accept it
WebP
Simplest rollout
- Fast to encode and widely accepted
- Transparent files much smaller than PNG
- Color stored at half resolution in lossy mode
Verdict: Use WebP as the default; test AVIF on your heaviest transparent assets and switch where the savings are real.
Can you convert PNG to AVIF with built-in macOS tools?
No. Apple added AVIF decoding in macOS Ventura, so Preview, Quick Look, Finder thumbnails and Safari display AVIF, but the system has no AVIF encoder. Preview's Export menu offers PNG, JPEG, HEIC, TIFF and PDF; Finder's Convert Image Quick Action offers JPEG, PNG and HEIF; sips and Shortcuts share the same limitation.
For a free command-line option, install libavif with Homebrew (brew install libavif). The avifenc tool converts a PNG with transparency directly, for example avifenc -q 75 cutout.png cutout.avif in recent versions, and a shell loop handles a folder. It gives precise control but no visual comparison of edges, which is the part that matters most for transparent assets.
Batch convert PNG to AVIF in Operimage
In Operimage, select Convert in the sidebar and drop the PNG folder on the window. Choose AVIF as the output format and set the quality slider; about 75% is a good start for cutouts and illustrations.
Then test before you commit. Click a cutout with hair, fur or a soft shadow, and a graphic with thin lines or small text, and compare Before and After at full size. If edges are clean, click Convert. Operimage keeps the folder structure and transparency, leaves the PNGs untouched, and Reveal output opens the AVIF folder in Finder. Save the settings as a Workflow if you will repeat the job.
If you are still creating the cutouts, Operimage's Remove background tool does that on-device and exports transparent PNG or WebP; the offline background remover guide covers its quality modes. You can then convert the transparent PNGs to AVIF in a second step.
What quality setting should you use for transparent AVIF?
AVIF quality numbers do not map one to one onto JPEG or WebP numbers, and each encoder scales its slider differently. Use the ranges below as starting points and decide with a side-by-side preview at the size the asset will be displayed. Transparent assets need more headroom than ordinary photos because flaws gather at the edges, where semi-transparent pixels blend subject and background.
If two kinds of asset share a folder, split them into two batches with different settings rather than choosing a compromise for both.
- Product cutouts and portraits: 70–80%.
- Illustrations with gradients: 70–75%; watch for banding in large smooth areas.
- Logos and icons with thin lines: 85%+, or keep PNG or SVG.
- Screenshots and UI with small text: 85%+, and check the text at 100% zoom.
- Decorative background graphics: 60–70%.
Checking edges, shadows and gradients
Transparent images fail in predictable places, so check those places on purpose. A cutout that looks perfect against a white preview can show a gray halo on a dark page, and soft drop shadows can turn into visible steps when compression is too strong. Test against the real background colors of the page where the asset will appear.
Compare file sizes as well as looks. Convert ten representative files to both AVIF and WebP and note the totals. If AVIF is only slightly smaller for your assets, WebP's simpler rollout may be worth more than the extra savings; the transparent WebP walkthrough uses the same checks for that format.
Before converting PNGs to AVIF
- Confirm the website or CDN serves AVIF
- Plan a WebP or PNG fallback for tools that cannot read AVIF
- Resize assets to the largest displayed size
- Check hair and soft edges on dark and light backgrounds
- Check drop shadows and gradients for banding
- Compare AVIF and WebP sizes on ten sample files
- Keep the PNG masters with overwrite off
Where transparent AVIF works, and where it doesn't
All current versions of Chrome, Firefox, Safari and Edge display AVIF with transparency, so on your own website it works for nearly every visitor. Serve it through an HTML picture element with a WebP or PNG fallback, or let an image CDN negotiate the format. WordPress accepts AVIF from version 6.5 when the server's image library supports it.
Outside the browser, support is thinner. Many marketplaces want JPEG or PNG listing images on a white background, design and office apps may not open AVIF, and Macs older than Ventura cannot preview it. For hand-off and marketplaces, keep PNG. To weigh the two modern formats in general, including encode speed and browser history, read which modern format to pick for the web.
Resize first, and keep file sizes honest
Pixel dimensions drive file size and encode time in every format. A 4000-pixel transparent PNG used in a 600-pixel product grid wastes most of its data whether it is PNG, WebP or AVIF. Resize to the largest size the asset is displayed at, allowing 2× for high-density screens, before converting.
If you need every asset under a fixed budget, for example 100 KB for a product grid, convert a test set, sort the output by size in Finder and adjust quality until the largest files fit. For JPEG and WebP output, Operimage's Compress tool can search for the best quality under a target size automatically; the size-budget compression guide explains how that works.
Color profiles and metadata in PNG to AVIF
PNGs exported from design apps on recent Macs are sometimes tagged with Display P3 or another wide-gamut profile. Browsers that respect the tag show the same colors, but anything that ignores it can make brand colors look dull or shifted. For predictable web color, export or convert the PNG masters to sRGB before creating AVIF copies, and compare a brand-colored asset in Safari and Chrome after conversion.
PNG files rarely carry camera EXIF, but screenshots and exports can include text chunks such as software names or creation dates. If an asset will be public, strip metadata in the same batch; it saves a few bytes and avoids leaking internal details.
Troubleshooting PNG to AVIF conversions
If results are not what you expected, start with these checks.
- Transparency turned white: the output format was JPEG, or the viewer does not support AVIF alpha. Confirm AVIF output and test in a current browser.
- AVIF is barely smaller than the PNG: the asset is a flat logo or icon. Keep PNG or use SVG for those.
- Banding in shadows or gradients: quality is too low. Raise it by 5–10 points for that asset type.
- Conversion is slow: AVIF encoding is heavy, especially for large images. Resize first and test a subset.
- File won't open for a colleague: their Mac runs macOS 12 or earlier, or their app lacks AVIF support. Send PNG for review.
Step by step
Open Convert and add the PNGs
In Operimage, choose Convert in the sidebar and drop PNG files on the window, or click Folder to load a directory and its subfolders.
Choose AVIF as the output
Select AVIF from the output formats. Transparent areas in the PNGs are kept in the AVIF files.
Set quality by asset type
Start around 70–80% for cutouts and illustrations, and higher for logos or screenshots with small text.
Check edges in Before/After
Click a cutout with soft edges and a graphic with thin lines, and compare Before and After at full size.
Convert and reveal the output
Click the round Convert button, then Reveal output to open the AVIF files in Finder. The PNG originals stay untouched.
PNG to AVIF methods on Mac
| Method | Writes AVIF | Keeps transparency | Batch | Privacy |
|---|---|---|---|---|
| Preview / Finder / sips | No (read only, macOS 13+) | Not applicable | Not applicable | Local |
| avifenc (Terminal) | Yes | Yes | With a shell loop | Local |
| Online converter | Yes | Usually | Often limited | Files uploaded |
| Operimage | Yes | Yes | Folders and subfolders | Local, nothing uploaded |
FAQ
Does AVIF support transparency?
Yes. AVIF supports an alpha channel, so transparent backgrounds from PNG files are kept, and current browsers display them correctly.
How do I convert PNG to AVIF on Mac?
Use a tool with an AVIF encoder, because Preview cannot save AVIF. In Operimage, choose Convert, add the PNGs, select AVIF, set quality around 75% and click Convert.
Is PNG to AVIF better than PNG to WebP?
AVIF usually produces smaller files for photographic cutouts and can keep sharper colored edges. WebP encodes faster and is accepted by more tools, so it is the simpler default.
Will AVIF make my logos smaller?
Often only slightly. Flat logos and icons already compress well as PNG, and SVG is usually the best web format for vector logos.
Can I open AVIF files on my Mac?
Yes, on macOS Ventura (13) and later in Preview, Quick Look and Safari. Older macOS versions cannot display AVIF without third-party software.
Why does my transparent AVIF show a halo?
Compression altered the semi-transparent edge pixels. Raise quality for that asset type, or check whether the original cutout already had a fringe.
Should I keep the PNG files after converting?
Yes. PNG is the lossless master for editing and the fallback for platforms and apps that cannot open AVIF.