How to convert SVG to PNG on a Mac
Converting SVG to PNG on a Mac means turning resolution-independent vector artwork into a fixed grid of pixels, so the first decision is the pixel size. Once you know it, there are three practical routes: export from the design app that created the SVG, use a free command-line renderer such as rsvg-convert or Inkscape, or load a folder into a batch converter such as Operimage, a free Mac app that works locally.
macOS itself has limited SVG tools. Finder's Quick Look previews SVG files when you press the Space bar, and Safari opens them, but Finder's Convert Image Quick Action and Preview's export are designed around photos and are not a dependable way to rasterize SVG at a chosen size.
SVG is just one of many formats you may need to move between; the Mac image format conversion overview covers the full set, from HEIC to WebP and TIFF.
- 1SVG logos24 files, vector source
- 2Convert to PNGTransparent background kept
- 3Resize512 × 512 and 180 × 180 sets
When should you convert SVG to PNG?
Keep SVG wherever it is accepted. Modern browsers render SVG natively, it stays sharp at every size, and simple logos and icons are often only a few kilobytes.
Convert to PNG when the destination cannot take vector files. That is common: many social networks, marketplaces, email newsletters, presentation tools, app icon slots and some CMS fields only accept raster images. Some platforms block SVG uploads on purpose, because an SVG is code that can contain scripts.
PNG is the natural raster target for vector artwork because it is lossless and supports full transparency. Flat colors, sharp edges and text survive without the blocky artifacts that JPG adds around hard edges.
SVG
Master
- Sharp at any size
- Tiny for simple logos and icons
- Editable shapes and text
- Not accepted by many upload forms
PNG
Delivery
- Fixed pixel size
- Lossless with full transparency
- Accepted almost everywhere
- Blurs if enlarged later
Verdict: Keep the SVG as the master and export a PNG for each size a destination asks for.
What size should the PNG be?
A PNG has a fixed pixel size, so export at the largest size you will display it, and add headroom for high-density screens. On Retina displays, an image shown at 256 × 256 points needs 512 × 512 pixels to look crisp. Exporting at 2× the display size is a sensible default; 3× covers most phones.
Many destinations specify sizes outright. A browser favicon is commonly 32 × 32, the Apple touch icon for iPhone home screens is 180 × 180, web app manifests usually ask for 192 × 192 and 512 × 512, and Open Graph social previews are 1200 × 630. Check the current documentation for any platform with strict upload rules, as requirements change.
Never export small and enlarge later. A 64-pixel PNG scaled to 512 pixels is blurry no matter what tool does it. If you need several sizes, export the largest one from the SVG and scale it down, or export each size directly from the SVG.
Watch the aspect ratio. A wide wordmark logo does not fit a square icon slot without either padding or cropping. Decide which you want before the batch: fit keeps the whole logo and adds transparent space around it, while fill covers the frame and trims the edges. For logos, fit is almost always the right choice, and a little padding around the mark looks more deliberate than artwork touching the edges.
- Open Graph preview1200 × 630 · 1.91:1
- App manifest icon512 × 512 · 1:1
- Manifest icon192 × 192 · 1:1
- Apple touch icon180 × 180 · 1:1
- Favicon32 × 32 · 1:1
How an SVG's width, height and viewBox decide the output
Every SVG declares how big it wants to be. The width and height attributes on the svg element set its default size, and the viewBox defines the coordinate system the shapes are drawn in. Most converters that do not ask for a size render the file at its declared width and height.
That explains a common surprise: an icon exported from a design tool at 24 × 24 converts to a 24-pixel PNG. The fix is to open the SVG in a text editor and change width and height, for example to 1024, while leaving the viewBox untouched. The artwork scales up cleanly because it is still vector at that point.
If an SVG has a viewBox but no width or height, renderers fall back to a default, often 300 × 150 or the viewBox numbers. Adding explicit dimensions removes the guesswork before a batch run.
Exporting PNG from the app that made the SVG
If the SVG came from Figma, Sketch, Adobe Illustrator or Affinity Designer and you still have the source file, exporting from that app is the most faithful route for a single asset. The design app knows the fonts, effects and artboard bounds, and every one of them can export PNG at a multiplier such as 1x, 2x or 3x, or at an exact width.
The usual pattern is to mark a layer or artboard for export, add PNG at 1x and 2x, and export both at once. Many teams name the files with a suffix, such as logo.png and [email protected], so developers can serve the sharper version to Retina screens.
The limit is volume and access. When you receive a folder of finished SVG files without the design source, or need the same conversion every week for new icons, re-opening each file in a design app is slow. That is where a batch converter or a command-line renderer takes over.
Whichever route you use, keep the PNG export in a separate folder from the SVG masters, and name it so the size is obvious, for example icon-512.png and icon-180.png. Clear names prevent someone from uploading the small version where the large one belongs.
Batch converting SVG to PNG with Operimage
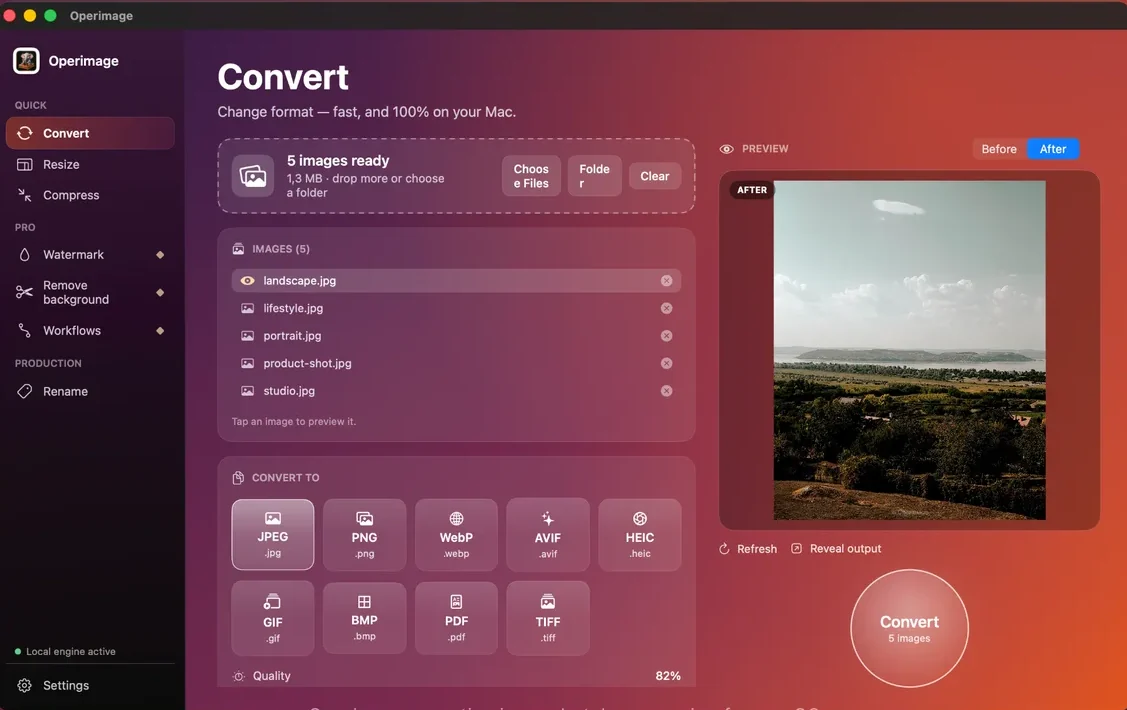
For a folder of logos, icons or illustrations, Operimage keeps the job visual and local. Open Convert, drop the SVG files onto the window or click Folder, choose PNG, then click a file in the image list to see the Before/After preview. Press the round Convert button and use Reveal output to open the PNGs in Finder. Nothing is uploaded, and the source files are not overwritten.
Operimage renders each SVG at the size the file declares, so check the output dimensions on the first run. When you need exact sizes, put the PNGs through the Resize tool with a manual width and height, or save a Workflow that converts and resizes in one pass. Scaling down from a large render is clean; scaling up from a small one is not, so enlarge small SVGs in the source first, as described above. The batch resizing guide covers fit and fill options for exact dimensions.
A converted PNG logo is also what you need for image watermarks. The guide to stamping a logo onto a whole photo set picks up from here.
Free command-line options for SVG to PNG
If you prefer Terminal, two free open-source tools render SVG accurately and let you set the output width directly. Both install with Homebrew.
rsvg-convert, part of librsvg, is small and fast: rsvg-convert -w 1024 logo.svg -o logo.png renders a 1024-pixel-wide PNG with the height scaled proportionally. Inkscape's command line handles complex files well: inkscape logo.svg --export-type=png --export-width=1024 does the same with the Inkscape 1.x syntax.
Both can be wrapped in a shell loop for whole folders. The trade-off is the usual one: precise and scriptable, but no preview, and fonts, filters or embedded images that render differently only show up when you open the results.
Fonts, transparency and other things that go wrong
SVG files can reference fonts, external images and CSS, and a renderer only draws what it can find. Most broken PNGs trace back to one of the issues below.
- Wrong font in the PNG: the SVG uses live text in a font that is not installed on your Mac. Install the font or convert text to outlines in the design app before exporting.
- Missing images or textures: the SVG links to external image files by path. Embed them, or keep them next to the SVG with the same relative path.
- White box instead of transparency: the SVG contains a background rectangle, or the PNG was flattened by the tool. Remove the rectangle in the source and keep PNG output.
- Hairlines look gray or broken: lines thinner than one pixel at the export size are anti-aliased into faint gray. Export larger or thicken the strokes.
- Blurry result: the SVG declared a small size and the PNG was enlarged afterwards. Increase width and height in the SVG and convert again.
- Filters, masks or blend modes differ: renderers support SVG features unevenly. Compare against the design app's own export and simplify effects if needed.
After export: compress, convert or flatten
PNGs rendered from SVG are usually small already, but large illustrations with gradients can grow to several hundred kilobytes. For websites, WebP keeps transparency at a smaller size; the guide to turning PNG files into WebP covers settings.
If a destination rejects transparency or only accepts JPG, flatten the PNG onto a solid background. The PNG to JPG conversion guide explains how that background is chosen and when it is a bad idea.
Before a batch SVG to PNG run
- Target pixel sizes listed for every destination, with 2× for Retina
- Small SVGs enlarged via width and height, viewBox untouched
- Fonts installed or text converted to outlines
- Background rectangles removed where transparency is needed
- One detailed file checked at 100% zoom for hairlines and edges
- SVG masters kept; PNGs written to a separate folder
Step by step
Check the size your SVGs will render at
Look at each SVG's width, height and viewBox. If the artwork is defined smaller than the PNG you need, enlarge the width and height in the source before converting.
Open Convert and add the SVG files
In Operimage, choose Convert in the sidebar, then drag in the SVG files or click Folder to load an icon or logo set with its subfolders.
Choose PNG as the output format
Select PNG so the transparent background is kept. Every file in the list will be written as a .png.
Check thin lines and text in Before/After
Click the most detailed file in the image list, such as one with hairlines or small text, and compare Before and After.
Convert, then resize to exact sizes
Press the round Convert button and use Reveal output to find the PNGs. If you need exact dimensions, run them through Resize with a manual width and height.
SVG to PNG workflow comparison
| Path | Batch safety | Size control | Privacy | Best fit |
|---|---|---|---|---|
| Design app export (Figma, Sketch, Illustrator, Affinity) | Medium | Exact, 1x/2x/3x | Depends on app | Files you are already editing |
| rsvg-convert or Inkscape CLI | Medium | Exact width or height | Local | Scripted batches for Terminal users |
| Online converter | Medium | Varies by site | Upload required | One non-confidential file |
| Operimage | High | Source size, then exact Resize | Local | Folders of SVGs with preview and safe output |
FAQ
How do I convert SVG to PNG on a Mac?
Export from the design app that created the SVG, use a free command-line tool such as rsvg-convert or Inkscape, or load the files into a batch converter such as Operimage and choose PNG.
Does converting SVG to PNG keep transparency?
Yes, PNG supports full transparency, so areas without a background stay transparent. If you see a white box, the SVG probably contains a background rectangle.
What resolution should I export an SVG at?
Export at the largest size it will be displayed, and double it for Retina screens. For example, a logo shown at 256 × 256 should be exported at 512 × 512 pixels.
Why is my PNG blurry?
The SVG was rendered at a small declared size and then enlarged. Increase the width and height in the SVG, or set the output width in your converter, and export again.
Can I batch convert SVG to PNG on a Mac?
Yes. Load a folder into Operimage and choose PNG, or loop rsvg-convert or Inkscape over the folder in Terminal. Check one complex file before converting everything.
Why does the text in my PNG use the wrong font?
The SVG references a font that is not installed on your Mac, so a fallback font is used. Install the font or convert the text to outlines before exporting.