The fix in short
When Shopify says an image is too large, the file is either over 20 MB or has more pixels than Shopify accepts. Resize the photo to 2048 × 2048 px, save it as an sRGB JPG at about 80% quality, and upload again. The result is typically a few hundred KB and about 4.2 megapixels, comfortably inside every Shopify limit.
The same fix answers the other meaning of "too large": product photos that upload fine but make pages slow, which speed tools report as oversized or inefficiently encoded images. A 2048 px JPG at 75–85% quality is sharp in zoom and light enough for fast pages.
On a Mac you can fix one image in Preview, or a whole catalog in one pass with Operimage, a free Mac app that resizes and compresses on your Mac. The broader strategy for preparing images across stores and marketplaces is in the e-commerce image optimization guide for Mac.
- 1Camera or phone photo8064 × 6048 px, 48 MP
- 2Resize and compress2048 × 2048, JPEG about 80%
- 3Shopify uploadAbout 4.2 MP, a few hundred KB
What are Shopify's image size limits?
Shopify documents two ceilings for uploaded images: file size and pixel count. The file must be smaller than 20 MB. The pixel limit is stated as 20 megapixels on some Shopify help pages (about 4472 × 4472 px for a square) and as 25 megapixels, up to 5000 × 5000 px, on the product media page. Because these figures have changed over time, check Shopify's current help page before you design a workflow around the exact ceiling.
In practice, you never need to approach either limit. Shopify recommends 2048 × 2048 px for square product photos, which is enough for zoom in most themes. Shopify then stores your upload and generates smaller copies for each place the theme displays it, served through its CDN. Uploading something far larger than 2048 px only slows down your uploads and your admin, without giving shoppers a sharper image.
JPG is the right format for product photos, PNG for logos and graphics with transparency, and WebP is accepted if your files are already WebP. HEIC from an iPhone is the format most likely to cause trouble in other tools, so converting it first keeps the whole pipeline predictable.
- Under 20 MBMaximum file size per image
- 20–25 MPPixel ceiling, depending on the help page
- 2048 × 2048Recommended square product size
- About 4.2 MPPixels in a 2048 px square
Why your image is too large for Shopify
Most oversized uploads come from modern cameras and phones, which capture far more pixels than a web store can use. Others come from file formats that are not meant for photos on the web. Knowing which case you have tells you whether to resize, convert or compress.
- 48 MP phone photos: recent iPhones can capture 48-megapixel images at 8064 × 6048 px. That is over Shopify's pixel limit even when the file itself is only a few MB.
- Camera originals: a 24 MP mirrorless or DSLR image at maximum JPEG quality is often 10–20 MB, close to or over the file limit.
- PNG product photos: a photo saved as PNG is lossless and frequently several times larger than the same image as JPG.
- TIFF and print masters: files from a photographer or retoucher meant for print can be tens of MB each.
- Upscaled or stitched images: panoramas and AI-upscaled images can exceed the pixel limit with modest file sizes.
- Banner images: slideshow and hero images exported at very large widths for retina screens are a common source of slow pages.
Common sources of oversized Shopify images
| Source | Typical pixels | Problem | Fix |
|---|---|---|---|
| iPhone 48 MP photo | 8064 × 6048 | Over the pixel limit | Resize to 2048 px |
| 24 MP camera JPG | 6000 × 4000 | Near the file and pixel limits | Resize and compress |
| Photo saved as PNG | Any | Very large file | Convert to JPG |
| Print TIFF master | Often 4000+ px | Very large file | Convert to JPG and resize |
| Retina hero banner | 4000+ px wide | Slow page | Size to the theme's width |
Fix one image with Preview on Mac
For one or two photos, Preview on macOS is enough. Open the image, choose Tools → Adjust Size, set the width or height to 2048 pixels with Scale proportionally ticked, and click OK. Then choose File → Export, set Format to JPEG, move the Quality slider a little left of Best and check the file size shown in the dialog before saving.
Preview has limits for store work. It does not crop to an exact square in the same step, it does not let you set a target file size, and doing it photo by photo gets slow past a dozen images. If your catalog has mixed shapes, square framing matters as much as the size; the guide to batch resizing product photos to square covers fit versus fill and padding.
In Terminal, sips -Z 2048 photo.jpg resizes an image so its longest side is 2048 pixels, which is enough to get an upload under the pixel limit. It is fast for folders, but there is no visual check of the result.
Batch fix a whole catalog with Operimage
When a supplier sends 300 camera originals, or you are moving a catalog into Shopify, fixing images one by one is not realistic. Operimage resizes and compresses folders of product photos on your Mac, with nothing uploaded and the originals left untouched.
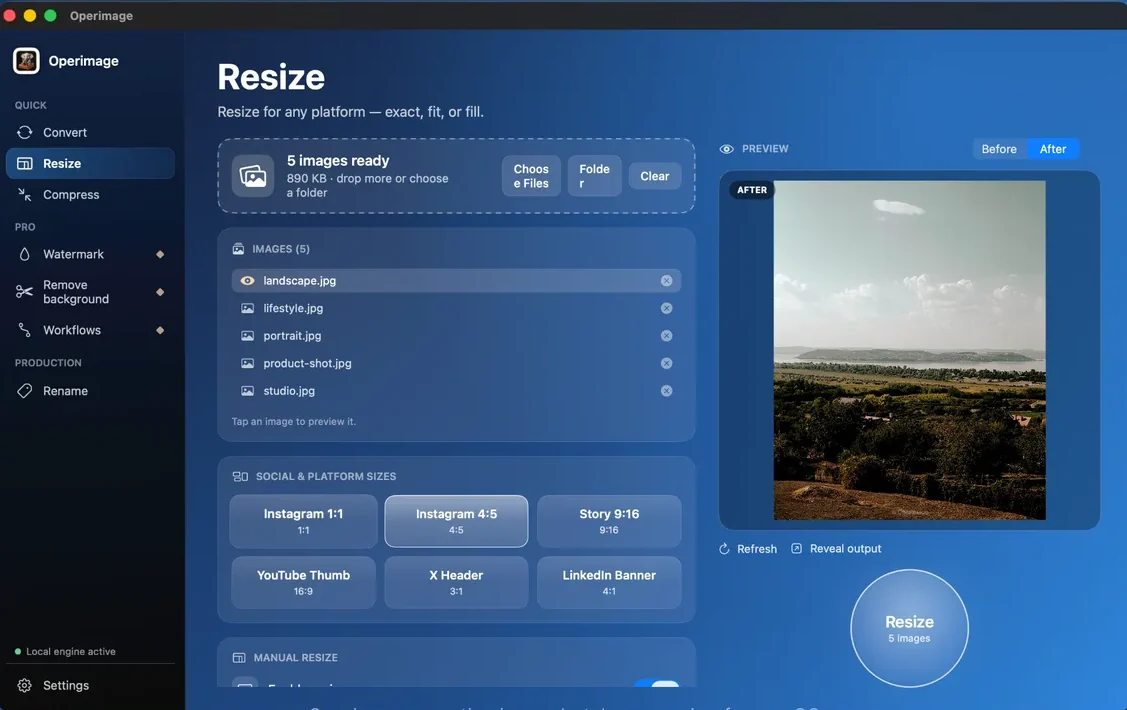
Open Resize, drop the folder onto the window and choose Manual resize. Enter 2048 × 2048 for square product photos and pick fit to keep the whole product with padding, or fill to crop to the square. Click a photo in the list to check the framing in the Before/After preview, then press Resize.
Next, open Compress with the resized photos. Choose JPEG output and either set the quality slider to around 80% or use Target file size, the AI optimizer that finds the best quality under a size budget. Turn on metadata stripping, press Compress and click Reveal output to find the files ready for upload. To repeat the process for every new product drop, save resize → compress as a Workflow. If you want a fixed budget per image role, the guide to compressing to an exact file size explains how the optimizer chooses quality.
How small should Shopify product images be?
Staying under 20 MB is the upload rule; fast pages need much less. Product photos are often the largest element on a product page, and page-speed tools flag images that are bigger than they are displayed or encoded inefficiently. A clear KB budget per image role keeps every upload consistent.
The budgets below are practical starting points, not Shopify rules. A white-background photo of a mug compresses far smaller than a close-up of patterned fabric, so check zoom on your own products and adjust. For the full set of format and compression choices for Shopify stores, see the guide to optimizing images for Shopify.
Starting budgets for Shopify images
| Image role | Pixel size | Format | Starting budget |
|---|---|---|---|
| Main product photo | 2048 × 2048 | JPG, sRGB, about 80% | 200–400 KB |
| Gallery or detail shot | 2048 × 2048 | JPG, sRGB | 150–350 KB |
| Hero or slideshow banner | Per theme documentation | JPG | 300–500 KB |
| Logo or size chart | As small as stays sharp | PNG | As small as possible |
Upload rejected or page too slow: two different problems
"Image too large" covers two separate situations, and the fix is slightly different for each. An upload error is a hard limit: the file will not go in until it is smaller in MB or pixels. A slow page is a soft problem: the upload worked, but the images cost shoppers time on mobile connections.
Upload rejected
Hard limit
- File over 20 MB or above the megapixel ceiling
- Usually camera originals, 48 MP phone photos, PNG or TIFF
- Fix: resize to 2048 px and convert to JPG
Page too heavy
Speed problem
- Upload works but speed tools flag large images
- Usually high-quality JPGs or oversized banners
- Fix: compress to a KB budget per image role
Verdict: Most catalogs need both: resize for the limit, compress for speed.
HEIC, PNG and color profiles
Format choices often cause the size problem in the first place. A few conversions before upload remove most of it.
- iPhone HEIC: convert to JPG first so every tool in your pipeline handles it; the guide to converting HEIC to JPG on a Mac covers the built-in options.
- PNG photos: convert photographic PNGs to JPG unless they need transparency; the size drop is usually dramatic.
- Display P3: phone photos use a wide color space; exporting as sRGB keeps colors consistent across browsers.
- Metadata: camera details and GPS location add a little weight and reveal where photos were taken; strip them for public product images.
Still too large after resizing? Troubleshooting
If an upload still fails after you resized it, the cause is usually one of a few small mistakes rather than a new limit. Work through these in order, checking the file in Finder with Get Info after each change so you can see the real pixel dimensions and size on disk.
If none of these apply and the image is clearly inside the limits, try a different browser or a stable connection; large uploads can time out on slow networks even when the file itself is acceptable.
- Wrong file uploaded: the resized copy was saved to a new folder, but the original was dragged into Shopify. Use Reveal output to open the exact folder of new files.
- Resize did not apply: an export at Actual Size or a preset that only changed the format leaves the pixel count unchanged. Check the dimensions in Get Info.
- Still a PNG: converting a photo to a different extension without re-encoding, or exporting as PNG, keeps the file heavy. Export as JPEG.
- Very high quality: JPEG at 100% can be several times larger than at 85% with no visible difference. Lower quality or use a target file size.
- Embedded extras: large color profiles, thumbnails and metadata add weight to some camera files. Stripping metadata removes them.
Prevent oversized images next time
A short routine stops the problem before it reaches Shopify. Ask suppliers and photographers for 2048 px sRGB JPGs, or run every incoming folder through the same saved Workflow before upload.
Before every Shopify upload
- Longest side 2048 px for product photos, square where the theme uses a grid
- JPG in sRGB, about 75–85% quality
- Each product photo a few hundred KB, never multiple MB
- HEIC and photographic PNG converted to JPG
- Metadata and GPS stripped
- Originals kept in a separate master folder
Step by step
Load the product photos into Resize
In Operimage, choose Resize in the sidebar and drop the oversized photos onto the window, or click Folder to load the whole catalog folder.
Set a 2048 px manual size
Under Manual resize, enter 2048 × 2048 for square product photos, choose fit or fill, and preview one image to check the framing.
Compress to a file-size budget
Open Compress, choose JPEG output and use Target file size to aim for about 300 KB per photo, or set the quality slider to around 80%.
Strip metadata
Turn on metadata stripping in Compress so camera details and GPS location are not published with your product images.
Save it as a Workflow and upload
Save resize → compress as a Workflow for future batches, then click Reveal output and upload the new files to Shopify.
FAQ
What is the maximum image size for Shopify?
Shopify accepts image files under 20 MB, with a pixel ceiling of about 20 to 25 megapixels depending on the help page. Check Shopify's current product media page for the exact figure.
Why does Shopify say my image is too large?
The file is over 20 MB or has more pixels than Shopify accepts. Photos from 48-megapixel phones and camera originals are the most common cause.
What size should Shopify product images be?
Shopify recommends 2048 × 2048 px for square product images. That is about 4.2 megapixels and well inside the upload limits.
How many KB should a Shopify product image be?
A 2048 px product photo saved as JPG at 75–85% quality is usually about 200–400 KB. Simple photos on white backgrounds come in smaller.
Does Shopify compress images automatically?
Shopify stores your upload and serves resized copies through its CDN. It still uses your file as the source, so oversized or poorly exported images remain worth fixing before upload.
How do I reduce image size for Shopify on a Mac?
Use Preview's Adjust Size and Export for a single photo. For many photos, resize to 2048 px and compress to JPG in one batch with a Mac app such as Operimage.